My 2014 TE Build

chillfancy

New member
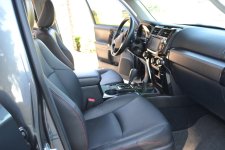
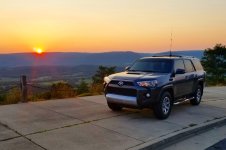
After driving a 2007 Subaru Impreza, 2015 Audi A3 Cabriolet Quattro, 2016 Audi A3 S-Line Quattro, and a 2017 Audi Q5 Quattro, I finally decided that I wanted something more practical.

After months of searching, I finally found a one owner 2014 Trail Edition. It came with leather, moonroof, cargo slider, navigation, rubber mats, tint, cargo slider, and chrome runners. It had 40k miles and was serviced at the dealership at every service interval.

I have many planned mods, but I don't plan on dropping a ton of money into it all at once:
Ham radio
New tires
Paint valences/hatch trim black
Relocate diff breather
LED bulbs (except headlights)
Additional fuse box
Under hood lights
Underbody "puddle" lights
Bi-xenon retrofit
Fog lamp replacement
Grill light bar
Roof rack
360 degree flood lights
C/D pillar storage rack
Front and rear metal bumpers
Winch
Compressor
2nd battery

 

Attachments

  • 20170827_153429.jpg
    20170827_153429.jpg
    139.5 KB · Views: 1,303
  • DSC_0005.jpg
    DSC_0005.jpg
    128 KB · Views: 1,233
Register to hide this ad
HAM radio install

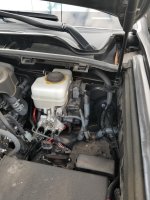
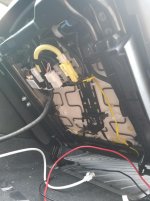
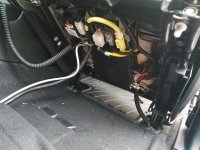
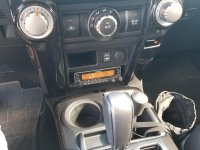
My first mod was mounting my Kenwood TM-V71a and providing an always-on power supply that could handle 13A.

I'm still looking at faceplace mounting and antenna coax routing options.

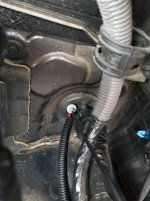
Step 1: Pass wires through firewall.
Step 2: Remove kicker plate trim and route wires through the wiring tray.
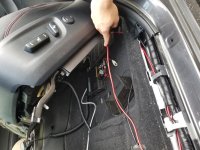
Step 3: Remove seal bolt covers and unbolt seat.
Step 4: Route wires under the carpet and through the existing holes in the carpet.
Step 5: Mount radio bracket under seat.
Step 5: Mount radio to bracket
Step 6: Re-install seat and torque A-class bolts. Replace trim panels.
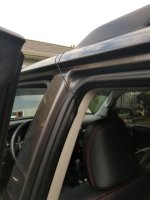
Step 6: (temporary) Route antenna coax up the B pillar trim and out to the roof.
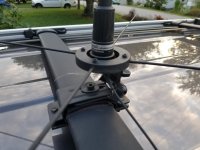
Step 7: Mount antenna to roof cross bar.
 

Attachments

  • 20170914_182148.jpg
    20170914_182148.jpg
    132.7 KB · Views: 1,227
  • 20170914_182157.jpg
    20170914_182157.jpg
    134.6 KB · Views: 1,279
  • 20170914_182344.jpg
    20170914_182344.jpg
    137.3 KB · Views: 1,349
  • 20170914_185144.jpg
    20170914_185144.jpg
    122.8 KB · Views: 1,258
  • 20170914_191200.jpg
    20170914_191200.jpg
    133.9 KB · Views: 1,243
  • 20170914_191939.jpg
    20170914_191939.jpg
    125.5 KB · Views: 1,223
  • 20170914_192011.jpg
    20170914_192011.jpg
    120.2 KB · Views: 12,795
  • 20170914_192002.jpg
    20170914_192002.jpg
    138.8 KB · Views: 7,820
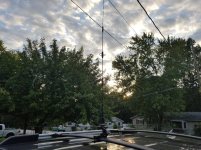
Antenna is a Comet CA-2x4SR (1m long vertical) with a home made bottom hat counterpoise mount.
 

Attachments

  • IMG_20170904_215312_113.jpg
    IMG_20170904_215312_113.jpg
    130.6 KB · Views: 5,090
Tapping into factory AUX

Finally got the radio headunit mounted up. I used 3M double sided adhesive to adhere the face to the top of the pocket.

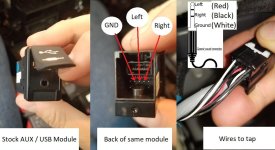
I also tapped into the AUX wires so I can feed the radio through the factory stereo without having to plug a wire into the face. I cut and soldered, but you could use wire taps if you want. The wire is very small gauge. 28?
 

Attachments

  • 20170923_155853.jpg
    20170923_155853.jpg
    132.1 KB · Views: 3,924
  • composite.jpg
    composite.jpg
    92 KB · Views: 3,919
How has it held up that high? Any clearance issues or close calls?

4 months in and I've hit a few trees in parking lots and a "low clearance" sign in a parking garage.

The mount folds over and luckily the radials haven't scratched the paint. Now I just stand on the runners and unscrew the antenna before entering low parking garages.
 
4 months in and I've hit a few trees in parking lots and a "low clearance" sign in a parking garage.

The mount folds over and luckily the radials haven't scratched the paint. Now I just stand on the runners and unscrew the antenna before entering low parking garages.

I've put mine on the rear hatch. The range is amazing. I was wondering if I may steal your homemade plans for your counterpoise. if you have them and are willing. i would love to try and correct my ground plain a little.

I ended up backing in somewhere and misjudged the clearance the other day. Thankful I also opted for the spring adapter. But the whole place could here it "SCRAAAAAAAAAAAAAAAAAP thwick thwick thwick." Held up fine. Just a lot of white paint that came off with a scotchpad.
 
I've put mine on the rear hatch. The range is amazing. I was wondering if I may steal your homemade plans for your counterpoise. if you have them and are willing. i would love to try and correct my ground plain a little.

I ended up backing in somewhere and misjudged the clearance the other day. Thankful I also opted for the spring adapter. But the whole place could here it "SCRAAAAAAAAAAAAAAAAAP thwick thwick thwick." Held up fine. Just a lot of white paint that came off with a scotchpad.

Feel free to steal my mount idea. It's a piece of mild steel sound stock turned down a bit, a thu hole as big as the NMO mount, and a pocket about 8mm DIA larger than the NMO mount about 1.5m short of all the way through. The 4x radial mounds are drilled about 25mm deep on a drill press, then 4x threaded holes on the top for set screws. Do you have access to a machine shop?
 
Feel free to steal my mount idea. It's a piece of mild steel sound stock turned down a bit, a thu hole as big as the NMO mount, and a pocket about 8mm DIA larger than the NMO mount about 1.5m short of all the way through. The 4x radial mounds are drilled about 25mm deep on a drill press, then 4x threaded holes on the top for set screws. Do you have access to a machine shop?

I do not.
 
2014 4Runner Trail Premium KDSS 2.5" 5100 Lift AT3W 285

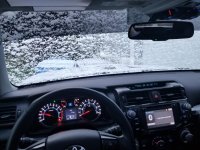
Winter treated the 4Runner well.

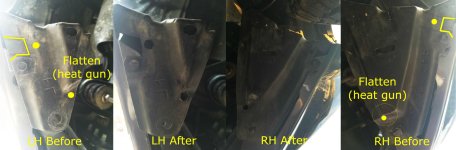
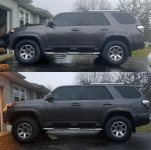
I finally bit the bullet and got a new set of Falken AT3W in 285/70R17. The tires rubbed quite a bit at stock height, so I installed Bilstein 5100's at 2.5" in the front. I also did the fender liner mod to give clearance in reverse and at full flex.
The rear lift will go in tomorrow. I saw very minimal KDSS lean.
 

Attachments

  • 20180308_071451.jpg
    20180308_071451.jpg
    137.2 KB · Views: 667
  • fendermod.jpg
    fendermod.jpg
    149.1 KB · Views: 659
  • front lift.jpg
    front lift.jpg
    129 KB · Views: 814
Cool write-up on the fender mod. Question about flattening with a heat gun. You drilled holes too? BTW, I bought the same tires but waiting to mount this weekend. How are you liking them?
 
Cool write-up on the fender mod. Question about flattening with a heat gun. You drilled holes too? BTW, I bought the same tires but waiting to mount this weekend. How are you liking them?

I love the tires. I'm running 38PSI. They are fairly quiet and look great. I've received a lot of compliments on the vehicle. Even with the fender mod, I still rub the front bumper ever so slightly in reverse while flexed.
 
Last edited:
AOB switch install wiring rock lights relay

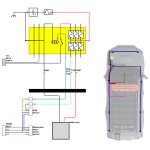
I put in some rock lights and figured I'd draw up a wiring diagram for my own reference later.

How to install AOB or other OEM style push switches.
If you want the new switches to DIM with the dash dimmer switch, you have to tap into one of the wires controlled by the dimmer switch. I used the front windshield wiper heater switch.

**MAKE SURE YOU UNHOOK ALL BATTERY CONNECTIONS IF YOU DON'T WANT TO RISK SHORTING A CIRCUIT**

1. Start by popping off the driver side door seal trim and the kicker plate to the left of the parking brake.

2. Undo the 2x bolts at the bottom of the knee trim, pulling it firmly at the top to dislodge the clips.

3. Run a fused + wire from the battery, and an additional one to go to the relay, through the driver side firewall wiring grommet.

4. Unclip the wiper heater switch and remove the tape/abrasion protection from the wiring.

5. Take a sharp razor blade and delicately shave off the sheath from the WHITE and the GREEN wires. You want to remove ~6-8mm around 50mm from the connector. Make certain you do not cut a single copper wire.

**IF YOU CONNECT ANYTHING TO THE OEM GREY YOU CAN DO SERIOUS DAMAGE TO YOUR VEHICLE**
Use heat shrink whenever possible.

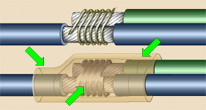
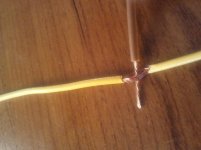
6. Using either inline branching splice method (image 1 and 2), splice and solder the following wires. I used 2x more pieces of wire to add some length to these runs.
OEM GREY to AOB BLACK
OEM GREEN to AOB BLUE

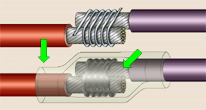
7. Using the inline splice method (image 3), splice and solder the following wires. If you switch these, nothing bad will happen.
FUSED + SUPPLY (from battery) to AOB GREEN
TRIGGER WIRE (to relay) to AOB RED

8. Use liquid electrical tape and/or a generous amount of high quality electrical tape to insulate your splices. Replace the abrasion protection and secure the bundle with more electrical tape.

9. Plug everything in and reinstall all panels.

10. Reconnect the battery.
 

Attachments

  • 407-10.gif
    407-10.gif
    10.6 KB · Views: 468
  • splice8.jpg
    splice8.jpg
    63.8 KB · Views: 429
  • 407-09.gif
    407-09.gif
    12.2 KB · Views: 476
  • 4runner.jpg
    4runner.jpg
    106.5 KB · Views: 478
Last edited:
My first mod was mounting my Kenwood TM-V71a and providing an always-on power supply that could handle 13A.

I'm still looking at faceplace mounting and antenna coax routing options.

Step 1: Pass wires through firewall.
Step 2: Remove kicker plate trim and route wires through the wiring tray.
Step 3: Remove seal bolt covers and unbolt seat.
Step 4: Route wires under the carpet and through the existing holes in the carpet.
Step 5: Mount radio bracket under seat.
Step 5: Mount radio to bracket
Step 6: Re-install seat and torque A-class bolts. Replace trim panels.
Step 6: (temporary) Route antenna coax up the B pillar trim and out to the roof.
Step 7: Mount antenna to roof cross bar.

I having difficulty finding a roof cross bar mount for an antenna. The one you’re running might be what I’m looking for. Are those the OEM cross bars? I measured them at a little over 2.5in wide. Could you tell me the make of the mount? The homemade counterpoise is sick looking great job.
 

Members online

Forum statistics

Threads
278,307
Messages
3,554,056
Members
248,016
Latest member
Advally Service

Trending content

Back
Top