Reluctanse's Project: 1992 TRD Faux 4Runner

Been working at the Oregon coast, went for a little drive this afternoon.

80-img_20160929_163220_6630bdbc0122cfc6cefe9d4f680619e5bc13e8c3.jpg
 
Unrelated to my rig-

So a while back my buddy rolled his '90 4runner, OM617 swap, SAS, dual cases, etc., and wrecked the body. But still drove it home :D thanks Toyota. Anyways, rather than repeat all the swap work on another rig, he took option 2, body swap! Found a clean V6 donor rig with a hole in the block for $900.

I found the time lapse video of the best part:

https://www.youtube.com/watch?v=3mz2sWq76Oc&feature=youtu.be

He's been driving it around now for a while (it's the one in the pics above).

Thought I'd share.
 
Pulled the trigger...

80-capture_7b98389bc143b16a107e2dc207513d45248e3876.png


Will pick them up locally and get them installed.

Job has changed recently and I'm pounding miles, and likely will continue to do so. 1500 already in the last month. So after much back and forth, I went with the old stand-by. Wanted fancy wheels/tires, etc., but the old Bighorns, while in decent shape, just don't drive worth a darn. They hydroplane and have basically no wet pavement traction. So rather than wait, new tire time!

Also getting some new headlights, will post up on that later.
 
Another sneak peak... hoping if I get time to have some new writeups for everyone this weekend, and some upgrades to my ride... we'll see!

80-img_20161028_094238_e2e9aece65ef45fc1fa7017e9d467f68cfd09808.jpg
 
We'll call this Project: Facelift.

Here's the before:

80-img_20161027_231934_5be382d4402e29fc20a406a495c1020ac12e33ca.jpg


Goals:
New headlights, the better to see you with
Clear markers, so I can be a cool kid
"Satoshi" style front grill revamp
So, here we go!

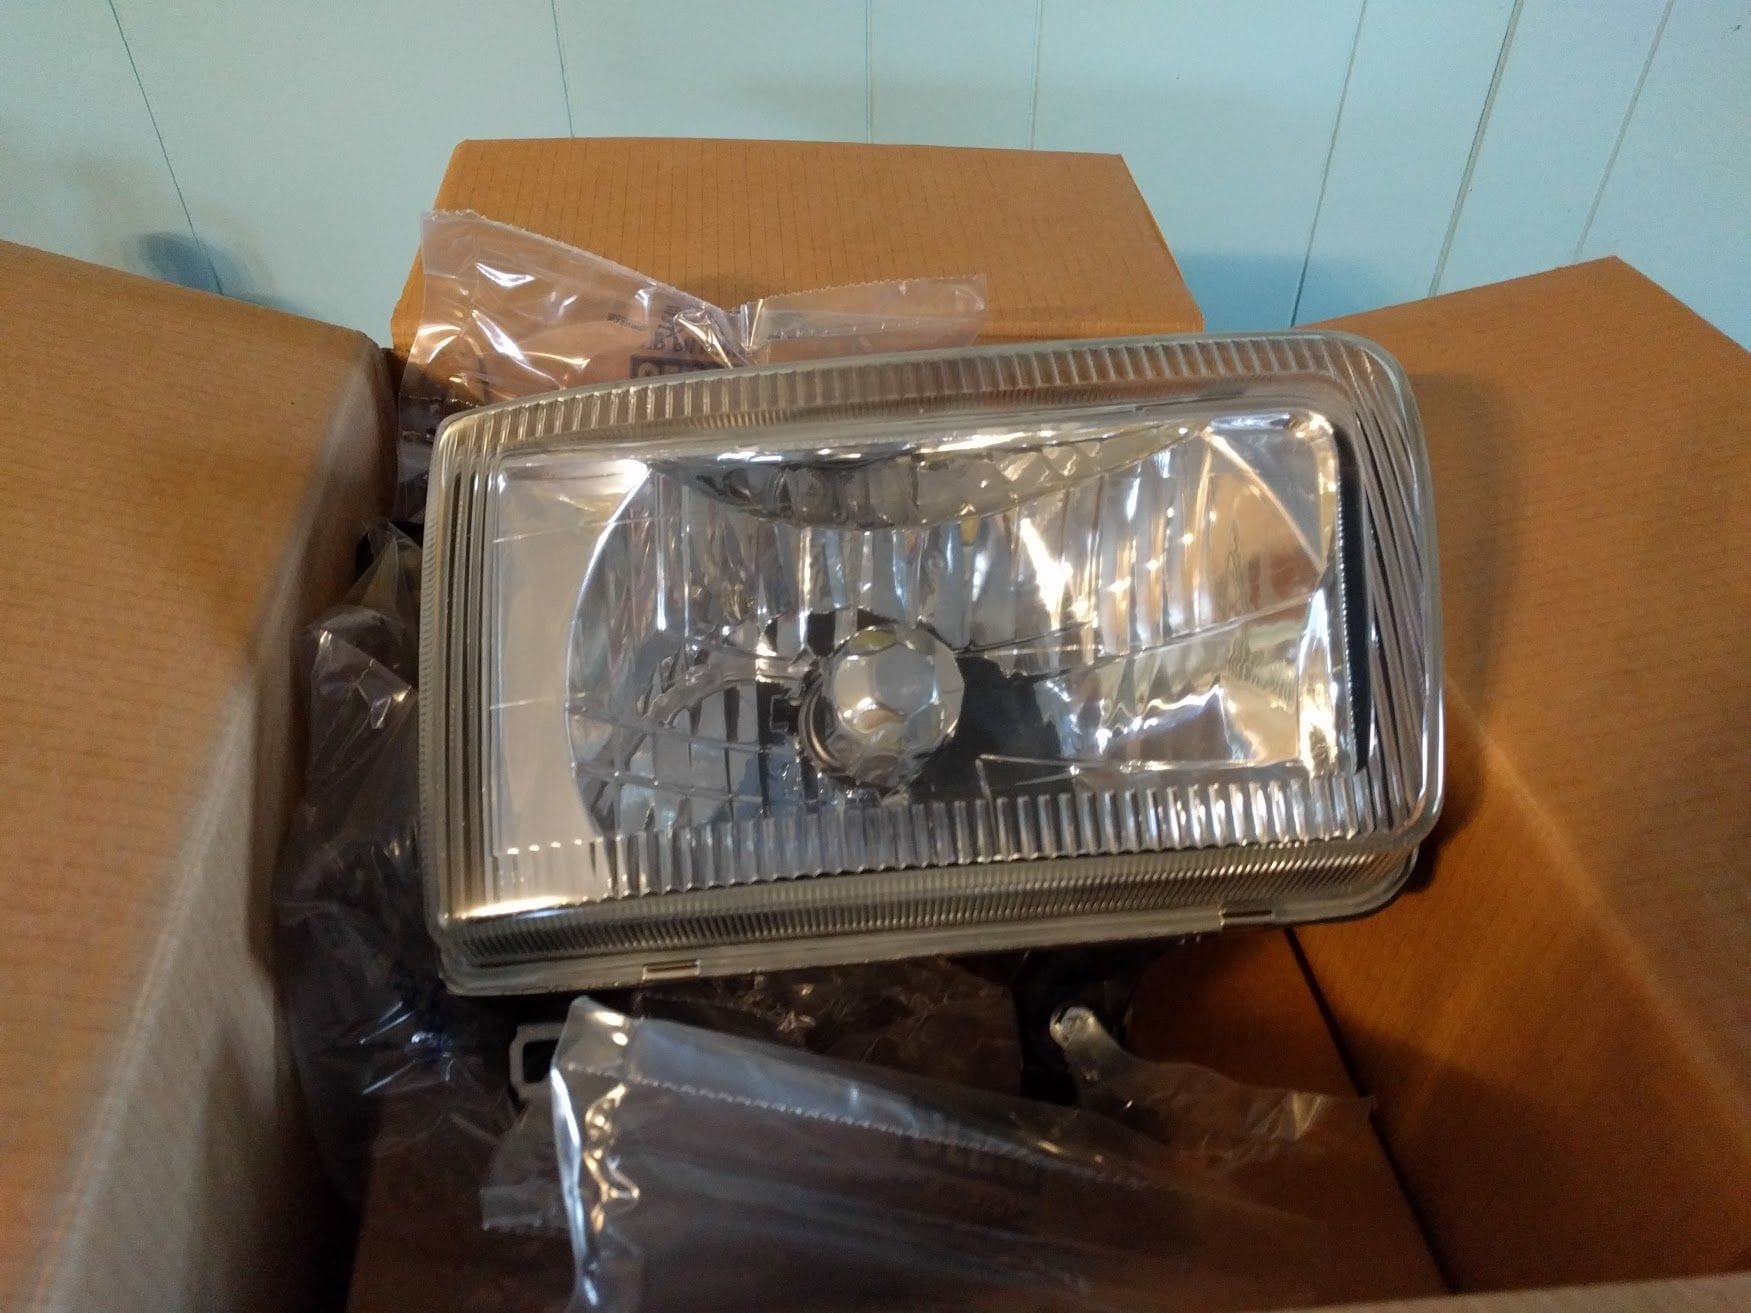
Headlights first. I have been doing lots of driving lately, and at night in the rain. What I discovered is that I basically can't see at all. Doesn't help that my high beams don't work (need to fix the switch, have been lazy). But on my future wish list is a projector retrofit headlight mod, but that will be $$$$ and time than I have right now. So to start, I found and bought these headlights: DEPO CRYSTAL CHROME HEADLIGHTS + CORNER LIGHTS FOR 92 93 94 95 Toyota 4Runner | eBay on Ebay. They are a clear lense, which is great for a retrofit project, but they also take an H4 bulb, which is an improvement on the 9004 stock bulbs, and should make a nice in-between step between the old busted headlights and my retrofit ultimate project. Also needed to purchase an adapter wire, also on ebay (link: One Pair Headlight Conversion 9007 Male to H4 Female Adapter for Hummer H2 Light | eBay ), to go from the 9004 to an H4 plug. At this time, I am not doing any relays or wiring upgrades, but that is on the list as well. We will see how much of an improvement this gives me. Finally, bought some Osram Nightbreaker H4 bulbs on Amazon. Link: https://www.amazon.com/gp/product/B0...?ie=UTF8&psc=1 These are overdriven bulbs and so have a shorter life, we'll see how long they last.

Pics:
headlights, OEM on left
80-img_20161028_162515_b456d02b4e0d755d60ccd42c1682d4c9c46d1d3d.jpg

headlights again
80-img_20161028_162531_fc25a1125c3c487fe98f42e97fc1f8d45068e3f4.jpg

bulbs
80-img_20161027_183533_747391831c6898bcc58c479ae2bdaf504c66853d.jpg

New lense, you can see its basically clear glass. Great for future projector!
80-img_20161028_094238_b5d2e8a2dd09ab9f460fcbd7963653f7959a19e7.jpg

adapter from Ebay
http://cimg3.ibsrv.net/gimg/www.yot..._911f2898af29063e1fd5ecaa30aa7f758040a0a2.jpg

I won't cover the swap much beyond this, its really straight forward. Take the side markers off - 2 screws each and the slide forward. Grill pops out with a flat-head screw driver to unhook the clips. 4 10mm bolts hold the headlights themselves in, then unhook the wiring. Add the new bulbs to the new headlights, add the wiring adapter, plug it in, bolt it up.

Here's a comparison shot, old vs new:

80-img_20161028_163430_a5a7857479ea6f3a1766263f62f1a05583fa4e09.jpg


Tested the lights, everything works great. Total time, probably about an hour, including opening boxes and dealing with packaging, doing some cleaning up, etc.

Costs:

Headlights: $190
Adapter wire: $16
Bulbs: $20.79

TOTAL: $226.79
Keep in mind, I did NOT do the relay upgrade recommended by 4Crawler. This is on my to-do list still, but again, wanted to see how this worked out first.

I will post up before/after pics of the lighting tonight after it gets dark.


Now, step 2: "Satoshi" mod style grill. AKA TRD Faux grill

I won't go into the history of the Satoshi grill, if you are interested Google it. It mostly started with 3rd gen 4runners and is a pretty popular mod over there, but I haven't really seen it done on a 2nd gen. That said It's sort of a merge between that style and the current 4Runner's grill. I went with a different type of mesh than you usually see the Satoshi guys use, its a honeycomb, as close to what the current 4Runner uses as I could find. It's not as large a mesh as the current 4Rrunner, but I'm pretty happy with the look and how it turned out.

Bought from https://www.customcargrills.com/ and am happy with the purchase. Everything is good quality, they shipped fast, prices are good.

Bought their Plastic Diamond XXL Grill Mesh Sheet in black, a 6x36" piece, and a 2.5-14" TOYOTA emblem. The emblem is an actual OEM piece, I found out when it arrived, which is great. I believe it is some Landcruiser part.

Total cost for above was $82.88

Step 1 was to cut out the center section of the old grill. I was a little apprehensive to cut up a whole complete functioning grill, but that went away quickly when I saw this:

80-img_20161028_160656_8b6c07fee1fc5c3a29ed4d7333e35c3cba7a5f19.jpg


I suspected this was a reprod grill from Taiwan, and I was right.

Cut away! Ended up using a sawzall blade to cut the pieces out, as well as a little bit of dremeling to clean things up.

Here it is center cut out.

80-img_20161028_170117_d05c43a992106f1b07059dcfcea0c435e8e3b232.jpg


Debated painting the whole grill black, but in the end just taped it off and repainting the inside part black again and left the outside chrome. I have in mind the future paint project, I *may* paint the grill body color. Haven't seen it done, not sure yet. So for now I left it chrome, the chrome is in good shape. I'm happy with how it turned out.

I cut the grill mesh using just wire cutters, as it's soft plastic, to fit the opening, and used a 2-part plastic epoxy to bond it. We'll see how well it holds but but for now it seems plenty strong.

Don't tell anyone, but I attached the TOYOTA emblem with zip ties.... they are black, you can barely see them. Didn't want to epoxy the emblem to the grill, and didn't have a better way to mount it. Oh yeah, and on this particular emblem, I had to remove the original mounting tabs on the back because they prevented me from aligning it center in the mesh etc. Not any other pics of the process, but again its a really straight forward little project. I'll report later on how well the epoxy holds, etc.

Also forgot to mention that the new headlights came with clear side markers. Nice!

Finished product!

80-img_20161029_102450_8b281d75e0607545fd26a1d9c87f378a88624076.jpg


80-img_20161029_102457_cad40f40245c78495f65eafe0569a1ae70d9127d.jpg


I'm really pleased with the end results. Looks like a different truck now, and a whole lot better! I was tired of how the front end looked, something about it, for some reason, on mine in particular, just bothered me.

I'm hoping the new headlights last a long time and the lenses don't yellow, we'll see, they are polymer rather than the glass that the originals were made of - anyone have any pointers on keeping them conditioned and in good shape?


P.S. you can see the bumper gap nicely in these shots.... that's a story for another time. Next purchase is probably a new front bumper!
 
Well spent some more time on the truck this PM. Fixed the headlight switch finally so I have high beams, yay! However in the process of that, realized the new lights were wired wrong. DUH! The adapter plug I got is for a 9007, and the stock lights are 9004s. Same plug, different wiring. Spent some time with a wire tester and got it figured out. If you do this project, make sure to check the wiring before you button it all back up, make sure the wires match what the new bulbs want.

Pics as promised:

Before:

80-img_20161027_232832_fcf5bfc0f9cc9a1f15d6b6c7008e90c8d7a3a862.jpg


80-img_20161027_232908_054d723a6b776e32dacae20615acc5c812963037.jpg

are they on?

Aaaaand the new:

80-img_20161029_223002_39ad68e69f277959397269c4b5f91837f193b7e0.jpg

check out that cutoff!

80-img_20161029_223040_eb192e1af7efc31659d23466234a7c0aad87c093.jpg

let there be light!

So I'm very please to say the least...!

I measured some volts while I was on there, to see what I might be missing without relays, depending on the side and high/low beam, there's anywhere between .75 and 1.25 or so volts that aren't getting to the headlights. So I'm pretty sure I'll be doing the relays sooner than later. But for now this is a HUGE upgrade!


In other news, prepped the rig for my 33x10.5's coming Tuesday and did some grinding. I had to guess since I don't have the tires, but I pretty much cleared the entire pinch weld to the body tub. This link is helpful if you aren't sure what you're doing Fitting 33x12.5's on a stock 94 truck - YotaTech Forums, but in reality, it's pretty straightforward. The only question is how much fender to trim, but I'll probably have to make more adjustments to that once I have the rubber. For now I'm confident I can at least get it home without gouging the new tires too bad.

OK, here's one pic, just cause.

80-img_20161029_171112_59a7f91545f1ad02b7fcd0afaa8617a8e59577bd.jpg
 
huh, I use Opera and I just tried on firefox and it didn't work either :cry2:
Dunno, still seeing them..:boxer:
i suck at the internet.... will attempt to fix this PM
operator head, space & Timing maybe:cheers:
JK

my housings like your should be delivered early next week. I went ahead and ordered LED H4 bulbs to see how those work. will return them if they don't work. I am gonna use a PIAA H4 upgrade harness I scored a few years ago. It worked wonders on the headlights in my Trekker. No reason not to recycle it.
 
Last edited:
Dunno, still seeing them..:boxer:
my housings like your should be delivered early next week. I went ahead and ordered LED H4 bulbs to see how those work. will return them if they don't work. I am gonna use a PIAA H4 upgrade harness I scored a few years ago. It worked wonders on the headlights in my Trekker. No reason not to recycle it.

Do let me know, I almost sprang for some LED's on this project, but in the end passed because reasons. Interested to see how they are.

Love the housings so far, drive to work this morning was much improved!

Coworkers decided to make fun of me today though, truck has this new shiny grill/front end, and the rest of it looks like old sad oxidized paint.... something looked out of place and it was my sweet front end! Will have to address the paint issue soon I think...
 
Well today was the day.... super excited how the new tires turned out. Quick background....

Been running the BFG's on my stuff for a while and have always been happy with them, so they were a known quantity. Really wanted to go a more aggressive look with a new wheel in 17" etc, but that was going to literally cost more than double what I spent. With the miles I'm driving now, I wanted a good wearing tire that was a known quantity on the road. If I had to sacrifice some offroad that will rarely get used, so be it. Not that the AT's struggle off road, but they just aren't a mud tire. No big deal. I know I'll EASILY get 40k miles on them, so away I went.

Next up, the 33x10.5's are a PERFECT fit on a stock 4runner. I ground the pinch weld, see above, and I'm glad I did, because I believe they would have rubbed at full turn. But as of now that is the only clearancing I've done and there's no rubbing on the street.

So on the stock 15x7 Toyota aluminum wheels on these trucks, here's how the tires measure out:

Right at 32" high (for comparison the 235/75r15s that were on there came in right at 29")

IMG_20161101_172648_zpsvqdiodds.jpg~original


Tread's 8.5" wide

IMG_20161101_172824_zpsljaaewqz.jpg~original


Really went back and forth on going 33x12.5 and getting rims, but ultimately didn't want to deal with the extra width with no lift, plus tires sticking out/legal issues etc, again being on the road constantly just makes it more of a magnet.

Again, these tires are a great fit stock, fill out the wheel wells nicely, and size-wise are a great fit.

For $700 INSTALLED really tough to beat...

There's a noticable loss of power across the board, as expected, but it's not bad. Speedo is about 10% off now, again right about as expected. I've got some 4.56's to swap in, but I'm saving for an ARB locker rear before I do that. So that will come later. For now its fine. Pretty much a 4th gear rig on the freeway unless going 70+.

More pics:

front... lots of clearance!
IMG_20161101_172143_zpsn7ea0wqo.jpg~original


rear is a little tighter
IMG_20161101_172316_zpsgg0am5u2.jpg~original


dat bumper tho...
IMG_20161101_172116_zpsgxs97kft.jpg~original


side profile... rear sag is much more prominent looking now
IMG_20161101_172132_zpsjrtzhvwc.jpg~original


Money Shot!
IMG_20161101_172335_zpschchavuj.jpg~original


I think I'm going to paint the wheels black.

I think next up will be a new front bumper...
 
First full tank on the new rubber:

Trip odo miles: 277.1 x 1.1 (based on GPS calculated actual speed) = 304.8 miles

Fill was 15.1 gallons

MPG on 33's with 4.10's in the punkins is 20.18

I will continue to monitor and post results, but that's not too bad. Definitely a change, but I expected similar and can certainly live with it. Was averaging about 21.5, so it's a change of about 6%. Considering how much bigger the tires are, that's pretty good. Haven't changed driving styles at all.

I'll keep you posted.
 

Members online

Forum statistics

Threads
278,316
Messages
3,554,120
Members
248,016
Latest member
Advally Service

Trending content

Back
Top