

BannerBuilt
New member
Stealth 40" LED light bar install
As requested, here are some more pictures of the light bar I installed on the stock roof rack of my 2006 Limited. The hardest part of the install wasn't actually the mounting of the bar, but routing the wires in a way that they remained hidden. I got my 40" bar from Exploration Outfitters, although there are a multitude of other Totron dealers online as well.
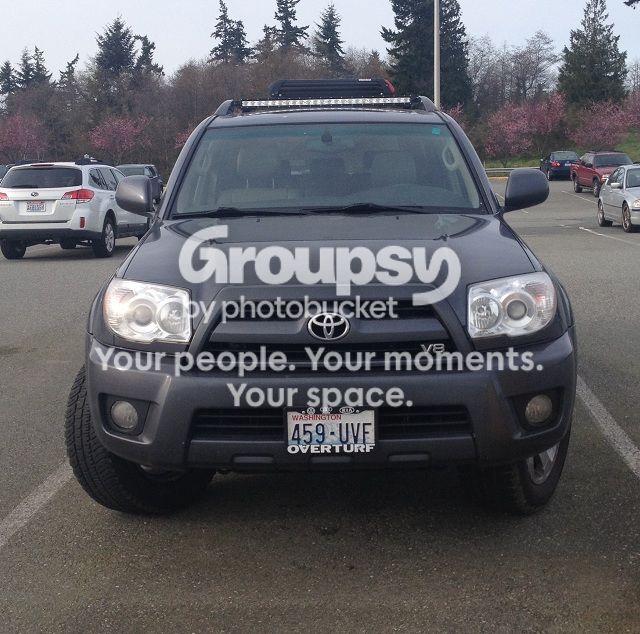
Next to a buddy at work:

Sunroof and ski rack are still fully fuctional:

Needed for the install:
40” Totron Single Row spot/flood combo light bar with wiring harness

2 – 6” angle brackets from Home Depot

4 – 1/4”–20 x 1/2” bolts (I used a security-style head, similar to the hardware you see on bathroom stalls)
2 - 1/4"-20 x 3/4" bolts
2 – 1/4"–20 Nylocks
4 – 1/4"–20 ‘draw bolt’ kits (you will only need the threaded plates from these assemblies)

Installation -
This picture pretty much says it all.

I loosely pre-assembled the brackets onto the bar on the ground, and then lifted everything into place. The threaded plates from the draw bolts are pretty trick – they will fit through the slot on your roof rack rail, and when you start to tighten them down, they will spin about 45 degrees and then lock in place against the upper and lower sides of the slot.
Depending on the bracket, you may have to change the hole locations to raise or lower the height of your bar. I have mine set at about 1/8” above the surface of the roof.
Wiring –
The first thing I did was to strip the plastic sleeve off of the wires leading to the bar from the relay. I hid the large wiring connector under the roof rack rail cap, then pulled back the windshield trim slightly and stuffed the two wires underneath. I then routed the wires though the hood hinge hole and mounted my relay to an existing bolt next to the fuse box.

Here was the tedious part –
You have to disassemble the connector between the supplied switch and relay in order to route the wires through the firewall the way I did. Using an optics screwdriver, I was able to pop the contacts out of the connector housing. I then cut off the little rubber nipple on the large firewall grommet and stuffed the wires through from the inside.

Reassemble the plug, mount your switch, and you should be ready to rock and roll!
Total install was less than an hour. For comparison, here are some pics of the side of a building from about 50 feet away.
Low beams and fogs:

High beams and fogs:

High beams, fogs, and LED bar:

LED only:

The iPhone is not very good for pictures like this...and I didn't pick the best setting either. This bar is much brighter than it appears, and 'throws' light much farther than the stock headlights. Next time around though, I'd probably go with the flood pattern only, because I don't really need the ability to see a mile down the road.
I would have preferred the 40" Rigid SR series for this install due to its reduced height and higher output...but alas, Grover Clevelands don't grow on trees.
OP WILL DELIVER:
Here are some output pics from my drive home the other night:
Low Beams

Low Beams + 40" LED Light Bar

Good luck with your installs gang!
As requested, here are some more pictures of the light bar I installed on the stock roof rack of my 2006 Limited. The hardest part of the install wasn't actually the mounting of the bar, but routing the wires in a way that they remained hidden. I got my 40" bar from Exploration Outfitters, although there are a multitude of other Totron dealers online as well.
Next to a buddy at work:
Sunroof and ski rack are still fully fuctional:
Needed for the install:
40” Totron Single Row spot/flood combo light bar with wiring harness
2 – 6” angle brackets from Home Depot
4 – 1/4”–20 x 1/2” bolts (I used a security-style head, similar to the hardware you see on bathroom stalls)
2 - 1/4"-20 x 3/4" bolts
2 – 1/4"–20 Nylocks
4 – 1/4"–20 ‘draw bolt’ kits (you will only need the threaded plates from these assemblies)
Installation -
This picture pretty much says it all.
I loosely pre-assembled the brackets onto the bar on the ground, and then lifted everything into place. The threaded plates from the draw bolts are pretty trick – they will fit through the slot on your roof rack rail, and when you start to tighten them down, they will spin about 45 degrees and then lock in place against the upper and lower sides of the slot.
Depending on the bracket, you may have to change the hole locations to raise or lower the height of your bar. I have mine set at about 1/8” above the surface of the roof.
Wiring –
The first thing I did was to strip the plastic sleeve off of the wires leading to the bar from the relay. I hid the large wiring connector under the roof rack rail cap, then pulled back the windshield trim slightly and stuffed the two wires underneath. I then routed the wires though the hood hinge hole and mounted my relay to an existing bolt next to the fuse box.
Here was the tedious part –
You have to disassemble the connector between the supplied switch and relay in order to route the wires through the firewall the way I did. Using an optics screwdriver, I was able to pop the contacts out of the connector housing. I then cut off the little rubber nipple on the large firewall grommet and stuffed the wires through from the inside.
Reassemble the plug, mount your switch, and you should be ready to rock and roll!
Total install was less than an hour. For comparison, here are some pics of the side of a building from about 50 feet away.
Low beams and fogs:
High beams and fogs:
High beams, fogs, and LED bar:
LED only:
The iPhone is not very good for pictures like this...and I didn't pick the best setting either. This bar is much brighter than it appears, and 'throws' light much farther than the stock headlights. Next time around though, I'd probably go with the flood pattern only, because I don't really need the ability to see a mile down the road.
I would have preferred the 40" Rigid SR series for this install due to its reduced height and higher output...but alas, Grover Clevelands don't grow on trees.
OP WILL DELIVER:
Here are some output pics from my drive home the other night:
Low Beams

Low Beams + 40" LED Light Bar

Good luck with your installs gang!
Last edited:


