Tips on power brake booster install!

4Runner4TW

New member
Hey everyone, I have a 99 Runner and the power booster has failed. I picked up one from the part store for $300. I found a video online and it looks straight forward. I'm just not sure how to drain the master cylinder though. I live at an apartment complex so I need to keep the mess to minimum. Any tips on disconnecting the MC and installing it onto the new brake booster? This is all new to me so I'm just winging it a bit. I'm going to tackle the job tomorrow. Luckily I found a way to work!

Thanks!
Chrys
 
Register to hide this ad
I did this a while back with a used one that I got from a salvage yard for $80 and they pulled it for me too. Came off a Tacoma with a 3.4, so it's a universal part from what I understand. I didn't want to pay the $250+ for the auto parts store ones.

I had the luxury of not having to adjust the booster pin or whatever to the MC, and I unclipped the hard lines from the fire wall so I could squeeze the old one out and new one in without removing the MC, but I was pretty nervous about bending a hard line too much. I'm in no way, shape or form a mechanic, just mechanically inclined enough to get myself into trouble lol. Took me around 1.5 hrs start to finish, but could be done in less time. Hopefully someone can answer the MC drain question better though. Good luck.
 
That is whats making me nervous about this, taking the old MC off and putting it onto the new brake booster.
 
That is whats making me nervous about this, taking the old MC off and putting it onto the new brake booster.

just unbolt it and swing it out of the way.
leave the lines connected.

don't worry about bending the hard lines, unless you crease them, you wont hurt anything.
 
What I was hoping is I can just switch it over. I heard about bench bleeding and no nothing about it.
Also, when it comes to bleeding the breaks assuming I complete the task, Is there any bleeding from the rear brakes? I have never had drums for rear breaks and I have only bled brakes once a few years ago. Its my understanding drums work by expanding a pad inside the drum but im not sure if it uses cables or fluid or what?
Thanks for all the input! I think I might do a write up on this since I have nothing else going on this weekend.
 
just unbolt it and swing it out of the way.
leave the lines connected.

don't worry about bending the hard lines, unless you crease them, you wont hurt anything.

It took me a minute to understand what you said. But it makes sense, if I am able to do this, do i need to bleed the brakes? It seems a little risky but I might be able to do it. Have you done it this way?
 
If you disconnect any brake line, you'll need to bleed the brake system. You'll need a buddy to help you in pumping the brakes. Or you can use the motive brake bleeder.

Bleeding sequence: RH rear, LH rear, LSPV (if your truck has one), RH front, LH front

<img id="ums_img_tooltip" class="UMSRatingIcon">
 
Im going to attempted to remove it without taking off brake lines. However if that doesnt work I did find a nice video of a 4runner on how to bleed the rear brakes. I have my girlfriend with me so she can help. I'll report back later...
 
Finished her all up. I didn't take pictures but I will go out and take a few tomorrow to help anyone in the future and write a quick write up tomorrow. Thanks everyone who helped!
 
Write up Brake Booster

I didn't see any write ups on this part install so I'm doing a quick one. It was fairly easy. All the pictures were taking after I installed it. Hope this helps!
Tools needed: 12mm deep socket, 14mm socket, 10mm wrench, 6in or 8in socket extension, one person to help bleed the brakes, but using a really quick technique! Also a roll of paper towels and something to place the master cylinder into that wont make a mess.

First disconnect the battery negative. If you dont the brake likes will be on the whole install. Its just safer to take off the negative when working in a area your unfamiliar with.

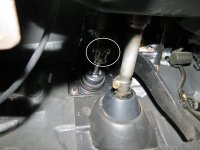
Next take out this pin that connects the brake pedal to the brake booster. also remove the spring. You will need these so do not lose!
 

Attachments

  • 8526 B.jpg
    8526 B.jpg
    125.8 KB · Views: 15,498
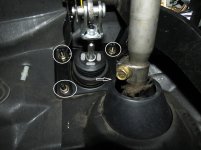
Next, loosen the 4 nuts that hold in the brake booster. Dont take them off yet just loosen to make sure you can get to them. I used the 12mm deep socket with extension (cant remember how long it was, 6 or 8).

Note, the 4th bolt is behind the steering rack in this picture but indicated by the arrow.
 

Attachments

  • 8528 B.jpg
    8528 B.jpg
    128.8 KB · Views: 18,418
Last edited:
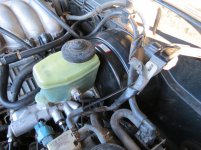
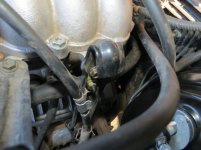
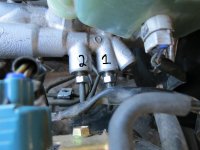
Now time to take off the master cylinder. Its held on by 2 nuts. Use the same set up from before to take them off. What I did was take one off completely and loosen the next. I then went and took off the 2 brake lines. To help, I stuffed a ton of paper towels under it to catch the brake fluid. You wont actually loose that much. Once off, set it on its side somewhere where it wont leak. I put it in a plastic bin with paper towels. My MC reservoir went from MAX to MIN, so you dont loose that much. Also, remove the vacuum hose. I replaced mine with extra hose I had
 

Attachments

  • IMG_8530.jpg
    IMG_8530.jpg
    133.9 KB · Views: 29,228
  • IMG_8531.jpg
    IMG_8531.jpg
    123.7 KB · Views: 21,467
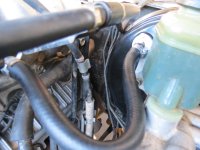
To get the brake booster out you will need to move this engine hook out of the way. Its a 12mm bolt up top and a 14mm on bottom. You will have to feel for that one. Do NOT take out the 14mm bolt, just loosen it to where you can swing the hook out of the way. Same procedure when changing the spark plug back there.
 

Attachments

  • IMG_8532.jpg
    IMG_8532.jpg
    125.8 KB · Views: 13,628
You can now go back inside the truck and take off all 4 nuts. Then give it a light push to break it free. Go to the engine bay and pull the booster out. It will be a tight fit so be careful. There are a lot of electrical connections, vacuum hoses, and dont bend the brake lines! However, it should just slide up and out.

If you bought a refurb one like mine you might need to switch over a few parts like the piece that connects the pedal to the booster from earlier. Just count the threads and match to the new one. Its straight forward. Reinstall everything. I started with everything inside the truck (4 nuts, putting in the pin and spring) and then went outside.
In the bay, reconnect that black hook, then install the MC and brake lines.

Now time to bleed!
 
OK, this will make bleeding the brakes way easier! I got this from my buddy who is a Lexus tech. He basically told me That I didnt enter any air into the lines, any air will be at the MC. So this is what you do.
First, fill the master cylinder (MC) to the MAX line. Then crack open both brake lines and let it drip for 1-2 minutes. Just stuff paper towels under it to catch the drips.

Now tighten up the lines and get someone in the car. Starting with the line closest to the firewall, crack open the line and have the person step on the brake. Fluid and bubbles should come out. Once their foot hits the floor then you tighten the line and then they can let up.
So loosen brake line, buddy pushes on brake pedal, once hits floor they hold it, you tighten the line, they release. I did this 4 times or until there is just fluid coming out, no bubbles. Repeat for the second brake line.
This process is quick and worked amazing for me. Just watch the fluid level. Also, keep the cap off. Once done, top off the fluid level and take for test drive. My pedal has never felt better.

Edit: I did this with the truck off, Didnt even have the key in the ignition. My buddy says this is what they do when they have recalls on MC from Lexus.
 

Attachments

  • 8533 b.jpg
    8533 b.jpg
    122.4 KB · Views: 14,672
Last edited:
Please note! The booster I bought was pre adjusted! I did not have to adjust the booster in any way. If the booster is not adjusted then you will need to do this. There are videos online of how to adjust them. Its not that hard just a bit time consuming. A booster that is not adjusted could result in a loose pedal that goes to the floor when applying the brakes or one that holds the brakes on. I spent a little extra money (300$ from O'Reilly's) to get one that was ready to install. This truck is also my DD so I needed the part ASAP and I had to walk to the part store to get it haha.

Overall install, a 4 out of 10. Not difficult at all. Take your time and think methodically. Dealerships want A LOT of money to install these so just do it yourself.

Here is a video that helped me a lot
http://www.youtube.com/watch?v=1IUVAuGrrgI
 
Last edited:
Question to clarify brake bleading when replacing booster

This is an old post so not sure you will ever see this. I have a 2000 4Runner. (Sons vehicle) I was curious why you did not leave the master cylinder lines on and to avoid having to bleed the brakes. I thought you said you were thinking about doing it that way.

I thought I saw a video a while back of someone doing it that way by removing the the large vent hoses to make room for moving the MC to the side so that the booster could be pulled out.

Also, i am not clear on what you said about bleeding the brakes? When you said to crack both lines and let it drip for a couple of minutes....are you talking about cracking all 4 wheel bleed screws or maybe cracking the lines at the MC and just letting it drip on the ground... but that makes no sense to me.

Sorry, but Im not a mechanic. I have bleed master cylinders twice in my life and regular wheel bleeding lots of times.... but not in the last 15 or 20 years...... so hope you can explain what lines you were talking about exactly. THANKS!
 
Please note! The booster I bought was pre adjusted! I did not have to adjust the booster in any way. If the booster is not adjusted then you will need to do this. There are videos online of how to adjust them. Its not that hard just a bit time consuming. A booster that is not adjusted could result in a loose pedal that goes to the floor when applying the brakes or one that holds the brakes on. I spent a little extra money (300$ from O'Reilly's) to get one that was ready to install. This truck is also my DD so I needed the part ASAP and I had to walk to the part store to get it haha.

Overall install, a 4 out of 10. Not difficult at all. Take your time and think methodically. Dealerships want A LOT of money to install these so just do it yourself.

Here is a video that helped me a lot
http://www.youtube.com/watch?v=1IUVAuGrrgI

I just wanted to say thank you for your write up, it really helped out today!
 
Found this thread when researching how to swap boosters. Took me 20 mins to swap.

On my 99 I left the hard lines connected to the MC and just pulled the MC forward of the engine hook and let it rest there

No need to disco the hard lines, or the engine hook for that matter, nor bleed the brakes

Only tools needed were a 12mm deep socket, 6" swivel extension (mine is a snap on) and needle nose pliers (for the clevis pin at the pedal)

I also used a 10mm socket to remove the evap vacuum relay bracket on the firewall above the booster at 1:00 but you may be able to remove the booster without removing that.
 

Members online

Forum statistics

Threads
278,310
Messages
3,554,079
Members
248,016
Latest member
Advally Service

Trending content

Back
Top