Transfer Case Output Shaft Seal Replacement

mtbtim

Elite Member
Hey Dudes,

If you've noticed a leak from the area of your transfer case output shaft, the seal is probably bad. Here'a a video showing you how to swap out the seal.

<iframe width="560" height="315" src="https://www.youtube.com/embed/8YuY6rv1hkE" frameborder="0" allow="accelerometer; autoplay; encrypted-media; gyroscope; picture-in-picture" allowfullscreen></iframe>
 
Last edited:
Register to hide this ad
Great, thanks. One suggestion I have is to use a paint marker on each of the 4 driveshaft nuts/bolts when you put it back together. On my rear end I used the guttentite method and they started working loose. A good idea to monitor these things for a while after putting drivetrains or suspension back together. Maybe if I torqued them properly they wouldn't have come loose but they were pretty tight.
 
Great, thanks. One suggestion I have is to use a paint marker on each of the 4 driveshaft nuts/bolts when you put it back together. On my rear end I used the guttentite method and they started working loose. A good idea to monitor these things for a while after putting drivetrains or suspension back together. Maybe if I torqued them properly they wouldn't have come loose but they were pretty tight.

I think you need to start pumping iron Bro. One day you could even be as manly as Timmy the Toolman. I was going to enter one of those strong man competitions but decided to start a YouTube channel instead.
 
Thanks again Tim.

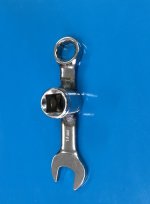
An alternative for cheap buggers like me. A free crowsfoot built just for this task. Excuse the welds, it was my first time welding.

The extra length of the crowsfoot does change the torque spec slightly. Formulas for this calculation can be found online, look up "torque adapter". It worked out to 2 or 3 lbs/ft for my adapter. Not too significant.

 

Attachments

  • t1.jpg
    t1.jpg
    36.8 KB · Views: 5,329
Thanks again Tim.

An alternative for cheap buggers like me. A free crowsfoot built just for this task. Excuse the welds, it was my first time welding.

The extra length of the crowsfoot does change the torque spec slightly. Formulas for this calculation can be found online, look up "torque adapter". It worked out to 2 or 3 lbs/ft for my adapter. Not too significant.

Very nice. I like it!
 
I have to ask Tim if you have ever tried freezing a new seal for 24 hours before installing? Just enough shrinkage can be the quick ticket.
 
I have to ask Tim if you have ever tried freezing a new seal for 24 hours before installing? Just enough shrinkage can be the quick ticket.

I haven't tried it yet but I've heard of it. I pretty much think I made it harder than it had to be getting the seal driven in. With an application like this, I worry about getting it right because you can drive it in further than you need to get it in and then you're pulling the seal, driving to your local dealer and hope they have the seal in stock. Analyzing how the companion flange inserts into the transfer case though, I know you could drive the seal in further than flush and be fine. I just want to show how to accurately insert the seal based off the instructions in the FSM. One of the main things Sean and I want to ensure is we pass on good info to the viewing public. This is why you sometimes see me doing corrections in videos because we realized after the fact we screwed up.
 
I have a leak coming from the front transfer case seal. Where the front driveshaft meets in the transfer case. Which seal is that?
 
I have a leak coming from the front transfer case seal. Where the front driveshaft meets in the transfer case. Which seal is that?

It's the same type of seal and quite possibly the exact one as the rear. You would need to confirm this by looking it up on an online parts seller website or by visiting your local Toyota dealer parts department. Remove the companion flange and replace the seal like we show in the video.
 
Hey Dudes,

If you've noticed a leak from the area of your transfer case output shaft, the seal is probably bad. Here'a a video showing you how to swap out the seal.

<iframe width="560" height="315" src="https://www.youtube.com/embed/8YuY6rv1hkE" frameborder="0" allow="accelerometer; autoplay; encrypted-media; gyroscope; picture-in-picture" allowfullscreen></iframe>

This video was super helpful for my repair attempt and his use of a seal installation tool inspired me to 3D print my own set of install tools.
 

Members online

Forum statistics

Threads
278,309
Messages
3,554,071
Members
248,016
Latest member
Advally Service

Trending content

Back
Top