2014 Warthog
New member
Crawford Eco Block Testing
Sooooooooo....
Remember that Crawford Eco Block MAF spacer thread a bit ago?
Ok, I'm not an idiot. We'll not so much these days, I was when I was 20 of course. I got scammed good at the swap meet with a "Spark energizer" thing that you popped onto the top of your coil to "Increase the intensity of your spark" to get better gas mileage. The guy had a car there and everything and would pop the thing in and out of the car while it was running and it ran great when in and not as hot when out.
Turns out he was standing on a piece of carpet with a switch under it that would cut out half of the plugs when he stepped on it making the engine run like crap on command.
Serious life lesson learned!
So I'm super pessimistic of EVERYTHING (Just ask anyone!). Intake cyclone? Gimmie a break, Fuel Shark? Is anyone THAT stupid? Etc etc etc...
Ok so the Crawford Eco Block MAF spacer... Here we go again... Only.. after reading everything I could about it and just relying on my general knowledge on the way the world works, both from an engineering and from a "Everyone is a scam artist" angles. I decided that there just /might/ be something to this.
So I quietly bought one a few months ago and gave been testing it. I've just got enough data to give what I think is a pretty solid test result.
I have a very strict set of habits when checking my MPG. I always gas up at the same station and usually the same pump. I always gas up just before and just after a trip so I completely separate my daily commute from any large outings. I'm a generally mellow driver, though not a hyper-miler.
For these results I averaged out my MPG only for completely full tanks and ONLY for 100% normal commute + weekend errand driving. Trips to the desert/Utah etc have WAY too many traffic/weather/random gas station variables to be very accurate.
Also, as an FYI, I live at nearly sea level and in California there is not really much if any of a summer/winter blend any more. It USED to be that in summer the MPG went DOWN because of anti-smog additives, but we get those year round now. So there is no big mileage drop/boost from winter to summer here any more like there used to be.
The numbers:
Completely stock
I only went through maybe 3 tanks completely stock and I didn't save the numbers...
Lifted, 265 (stock size) Toyo AT2 tires (Covers an 11 month period from April 2014 to March 2015, no Summer/Winter gas issues at all)
18.06 + 18.78 + 18.69 + 18.58 + 18.81 + 18.38 + 18.53 + 18.97 + 18.71 + 18.48 +
18.33 + 18.86 + 17.89 + 19.41 + 19.65 + 18.58 + 18.02 + 18.42 + 17.79 + 18.27 +
18.63 + 18.22 + 17.93 + 18.48 + 18.08 + 18.03 + 18.26 + 18.61 + 18.38 / 29
18.476
Same as above but 275 BFG KO2s
16.8 + 17.66 + 17.31 + 17.18 + 17.66 + 17.51 + 17.38 / 7
17.357 - 1.119 MPG
Same as above but with the Crawford Eco Block
18.15 + 18.21 + 18.66 + 17.92 + 18.27 + 18.45 + 18.11 + 18.17 / 8
18.24 + 0.883 MPG
Results
* 1.1 MPG drop from Stock AT to 275s
* 0.9 MPG increase using the MAF spacer with all other variables constant.
I was already as light on the pedal as my Patience would allow with the 275s knowing they were sucking my mileage down so there was no further room for pedal shenanigans with the spacer in.
So given where I drive and how I drive, those are the concrete numbers. The results were immediate and consistent, both for the tire change AND for the MAF spacer install. I'll pay for itself after about 5 months for me, and after that it's like getting a free gallon of gas with every fill. Not too bad.
So what about more power?
While I believe the dynos which show a + 5 HP across the range, I absolutely could not feel a thing on my first drive after install. The % gain in HP is just too small for me to notice.
What about mileage on trips or offroading?
I have no idea and may never really know... For example though I only lost 1 MPG going from 265 to 275, that is only for my mellow daily commute of 50 miles. When going heavy throttle out up a mountain, or if I had a lead foot, the loss could be more like 2 mpg as others have reported. My daily commuting is so utterly consistent but the gains, while there, are small enough, that I don't think even if I drive to Utah twice a year for 5 years if I could tell if I got better mileage when driving all out than before given the HUGE variation in MPG per fill up on my last three trips due to traffic, weather, energy level etc.
In the end I'm pleasantly surprised and quite happy to have nearly eliminated my 275 oversize tire penalty and will likely make going to 285 at some point less of an MPG disappointment
[Edit 08-04-15] Added 2 more tanks to eco block group and plotted mileage.
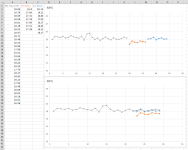
After plotting the data, the changes from stock to over size tires, then the addition of the eco block becomes even more clear.
There is a slow downward trend in my stock MPG over time, likely due to my adding bumpers, winch, battery and skids during that time increasing weight. However the mast few tanks seem relatively stable as I slowed down my "building". There is also no indication of any seasonal change in MPG due to gas reformulations.
Laying the KO2 sequence and finally the Eco Block added sequence on top of just the end portion gives the clearest picture of the MPG changes due to those two items.
Calculating only the last 8 fills of the stock/no eco block sequence instead of the entire thing and the numbers look like this:
Lifted, 265 (stock size) Toyo AT2 tires
18.22 + 17.93 + 18.48 + 18.08 + 18.03 + 18.26 + 18.61 + 18.38 / 8
18.249
Same as above but 275 BFG KO2s
16.8 + 17.66 + 17.31 + 17.18 + 17.66 + 17.51 + 17.38 / 7
17.357 - 0.892 MPG
Same as above but with the Crawford Eco Block
18.15 + 18.21 + 18.66 + 17.92 + 18.27 + 18.45 + 18.11 + 18.17 / 8
18.24 + 0.886 MPG
Results
* 0.9 MPG drop from Stock AT to 275s
* 0.9 MPG increase using the MAF spacer with all other variables constant.
So in the end the spacer completely offset the drop from the 275 KO2s. Nice!
Sooooooooo....
Remember that Crawford Eco Block MAF spacer thread a bit ago?
Ok, I'm not an idiot. We'll not so much these days, I was when I was 20 of course. I got scammed good at the swap meet with a "Spark energizer" thing that you popped onto the top of your coil to "Increase the intensity of your spark" to get better gas mileage. The guy had a car there and everything and would pop the thing in and out of the car while it was running and it ran great when in and not as hot when out.
Turns out he was standing on a piece of carpet with a switch under it that would cut out half of the plugs when he stepped on it making the engine run like crap on command.
Serious life lesson learned!
So I'm super pessimistic of EVERYTHING (Just ask anyone!). Intake cyclone? Gimmie a break, Fuel Shark? Is anyone THAT stupid? Etc etc etc...
Ok so the Crawford Eco Block MAF spacer... Here we go again... Only.. after reading everything I could about it and just relying on my general knowledge on the way the world works, both from an engineering and from a "Everyone is a scam artist" angles. I decided that there just /might/ be something to this.
So I quietly bought one a few months ago and gave been testing it. I've just got enough data to give what I think is a pretty solid test result.
I have a very strict set of habits when checking my MPG. I always gas up at the same station and usually the same pump. I always gas up just before and just after a trip so I completely separate my daily commute from any large outings. I'm a generally mellow driver, though not a hyper-miler.
For these results I averaged out my MPG only for completely full tanks and ONLY for 100% normal commute + weekend errand driving. Trips to the desert/Utah etc have WAY too many traffic/weather/random gas station variables to be very accurate.
Also, as an FYI, I live at nearly sea level and in California there is not really much if any of a summer/winter blend any more. It USED to be that in summer the MPG went DOWN because of anti-smog additives, but we get those year round now. So there is no big mileage drop/boost from winter to summer here any more like there used to be.
The numbers:
Completely stock
I only went through maybe 3 tanks completely stock and I didn't save the numbers...
Lifted, 265 (stock size) Toyo AT2 tires (Covers an 11 month period from April 2014 to March 2015, no Summer/Winter gas issues at all)
18.06 + 18.78 + 18.69 + 18.58 + 18.81 + 18.38 + 18.53 + 18.97 + 18.71 + 18.48 +
18.33 + 18.86 + 17.89 + 19.41 + 19.65 + 18.58 + 18.02 + 18.42 + 17.79 + 18.27 +
18.63 + 18.22 + 17.93 + 18.48 + 18.08 + 18.03 + 18.26 + 18.61 + 18.38 / 29
18.476
Same as above but 275 BFG KO2s
16.8 + 17.66 + 17.31 + 17.18 + 17.66 + 17.51 + 17.38 / 7
17.357 - 1.119 MPG
Same as above but with the Crawford Eco Block
18.15 + 18.21 + 18.66 + 17.92 + 18.27 + 18.45 + 18.11 + 18.17 / 8
18.24 + 0.883 MPG
Results
* 1.1 MPG drop from Stock AT to 275s
* 0.9 MPG increase using the MAF spacer with all other variables constant.
I was already as light on the pedal as my Patience would allow with the 275s knowing they were sucking my mileage down so there was no further room for pedal shenanigans with the spacer in.
So given where I drive and how I drive, those are the concrete numbers. The results were immediate and consistent, both for the tire change AND for the MAF spacer install. I'll pay for itself after about 5 months for me, and after that it's like getting a free gallon of gas with every fill. Not too bad.
So what about more power?
While I believe the dynos which show a + 5 HP across the range, I absolutely could not feel a thing on my first drive after install. The % gain in HP is just too small for me to notice.
What about mileage on trips or offroading?
I have no idea and may never really know... For example though I only lost 1 MPG going from 265 to 275, that is only for my mellow daily commute of 50 miles. When going heavy throttle out up a mountain, or if I had a lead foot, the loss could be more like 2 mpg as others have reported. My daily commuting is so utterly consistent but the gains, while there, are small enough, that I don't think even if I drive to Utah twice a year for 5 years if I could tell if I got better mileage when driving all out than before given the HUGE variation in MPG per fill up on my last three trips due to traffic, weather, energy level etc.
In the end I'm pleasantly surprised and quite happy to have nearly eliminated my 275 oversize tire penalty and will likely make going to 285 at some point less of an MPG disappointment
[Edit 08-04-15] Added 2 more tanks to eco block group and plotted mileage.
After plotting the data, the changes from stock to over size tires, then the addition of the eco block becomes even more clear.
There is a slow downward trend in my stock MPG over time, likely due to my adding bumpers, winch, battery and skids during that time increasing weight. However the mast few tanks seem relatively stable as I slowed down my "building". There is also no indication of any seasonal change in MPG due to gas reformulations.
Laying the KO2 sequence and finally the Eco Block added sequence on top of just the end portion gives the clearest picture of the MPG changes due to those two items.
Calculating only the last 8 fills of the stock/no eco block sequence instead of the entire thing and the numbers look like this:
Lifted, 265 (stock size) Toyo AT2 tires
18.22 + 17.93 + 18.48 + 18.08 + 18.03 + 18.26 + 18.61 + 18.38 / 8
18.249
Same as above but 275 BFG KO2s
16.8 + 17.66 + 17.31 + 17.18 + 17.66 + 17.51 + 17.38 / 7
17.357 - 0.892 MPG
Same as above but with the Crawford Eco Block
18.15 + 18.21 + 18.66 + 17.92 + 18.27 + 18.45 + 18.11 + 18.17 / 8
18.24 + 0.886 MPG
Results
* 0.9 MPG drop from Stock AT to 275s
* 0.9 MPG increase using the MAF spacer with all other variables constant.
So in the end the spacer completely offset the drop from the 275 KO2s. Nice!
Attachments

Last edited: