11-17-2013, 07:00 PM
|
#1
|
 |
Member
|
|
Join Date: Nov 2013
Location: Denver, CO
Posts: 396
Real Name: Brandon
|
|
|
Member
Join Date: Nov 2013
Location: Denver, CO
Posts: 396
Real Name: Brandon
|
Hour's '99 Build
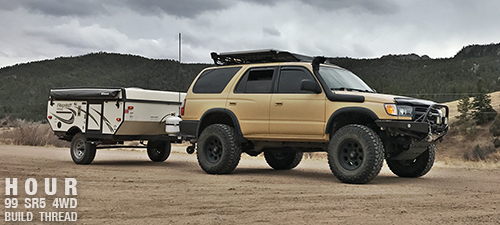
1999 SR5 4x4 Auto - Bought 11/8/13 @ 241k | 257k as of 10/14/16
After projector retrofit, early Oct 2016
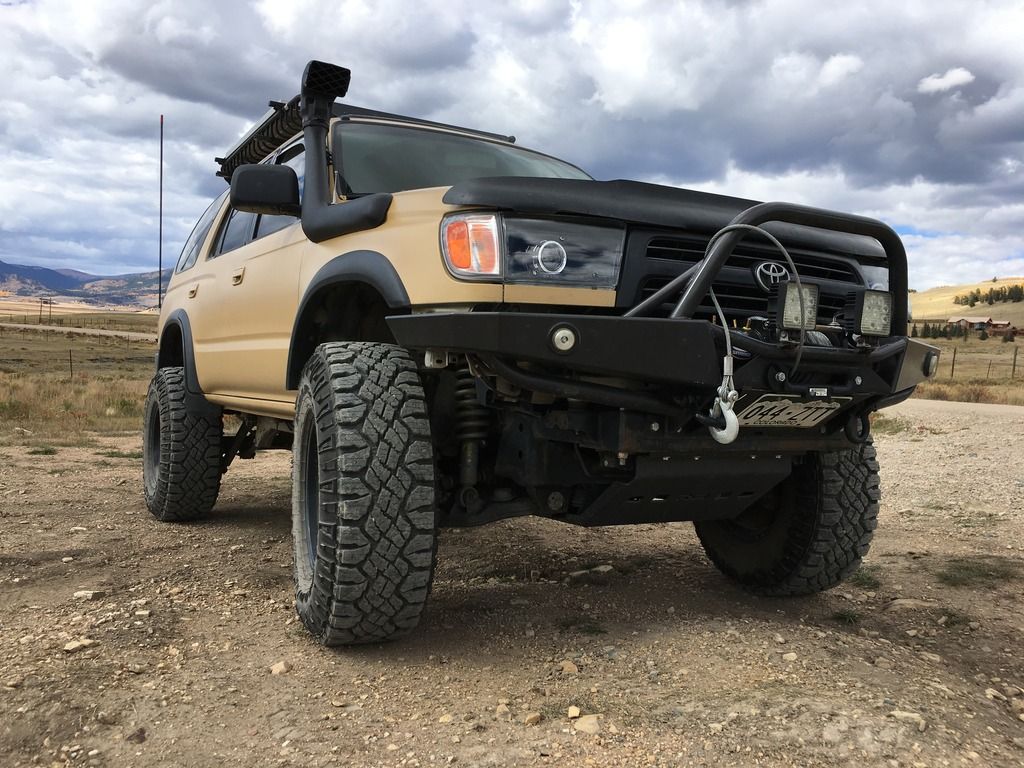
 - DIY HVLP Flat Desert Tan Paintjob
- Addicted Offroad Plate Bumper
- RCI Front & Transmission Skids
- Hilux 167 snorkel
- Rage Stingray roof rack, extension, and additional cross bars
- Wade window vent/visors
- AutoVentshade 23041 Bug deflector
Ride related- Tundra Bilstein 5100's + Toytec/Eibach Springs up front
- Tacoma Bilstein 5100's + LC 8.? Wraps in back
- Level 8 Tracker wheels, 16x8.5, 3.75 backspacing
- Toytec 1" Body lift
- Goodyear Duratracs, 285/75/16
- Energy Racing sway bushings
Electrical & Lighting- Dedicated Android phone & OBDII bluetooth scanner running Torque
- 2 x 27w Kalwell LEDs up front
- 2 x 27w Kalwell LEDs for aux reverse lights (and manually toggled)
- Interior lighting replaced with LEDs
- Bluesea aux fuse block
- Superwinch LP8500 winch
- Uniden PRO505 CB Radio
- 4' Firestik CB antenna, Insain fab antenna mount, Firestik spring, Hustler quick disconnect, Astatic external speaker
- 2 x 100w Renogy solar panels mounted to roof rack
- 105 amp hour deep cycle battery
- Whynter 62DZ Dual-zone 12v refrigerator/freezer
- NiLight 2.5" Mini Projectors
- Innovited 35W H1 HID @ 5000k
- DEPO Headlights & Corner lights, blacked out
- Prodigy P3 Brake Controller (have parts, yet to install)
Interior & A/V- Cabela's Trailgear camouflage seat covers
- Weathertech digital fit floor liners
- Pioner P1400DVD head unit
- RF Prime 6.75" 2-way compontent speakers up front
- Pioneer 5.25" 2-way speakers in rear
- RF Prime 500w Class D amp
- Pioneer TSW311D4 12" Subwoofer in sealed box
- ProComm CB/FM Multiplexor
- License plate backup camera
Mechanical, maintenance, and whatever in my 14k/3 yrs of owning- Borla muffler
- B&M Auxiliary transmission cooler
- CVJ remanufacturered axles
- NGK plugs & wires
- Synthetic fluid in diffs and tcase
- OE radiator, thermostat, Zerex red coolant
- Synthetic brake fluid flush
- Power steering flush
- Transmission drain and fill to infinity
- Valve covers (mine were cracked), gaskets, pcv valve
- Steering rack stabilizer (Summer 2016)
- Wagner Thermoquiet brakes and rotors, again (Summer 2016)
- OEM Lower ball joints (Summer 2016)
- Moog inner and outer tie rods (Summer 2016)
- OEM fuel filter (Summer 2016)
- OEM MAF sensor (Fall 2016)
- OEM Denso fuel pump (Fall 2016)
- OEM Upstream and downstream O2 sensors (Fall 2016)
Pre-paint job and some other things... October 2014
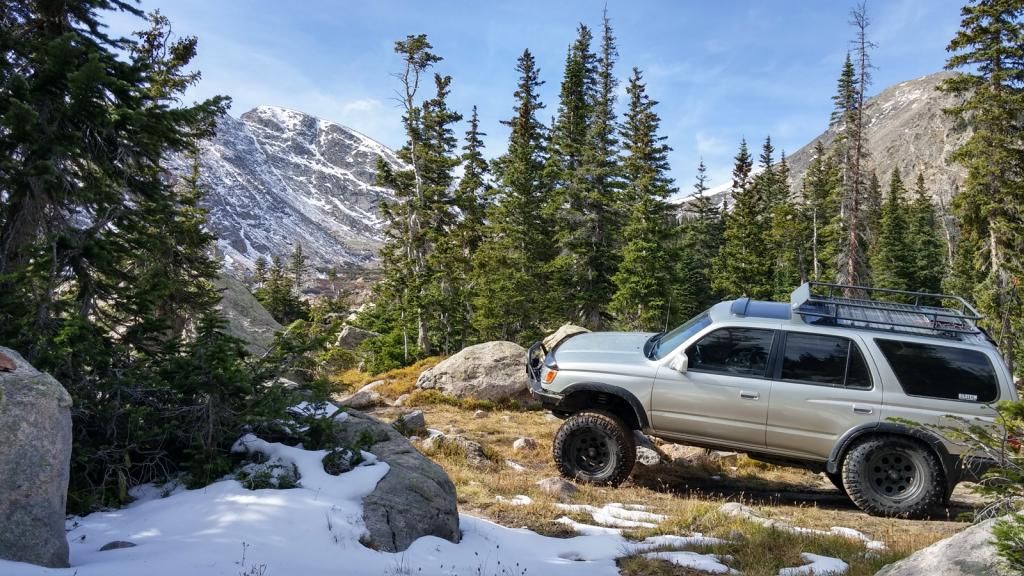
 First pic a couple of days after purchase, had to throw some temporary wheels on as the tires it came with were toast

Last edited by hour; 10-14-2016 at 03:13 AM.
|

|
 Reply With Quote Reply With Quote
|
|
11-17-2013, 07:15 PM
|
#2
|
 |
Member
|
|
Join Date: Dec 2012
Location: Salt Lake City, UT
Posts: 105
Real Name: Chris
|
|
|
Member
Join Date: Dec 2012
Location: Salt Lake City, UT
Posts: 105
Real Name: Chris
|
good pickup on the 4r - looks really clean! Can't wait to see what you make of it.
__________________
98' Runner SR5 5-speed. Desert Dune Metallic. 210k. OME 881 + OME 890 suspension, Nitrocharger shocks. Custom built sliders, Rola Rack + Extension. LED gauges. 42" Undead Offroad Light Bar. Weathertecs NEXT: Procomp 7069's and 285 Duratracs
Build Thread: http://www.toyota-4runner.org/3rd-ge...ead-intro.html
Slider Build: http://www.toyota-4runner.org/3rd-ge...der-build.html
|
|
|
Reply With Quote
|
|
11-17-2013, 07:18 PM
|
#3
|
 |
Senior Member
|
|
Join Date: Mar 2013
Location: SW UT
Posts: 2,304
|
|
|
Senior Member
Join Date: Mar 2013
Location: SW UT
Posts: 2,304
|
Where in CO are you? Boulder?
|
|
|
Reply With Quote
|
|
11-17-2013, 07:59 PM
|
#4
|
|
Member
|
|
Join Date: Nov 2013
Location: Denver, CO
Posts: 396
Real Name: Brandon
|
|
|
Member
Join Date: Nov 2013
Location: Denver, CO
Posts: 396
Real Name: Brandon
|
In Thornton / right near Denver city limits. Also up in Fort Collins pretty often as I used to live there.
|
|
|
Reply With Quote
|
|
11-17-2013, 08:03 PM
|
#5
|
 |
Junior Member
|
|
Join Date: Nov 2013
Location: CO
Posts: 16
|
|
|
Junior Member
Join Date: Nov 2013
Location: CO
Posts: 16
|
 In Co
In Co
My guess is Bongmont or RoveRand. hehehe. Your t4r Looks like a pretty good starting point.
|
|
|
Reply With Quote
|
|
11-17-2013, 08:14 PM
|
#6
|
|
Junior Member
|
|
Join Date: Nov 2013
Location: CO
Posts: 16
|
|
|
Junior Member
Join Date: Nov 2013
Location: CO
Posts: 16
|
oh crap, you posted right before I finished.. dang distractions.
|
|
|
Reply With Quote
|
|
11-17-2013, 10:37 PM
|
#7
|
 |
Senior Member
|
|
Join Date: Apr 2012
Location: Roaring Fork Valley
Posts: 1,517
Real Name: Tyler
|
|
|
Senior Member
Join Date: Apr 2012
Location: Roaring Fork Valley
Posts: 1,517
Real Name: Tyler
|
Woot FoCo! Good to see another colorado 4runner!
__________________
2000 4Runner:Kings, 37s, lockers 2018 TRD OR:stock and staying that way
|
|
|
Reply With Quote
|
|
12-22-2013, 02:20 AM
|
#8
|
|
Member
|
|
Join Date: Nov 2013
Location: Denver, CO
Posts: 396
Real Name: Brandon
|
|
|
Member
Join Date: Nov 2013
Location: Denver, CO
Posts: 396
Real Name: Brandon
|
So, I've accumulated quite a few parts since making this thread but weather has been uncooperative. Tonight I rented a shop bay from this awesome company near Denver, $28/hr and you get every tool you could ever wish for, swing arm lift, heated, TV, wifi... the works. Intended on getting the entire suspension done but the rears really threw me for a loop. It was also 6 feet in the air with my iPad and computer inside, so I winged it.
Rear shocks out in 5 minutes using the twist and break method, rear springs out in about 10 minutes using a transmission jack, rear spring reinstallation... 1hr. Reconnecting sway bar. 45 minutes lol. Anyway, rears are done and I'm just going to do the fronts in my parking lot soon. Until then, nose dive.

(with 300lbs of crap in the back, should be even higher when I unload it)
__________________
Last edited by hour; 12-23-2013 at 11:16 PM.
|
|
|
Reply With Quote
|
|
12-22-2013, 08:53 PM
|
#9
|
|
Member
|
|
Join Date: Nov 2013
Location: Denver, CO
Posts: 396
Real Name: Brandon
|
|
|
Member
Join Date: Nov 2013
Location: Denver, CO
Posts: 396
Real Name: Brandon
|
So, I'm not entirely sure what springs I got in the rear... friend's 94 FJZ80 old springs, double purple, dark blue, white... so I think 8wrap. The other spring was dirty and paint marks were gone. Anyway, wow. Pic is with all weight out of the back, came up quite a bit.
This embarrassingly took me two days to do the front, because I started late in the day 12/22/13 to allow some snow to melt in the parking lot. Then it snowed again and I had work in the morning, so I finished the other side 12/23/13. Enjoying the ride.


And with all 4 corners finally done:

__________________
Last edited by hour; 12-23-2013 at 11:21 PM.
|
|
|
Reply With Quote
|
|
12-23-2013, 10:58 PM
|
#10
|
 |
Member
|
|
Join Date: Nov 2013
Location: Littleton Colorado
Posts: 153
Real Name: Craig
|
|
|
Member
Join Date: Nov 2013
Location: Littleton Colorado
Posts: 153
Real Name: Craig
|
I like it. I just did mine Saturday. I'm surprised at how well the front eibachs ride. I was thinking they'd be too stiff.
|
|
|
Reply With Quote
|
|
12-23-2013, 11:30 PM
|
#11
|
|
Member
|
|
Join Date: Nov 2013
Location: Denver, CO
Posts: 396
Real Name: Brandon
|
|
|
Member
Join Date: Nov 2013
Location: Denver, CO
Posts: 396
Real Name: Brandon
|
Quote:
Originally Posted by C-RAIG

I like it. I just did mine Saturday. I'm surprised at how well the front eibachs ride. I was thinking they'd be too stiff.
|
It's night and day for me, very impressed with them after a 5 mile test. No clue how old the factory stuff was but it needed to go. Handles bumps comfortably but I think I need to take a look at the sway bars front and back. Rocks side to side a good deal, not sure if that's due to the soft ride of the LC springs though. After I get it aligned I'll start driving it more and make some solid conclusions.
Brakes seem a little weak suddenly and I'm not sure if I just got used to my Tacoma again or if I screwed something up on the rears (noticed this right after finishing rears). I did stretch the brake line pretty good but was able to bend the tab down and reduce tension. It didn't leak as a result of the stretching so who knows... another thing to add to the to-do list.
__________________
|
|
|
Reply With Quote
|
|
12-23-2013, 11:44 PM
|
#12
|
|
Member
|
|
Join Date: Nov 2013
Location: Littleton Colorado
Posts: 153
Real Name: Craig
|
|
|
Member
Join Date: Nov 2013
Location: Littleton Colorado
Posts: 153
Real Name: Craig
|
My brakes felt weak too, but came back after a trip around the block. I got a panhard drop, extended brake line and diff drop from toytec on my way home. Hoping that will tame the swaying a little. So far I love it. Way smoother than stock springs on the top perch.
|
|
|
Reply With Quote
|
|
12-27-2013, 03:42 AM
|
#13
|
|
Member
|
|
Join Date: Nov 2013
Location: Denver, CO
Posts: 396
Real Name: Brandon
|
|
|
Member
Join Date: Nov 2013
Location: Denver, CO
Posts: 396
Real Name: Brandon
|
This thread has some of the worst photos I've ever taken. Time hasn't been on my side lately, or during daylight at least.
Anyway, after I finished the last corner of my lift and took off my running boards it was getting dark. I cleaned up really well, so I thought, but I guess I left the freaking handle to my jack outside. Groundskeeper guys must have tossed it  This was my third jack, and I still have the other two. I lost the handles for them too. Freaking stupid. Anyway, a new Craftsman handle is on the way for $20 from Amazon - pleased with that actually since I doubted I could even buy the handle separately and would be SOL once again.
I also ordered lower ball joints and the appropriate 8 bolts from Camelback Toyota tonight. I really hate buying OEM stuff but I just had to do it. I have no clue how old the current ones are and with the lift I figured it was a good idea.
Until then, here she sits, pic taken in the 30 seconds I had during daylight before heading to work in the Taco. Hoping I can install the LBJs without ruining the outer tie rod ends as I really don't want to drop another ~$90, wait another week for parts, wait another week to make time to install, and then finally align. I'll also swap over Level 8 wheels right before alignment so it's 100% This is with the typical ~300lbs in back

__________________
|
|
|
Reply With Quote
|
|
12-27-2013, 12:17 PM
|
#14
|
|
Senior Member
|
|
Join Date: Apr 2012
Location: Roaring Fork Valley
Posts: 1,517
Real Name: Tyler
|
|
|
Senior Member
Join Date: Apr 2012
Location: Roaring Fork Valley
Posts: 1,517
Real Name: Tyler
|
Looks real good man! You should be able to do the LBJs without mangling up the OTREs. With mine I just rented a 2 arm puller (whatever the bigger one is from autozone) and didn't mess them up at all. Dont forget locktite on the 8 bolts!
As per the LC coils, those are 8 wraps and without weight you will sit pretty nice. I found that the LC coils were much more planted with extra weight in the back. I like the way it sits though, seems pretty level.
__________________
2000 4Runner:Kings, 37s, lockers 2018 TRD OR:stock and staying that way
|
|
|
Reply With Quote
|
|
12-28-2013, 01:50 AM
|
#15
|
|
Member
|
|
Join Date: Nov 2013
Location: Denver, CO
Posts: 396
Real Name: Brandon
|
|
|
Member
Join Date: Nov 2013
Location: Denver, CO
Posts: 396
Real Name: Brandon
|
Thanks for the encouragement with the LBJs. Yup, got loctite, had to get some anyway when I reinstalled the bolts after finishing the front. Seems like my order is held up with Camelback due to something being out of stock. They didn't say what it was though. Hopefully not the bolts, as I'd hate to wait longer for something I could get locally for a few pennies more.
Finally got some day time shots. Damn I miss being able to drive up the Poudre or to Horsetooth at least in Fort Collins and get some amazing shots. Not much beauty at all around here.


Edit 12/28-
Removed slack in throttle cable/all the other adjustable cables today (huge improvement) and installed transmission cooler following BigFishAllDay's write-up. Didn't need the two extra clamps me mentioned, as I just reused the stock clamps to connect a section of old hose between the bottom radiator inlet/outlet. I figure it's safe to reuse those since they were still tight and there should be nothing flowing through there anymore.
Lost maybe 1/3rd of a quart from lines (dark red/brown, better than milkshake!) but didn't bother to add back in. Took a little over 1.5qts to be within the HOT marks on dipstick, doing proper procedure of driving, parking, shifting up and down through each position, and checking when running. Anyway, took about an hour since I immediately opted to slice the lines off and not struggle yanking em. BigFishAllDay seemed to install his cooler a little more towards the passenger side but I wanted to keep tension off the lines and it's still getting tons of air sucked through it from the radiator fan. EZ process and will be happy not worrying over milkshake anymore.

Left my grill off, plan on painting it tomorrow. Also left skid off so I can do a less messy oil change in the morning. Got too windy after I finished this. Speaking of grill, my 99 was attached differently than BigFishAllDay's. All but one clip came out without struggle, one simply would not let go and I guess it's now broken. Pretty awful design :o
__________________
Last edited by hour; 12-29-2013 at 06:18 PM.
|
|
|
Reply With Quote
|
 Posting Rules
|
You may not post new threads
You may not post replies
You may not post attachments
You may not edit your posts
HTML code is On
|
|
|
|


 Linear Mode