 10-18-2017, 11:15 PM
|
#16
|
 |
Elite Member
|
|
Join Date: Oct 2014
Location: Citrus Heights, California
Age: 36
Posts: 7,338
Real Name: Jerod
|
|
|
Elite Member
Join Date: Oct 2014
Location: Citrus Heights, California
Age: 36
Posts: 7,338
Real Name: Jerod
|
My 4Runner's running pretty good now, but with the extra power I'm realizing the limitation of the stock transmission. the gears are always searching and the 1st->2nd gear shift is VERY sloppy and slow.
 https://www.summitracing.com/parts/trg-340-hd2
@ Black798
did an AWESOME write up on how to install a TransGo Shift Kit here, I take no credit for doing this on my own: Transgo 340-hd2 install and reveiw. The install was difficult because when I took out the valve body and opened it up, it slipped out of my hands due to all the oil on it and dropped all the bearings out. I tried to put it together as best I could but the tranmission ran TERRIBLE. Luckily, Black798 helped me out and I stole an extra bearing from a spare transmission in the backyard since I had lost one and all was well.
Also, get a solid gasket for the transmission pan while you are at it: https://www.summitracing.com/parts/fel-tos18685
Normal driving around town and in traffic, etc there's little change which is a good thing. Shifts are quiet and smooth, no noticeable difference for the average driver. The 2-3 shift is a bit quicker but it feels the same. ECT on makes it hold the RPM's a bit higher than usual, close to 3k RPM but nothing crazy since it did that before.
At about 1/2 or more throttle is when you notice the change. The shift is very quick and there's a little "jolt" snapping into the next gear. Acceleration is a bit of a jump but once again nothing crazy. The difference here is that with the ECT Power off (or for those that don't have it) the transmission shifts at higher RPM's and doesn't bog down at low RPM's. Those without a supercharger won't know quite what I'm talking about here but that's ok. Basically it acts as if you had ECT power on, without it on. And with it on, it revs about 3k RPM before shifting, allowing you to use more of the power band.
WOT runs - This is where it is noticed the most. I used the "truck" settings not the "hot rod" because I didn't want it to shift funny at normal driving speeds for my wife. She drives pretty conservative anyway. At wide-open-throttle, this kit shifts VERY fast. My 1-2 shift no longer jumps around searching for a gear like it did before with not ECT Power on. I basically always kept ECT on, since without it the gears would not downshift and it would bog down at sub-3k RPM's and not respond well. Now it act like it should. Once again, not sure if those without a supercharger will know what I mean by this but those that do will understand. This also helps eliminate the "low RPM ping" that many complain about since it won't stay at low RPM's with any substantial boost. With ECT Power on at WOT - I have yet to try this more. The few times I did it responded nicely and rev'd very high and used all of the power band, which it USUALLY did before but once again, the stock transmission acts funny sometimes and once in a while it would upshift then immediately downshift again, which basically robbed power and make for a very jerky ride. It has yet to do this and shifts fast (read: it jerks because it shifts so fast!). I don't have any times to share comparisons though and a video does not do the kit any justice since it is felt by the driver, not observed.
My conclusion - This kit does not magically "unlock tons of HP" or something like that. What it does is shorten shift times and gets rid of lazy shifts especially going from 2-3 but also 1-2, and helps hold a gear higher under more normal/aggressive driving. Of course, if you are on a track quicker shifts equals faster times but that's not what I was after.
Contrary to what you'll read online about Gadget's thoughts on a valve body upgrade being necessary (some of you will recognize his site here: Transmission Modifications) the stock transmission works fine. As long as you have an external cooler on it or change the fluid regularly there's no issues. Performance wise it acts funny, especially once you go beyond just a stock supercharger since it'll search for gears sometimes but nothing that threatens the integrity of the transmission. Those with ECT Power will notice it cleans it up a bit, but not entirely. This kit makes it work in sync with the extra power nicely. However, being that we have only a 4 speed transmission and in WOT situations you're only using 3 gears, this only is affecting two shifts. That's why it's not a huge game-changer. If we had a 5-speed or 6-speed, this would be a whole different story!
This is not for the average DIY'er, which I consider myself to be. Without the help here on the forums I would not have been able to successfully complete the job and I almost took on more than I could handle. Do this upgrade at your own risk and have a contingency plan if your transmission doesn't work right after the install.
Last edited by gamefreakgc; 10-18-2017 at 11:18 PM.
|

|
 Reply With Quote Reply With Quote
|
|
10-19-2017, 12:49 AM
|
#17
|
|
Elite Member
|
|
Join Date: Oct 2014
Location: Citrus Heights, California
Age: 36
Posts: 7,338
Real Name: Jerod
|
|
|
Elite Member
Join Date: Oct 2014
Location: Citrus Heights, California
Age: 36
Posts: 7,338
Real Name: Jerod
|
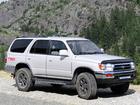
My exterior needed a fresh new looks, so I figured some new wheels and paint was in order. I had a set of Tacoma TRD wheels in my backyard I took off another 4Runner but the paint was in bad shape. Great excuse to try painting my own wheels!
I decided on Graphite Duplicolor Wheel Paint, found here at Oreilly's for cheap: https://www.oreillyauto.com/detail/d...hwp102/4268146. Also picked up some self-etching primer and clear coat. I love the look of the dark silver color contrasted against the Desert Dune paint:

I also cleaned up the existing paint job since my paint was scratched, faded and looking very dull. This was a 3-step process for me, since I have light colored paint. I also had some deeper scratches on the doors I knew that wax alone would not take care of.
First step was to use a clay bar and cleaning liquid to get all the sap, grime, tar, and other hardened stuff off my paint. This took a while but made the surface silky smooth when done.
Next step was Ultimate compound using a wool bonnet one a rotary tool from Harbor Freight. I kept the speeds low and make sure I got all areas evenly. This took out all the scratches and smoothed it out very nicely. This must be done with care otherwise you can burn your paint.
Taping is a must before you start applying wax or compound.
Since I have light paint and not dark, I didn't need a polish so went straight to wax. This one's nice since if I ever decide to wax again, this cleans & waxes the paint in one go. Less is more here too, it doesn't take much wax. The more you put on the harder it is to take off too. The finished product on the paint was fantastic, I could see my reflection in the doors and hood! BTW, this bonnet that fits over the buffing pads was awesome to polishing up the wax at the end: Shurhold 3153 Microfiber Bonnet
But now my black trim looked dirty and unsightly...
This scrubbed in with a small brush was a lot of work in the valance and running boards but took out all the white grossness that had built up over the years. I finished it off with a black silicone liquid sealer and it looks brand new! Here's the finished product (with decal):


|
|
|
Reply With Quote
|
|
10-19-2017, 12:54 AM
|
#18
|
|
Elite Member
|
|
Join Date: Oct 2014
Location: Citrus Heights, California
Age: 36
Posts: 7,338
Real Name: Jerod
|
|
|
Elite Member
Join Date: Oct 2014
Location: Citrus Heights, California
Age: 36
Posts: 7,338
Real Name: Jerod
|
Now that I'm getting serious with this build, I needed a little flair to make it my own! I found a website, Chrome Car Letters - Toyota TRD Chrome Badge, Toyota TRD*Keychain, and Toyota TRD*Decals, that has some nice, authentic TRD designs.
I went ahead and ordered two of of the TRD badges and a large, 16" TRD style 2 logo in Brite Cardinal Red. I think they turned out pretty good!
*Note, the logo is not streaky like the photo, poor resolution here.


|
|
|
Reply With Quote
|
|
10-19-2017, 01:01 AM
|
#19
|
|
Elite Member
|
|
Join Date: Oct 2014
Location: Citrus Heights, California
Age: 36
Posts: 7,338
Real Name: Jerod
|
|
|
Elite Member
Join Date: Oct 2014
Location: Citrus Heights, California
Age: 36
Posts: 7,338
Real Name: Jerod
|
Headers!
So, now is where my build takes a turn for the better in performance, but turn for the worse for my bank account.
I realized that I wasn't going to do anything halfway and my current setup with the pulley, methanol injection just wasn't cutting it anymore. I want to get serious with my 4Runner. What's next you might ask? Headers.
I've not seen a good resource for the Doug Thorley Shortie Headers for our 4Runners, so writing this for future reference for all members & 4Runner enthusiasts.
Below you'll find the Short Review (if you don't want to read it all) and the Full Review.
Short Review:
The headers give a nice grunt across the entire powerband. It’s not going to blow your socks off, but a subtle increase in power. You'll notice an increase for passing, accelerating, or flooring it. The installation for 96-98 Autos is a complete nightmare. I am unsure about 99-00, but for 01-02 years it would fit better, or better yet, a manual transmission. Tacomas have an easier time as well than 4Runners.
Ratings:
Install – 2 out of 10, barely fits. Lots of fabrication needed for 96-98.
Power – 7 out of 10, nice increase with a supercharger. Not huge, but just the next step in building out a 4Runner with a supercharger. It's like the difference between having your A/C on, then turning it off to free up HP.
Noise – 5 out of 10, noisier under heavy throttle but the sound isn’t my favorite.
Overall – 5 out of 10. There’s a reason why this was one of the last performance mods I’m going to do on my 4Runner. It’s expensive, difficult, but once it is on, you never have to worry about it again.
Full Review:
I purchased the Doug Thorley Headers, Part #: THY-507-C from Auto Acessories Garage: https://www.autoaccessoriesgarage.co...?set-vehicle=1. With a coupon code, I paid $665.00, which is the cheapest price I could find anywhere. Since I live in the red-tape filled state of California, having it 50-state smog legal is imperative, which it is. You might be asking, why even bother with headers? My answer:

My vehicle is also supercharged but with a 10 PSI pulley and methanol injection, so the gains might even be higher for me since I’m cramming even more air into the engine, and it needs to get out quickly.
Upon arrival, here’s what the parts looked like:


I was missing the relocation bracket and the weld-on flange, so I had to contact Auto Accessories Garage about getting the missing parts. I must say, they were extremely polite and very fast to contact Doug Thorley Headers to get what I needed. Sothern hospitality at its best! So if you do order headers, make sure all the parts are included before diving in. I liked their customer service so much, I bought some other items from them as well.
After calling around looking for a shop that would be willing to do the the installation, I was recommended to All Automotive here in my town of Citrus Heights. If anyone in the Sacramento area ever needs a quality mechanic that does top notch work, Gardner is the best I have ever seen. Treated my 4Runner like I would treat it and went above and beyond what was expected to not only install it, but make it look good in the process: Home | All Automotive Service. Seriously though, I will never go to another shop for custom work or fabrication again.
Install – 2 out of 10
The installation was a complete nightmare. I knew it was going to be bad, but once he showed me all that was needed to be done I can’t believe he didn’t just chuck the headers out of the shop and tell me to find someone else to do it. It took him 10 hours, but he only charged me for 7. That put the cost of installation at $742 (before ya’ll freak out, this was about what I was expecting).
The transmission dipstick tube had nowhere to go. He ended up bending it and creating a new bracket to hold it in place:

The transmission kickdown table had nowhere to go and had to be bent (it is protected from heat at least though):

The exhaust flange did not weld on the piping since the downpipe is 2.25” piping (why Toyota, why?), compared to the headers which is 2.5” so he had to weld a section of 2.5” on (note in this photo, you can see the flange welded to 2.5" pipe, then welded to the 2.25" pipe):

Various hoses and wires did not fit right so he had to re-route some.
I have no welding capacity, so I knew this was out of my league from the start. Add on a wideband sensor bung and some gaskets, my total cost was…
$1432.49. Yes, you read that right.
Like I said at the beginning, this is one of the last performance mods I will ever do to my 4Runner. For half the cost of a supercharger I added 16 HP and 11 lbs of torque, maybe a little bit more. If you have a stock engine and are thinking about adding headers, I hope this points you to a blower instead.
Power – 7 out of 10
It did exactly what I thought it would do. Nothing more, nothing less.
My best comparison is like if you are doing some pulls and had the A/C on, then turned it off. That's about the power increase you'll get with these headers.
For those of us who are supercharged, I read in advance it would do a curious thing of reducing boost. Turns out, that is true. There’s less backpressure in the exhaust now so the air evacuates the combustion chamber faster, allowing for more air in and less pressure built up in the supercharger. I need less fuel to run the same 2.1” pulley now, which I’m expecting to also translate into MPG savings. I topped out at 10.7 PSI the last time I had a boost meter hooked up before the headers and it tops out now at 10.0 PSI exactly. So less boost pressure because more air is flowing.
For those of you with superchargers fighting ping or lean conditions, this might be a solution or alternative to fuel mods, and it’s smog legal. For a reference point, with the setup at WOT I was running at about 12.8ish AFR's. After putting on headers, the AFR's decreased to 10.7. I needed less fuel for the same amount of boost.
One other thing I've noticed is a reduction in exhaust temperatures, as well as engine temperatures. I'm no engineer so I don't know the full effects of this benefit, but I know that superchargers put off a lot of heat because of the compressed air and excess heat is not good for any engine. Less heat may = more timing, and my initial runs have confirmed the ECU is running more timing advance than before.
Noise – 5 out of 10
Some people like big, gurgling V-8’s rolling down the road. I am not one of those people. I don’t do any mods for the sake of noise or appearance (except for the TRD decals), purely for function or performance. At little throttle you won’t even hear the headers. At moderate throttle you’ll get a gurgling noise. At full throttle or WOT it blares a bit more, not obnoxiously but once again, I'm not a huge noise person. Some people might like it more than I do. It does sound more like a V-8 than a V-6 now though. At WOT, the supercharger is much louder than the headers, but that's partly because of the smaller pulley I have on there.
Overall – 5 out of 10
In a rating scale of 1 to 10, 1 to 5 is the lower half of the scale. I put it as a 5 because it gave the power I was looking for, but the installation totally kills any “fun factor” of modifying your engine. At the end of the day though, I’m glad I had the funds to have it done and am satisfied with the results.
Hoping this will help future 4Runner owners decide if headers are right for them and what might be required to make it all work.
MPG ratings to come once I can get myself to stop stomping on the throttle at every stop! Feel free to ask any questions and I'll try my best to answer.
UPDATE: Noticed a slight gain of 0.5-1.0 MPG's after install. Not drastic, but helps a little bit.
HP Increase:
+16 HP
Running Total:
+59 HP
Last edited by gamefreakgc; 02-16-2018 at 08:16 PM.
|
|
|
Reply With Quote
|
|
10-19-2017, 01:10 AM
|
#20
|
|
Elite Member
|
|
Join Date: Oct 2014
Location: Citrus Heights, California
Age: 36
Posts: 7,338
Real Name: Jerod
|
|
|
Elite Member
Join Date: Oct 2014
Location: Citrus Heights, California
Age: 36
Posts: 7,338
Real Name: Jerod
|
If you've made it this far, congratulations! You are now at the present day, so posts won't be so fast and furious now.
Next steps from here are a higher flow fuel pump, bigger injectors, AEM F/IC 6 to tune the injectors and URD harness to wire it all in.

Oh look what came in the mail today... it's a 200ish lph DENSO fuel pump from a Mitsubishi Lance EVO IX, Part#195130-3570. Bought it used for $20!

This will replace the stock fuel pump and is completely plug & play, or so I hope. Also is quiet, unlike Walbro fuel pumps. This gives me more than enough fuel to drive larger injectors.
|
|
|
Reply With Quote
|
|
10-19-2017, 08:22 AM
|
#21
|
 |
Member
|
|
Join Date: Mar 2015
Location: Bozeman, Montana
Age: 25
Posts: 917
Real Name: Phoenix
|
|
|
Member
Join Date: Mar 2015
Location: Bozeman, Montana
Age: 25
Posts: 917
Real Name: Phoenix
|
@ gamefreakgc
thanks for the mention, good to hear the shift kit is holding up well. I am super pleased with mine. Even though Im NA I noticed that the kit made the shift points so much more consistent in 4 low. It used to slam from 1 to 2 anywhere between 2k and 3500 but now its a nice jolt right at 2200 that If I work the pedal right is barely noticeable.
__________________
98 Limited - Solid Axle Swapped,Turboed,And On 37s - Build
Transgo Shit Kit Writeup - Click Here
|
|
|
Reply With Quote
|
|
10-28-2017, 10:20 PM
|
#22
|
|
Elite Member
|
|
Join Date: Oct 2014
Location: Citrus Heights, California
Age: 36
Posts: 7,338
Real Name: Jerod
|
|
|
Elite Member
Join Date: Oct 2014
Location: Citrus Heights, California
Age: 36
Posts: 7,338
Real Name: Jerod
|
Pump runs great just installed it but the job took 8 hours. Why did it take so long you might ask?
The Evo 9 fuel pump is not plug and play, part #195130-3570. The spades seen below are to big:
I had to take a dremmel and shave down the sides since I only had the fuel pump, not the connector and pigtail. You can use this fuel pump if you have the pigtail for it, otherwise do not bother. It's also taller than the stock unit so I had to bend the base of the fuel sending unit to get it to fit. Stock rubber washer fit fine though.
I also stripped the nut on one of the high-pressure fuel line  . Here's a tip: there's three possible ways to disconnect the line, one right at the end of the tank with the rubber hoses, one in the middle of the tank and the fuel filter (the one I tried), and one at the fuel filter itself. I should have just done the one at the fuel filter, since I had replaced the fuel filter a few years ago. Oh well.
After rounding the nut and stripping the threads halfway out, I gave up at the center nut and prayed it wouldn't leak. There's a flexible rubber section in the middle so I was able to get the entire fuel line out with no issues.
It's all buttoned up and ready for bigger injectors. I will never drop a fuel tank again. Ever. Ever ever.
|
|
|
Reply With Quote
|
|
12-27-2017, 03:14 PM
|
#23
|
|
Elite Member
|
|
Join Date: Oct 2014
Location: Citrus Heights, California
Age: 36
Posts: 7,338
Real Name: Jerod
|
|
|
Elite Member
Join Date: Oct 2014
Location: Citrus Heights, California
Age: 36
Posts: 7,338
Real Name: Jerod
|
Been a little while since I've done much, other than little fixes here and there. However, I've initially connected my AEM F/IC 6 to drive larger injectors and FINALLY get a good tune.
I'm still tweaking the setup so will get photos up soon. I used the URD patch harness in case I messed things up royally I could go back to stock. More to come soon.
|
|
|
Reply With Quote
|
|
12-27-2017, 04:54 PM
|
#24
|
 |
Senior Member
|
|
Join Date: Nov 2014
Location: Cowlitz County, Washington
Posts: 1,777
Real Name: Mike
|
|
|
Senior Member
Join Date: Nov 2014
Location: Cowlitz County, Washington
Posts: 1,777
Real Name: Mike
|
Quote:
Originally Posted by gamefreakgc

Pump runs great just installed it but the job took 8 hours. Why did it take so long you might ask?
The Evo 9 fuel pump is not plug and play, part #195130-3570. The spades seen below are to big:
I had to take a dremmel and shave down the sides since I only had the fuel pump, not the connector and pigtail. You can use this fuel pump if you have the pigtail for it, otherwise do not bother. It's also taller than the stock unit so I had to bend the base of the fuel sending unit to get it to fit. Stock rubber washer fit fine though.
I also stripped the nut on one of the high-pressure fuel line . Here's a tip: there's three possible ways to disconnect the line, one right at the end of the tank with the rubber hoses, one in the middle of the tank and the fuel filter (the one I tried), and one at the fuel filter itself. I should have just done the one at the fuel filter, since I had replaced the fuel filter a few years ago. Oh well.
After rounding the nut and stripping the threads halfway out, I gave up at the center nut and prayed it wouldn't leak. There's a flexible rubber section in the middle so I was able to get the entire fuel line out with no issues.
It's all buttoned up and ready for bigger injectors. I will never drop a fuel tank again. Ever. Ever ever. |
This is good to know since I have the EVO pump and Injectors still sitting on my bench.
__________________
2001 Imperial Jade Gold Letter Sport Package - Original Owner
|
|
|
Reply With Quote
|
|
12-27-2017, 11:06 PM
|
#25
|
|
Elite Member
|
|
Join Date: Oct 2014
Location: Citrus Heights, California
Age: 36
Posts: 7,338
Real Name: Jerod
|
|
|
Elite Member
Join Date: Oct 2014
Location: Citrus Heights, California
Age: 36
Posts: 7,338
Real Name: Jerod
|
Quote:
Originally Posted by Rock_Rat
This is good to know since I have the EVO pump and Injectors still sitting on my bench.
|
If you have the wire harness to go with it, it will not be as bad. But I really recommend doing this job with a friend. Doing it alone was so frustrating, and I only had about 2 gallons of gas in there.
|
|
|
Reply With Quote
|
|
12-29-2017, 01:53 AM
|
#26
|
|
Elite Member
|
|
Join Date: Oct 2014
Location: Citrus Heights, California
Age: 36
Posts: 7,338
Real Name: Jerod
|
|
|
Elite Member
Join Date: Oct 2014
Location: Citrus Heights, California
Age: 36
Posts: 7,338
Real Name: Jerod
|
Ok! Did a lot today. First things first, I was super tired of those stock meep-meep horns so wanted something a little more beefy. I went with the PIAA Super Bass horns (if you have decent speakers, there's a sound clip in the link below):
PIAA | Automotive Superior Bass Horn (330/400Hz) #85115
Here's how they came out of the box:

The installation is simple enough but you will need 2 female spade connectors, 0.250 size. Wire size should be 16-18 gauge, since one side has two wires. Start by removing the grill.
Our stock horns have power through the wiring harness but are grounded through the mounting screw. The driver's side horn has two wires (both are power wires) and the passenger's side horn has the one wire from the driver's side. Follow the directions for the two horns, one wire setup. You'll just need a spot to secure the ground wires under a 10mm screw, I used the brackets in the corner.
After fitting the passenger's side horn, the A/C line was in the way. What I did was loosen the hex screw on the A/C tubular thingy (no idea what it is really) and pushed it down, lowering the entire line and tightened it back up. Perfect.
Finished product:

Sounds AWESOME!
|
|
|
Reply With Quote
|
|
12-29-2017, 02:26 AM
|
#27
|
|
Elite Member
|
|
Join Date: Oct 2014
Location: Citrus Heights, California
Age: 36
Posts: 7,338
Real Name: Jerod
|
|
|
Elite Member
Join Date: Oct 2014
Location: Citrus Heights, California
Age: 36
Posts: 7,338
Real Name: Jerod
|
And now the part I've been waiting YEARS for, larger injectors plus the AEM F/IC 6 installation! My engine runs very lean, doesn't throw codes but my injectors are completely tapped out. One time I did a WOT run I ran out of methanol mixture and the AFR's hit 18 on max boost! Scary stuff.
I ordered an AEM F/IC 6 and instead of wiring into the stock harness I went with URD's patch harness so that I could remove it and go back to stock if I ever needed to *cough* smog *cough*: Plug N Play Harnesses - Underdog Racing Development. A big shout out to MTD (why can I not do a Mention?) for his thread about how to install the AEM F/IC 6: How To: AEM F/IC-6 Install, Tuning, and Help Thread - Toyota 4Runner Forum - Largest 4Runner Forum. Without that I'd still be struggling with the installation.
After talking with a local Toyota engine builder who specializes in 5VZ-FE's and reading Gadget's site which confirmed what he said, I went with the Supra/Lexus injectors from Five-O Motorsports: Toyota Supra Non-Turbo, 1993, 1994, 1995, 2JZ, 23250-46030/46031 (54212134) Refurbished JDM fuel injectors - 3 Year Warranty. These do not have air-assist, so they fit a little differently but work just fine. These flow at 305 cc's compared to the stock 238 cc's, that's a 28% increase over stock. More on why that number mattered for me later.
First I had to wire things up. A few awesome members were able to get a hold of the ECU wiring diagram for a 1998 4x4 Auto.
 A wiring diagram with ECU pinouts is a must!
. You will be lost without one and risk messing up your vehicle by tapping the wrong wires. After about 5 hours work, this is what I ended up with:

You'll notice the one wire on a spade and not soldered, that's for the wideband. I didn't want to solder this one because the wideband output wire was coming from the center console and would need to be disconnected to remove the wiring harness if need be.
I hooked it up and played around with the AEM unit for a bit, doing calibrations, etc. This guy's site is super, super helpful on how to use the AEM unit: Fried Rice BANZAI, see the posts by date on the lower right side.
Then came installing the injectors. I won't go step by step here, since if you don't know how to replace injectors, you shouldn't be thinking of doing this. However, I wanted to share a few tips on getting the Supra/Lexus injectors to fit right. They are a little bit smaller than stock, so it changes how you install them. Take the largest o-rings/manifold gasketst off the old stock injectors (they fit on the lower half of the injectors) and slip them on the new injectors. You will probably need to take the large doughnut rings off the bottom and then slip them on. If you don't put these on, junk will start to seep down in between your injectors and the intake manifold. You then want to connect the wires before tightening down the fuel rails. They sit at a slightly different angle so you can't connect them after securing the rails.
Got the new injectors in took a peek down my intake. Looks like the water/meth is working as intended look how clean that intake is and valves are! Seems as though the top doesn't get hit with the spray though.

While I had the intake off, I removed the 675 cc methanol nozzle I had installed and put in a 175 cc nozzle. I no longer am 100% reliant on water/meth to get my AFR's in line and can use the system as intended: boosting the octane.
Got it all put together and fired it up perfect the first time. I took it for a spin to let my fuel trims settle. A step back, some of you might know my Long-Term fuel trims are stupid high. As in maxed at +19.5%. That's while NOT UNDER BOOST. Here's how they looked after dropping 305 cc injectors in there with no tune:
 That's right, the stock ECU adjusted for the injectors with plenty of room to spare!
 That shows how much fuel the ECU was dumping on just to try and stay stoich. Nuts. Anyway, that's all for today. My idle is a bit too high so I think my IAC is shot, going to swap it out with another one I have on hand. Then I'm going to start doing some WOT runs to see how these new injectors fare and how lean/rich I am at open loop. Spoiler: I need a good tune lol.
Last edited by gamefreakgc; 05-22-2019 at 12:44 PM.
|
|
|
Reply With Quote
|
|
12-30-2017, 01:21 AM
|
#28
|
|
Elite Member
|
|
Join Date: Oct 2014
Location: Citrus Heights, California
Age: 36
Posts: 7,338
Real Name: Jerod
|
|
|
Elite Member
Join Date: Oct 2014
Location: Citrus Heights, California
Age: 36
Posts: 7,338
Real Name: Jerod
|
Finished tucking away the AEM unit today. There is no room back there, period.
I was able to stuff the computer itself above the glove box latch bracket on the left side. In order for it to fit, I took the the bracket out, cut a notch in it where the unit sits in order to it to fit. It's snug, I put some felt on the body at the pressure points & top so it does not rattle either.

That was the easy part. The AEM harness and patch harness had no where to go. I ended up just smashing the vent pipe back into place, taping it on one end and used that to hold everything in place. Some zip ties for the USB cord and boost hose so nothing moves and we'll see if this works.


I drilled a hole in the glovebox to thread the USB cable through, verified it all worked and buttoned it all up. My glovebox is hard to close now... but at least it fits.
If you try and fit it in there with a patch harness, get ready for a wrestling match. You have to either sacrifice your vent or your glovebox, no way it will fit without sacrificing one.
|
|
|
Reply With Quote
|
|
01-02-2018, 03:32 PM
|
#29
|
 |
Member
|
|
Join Date: Aug 2006
Location: Middle TN
Posts: 784
|
|
|
Member
Join Date: Aug 2006
Location: Middle TN
Posts: 784
|
Great thread.
Curious what benefit the AEM F/IC 6 vs the URD 7th injector kit with the AIC-T with PTB enrichment? I went with the latter and it's been pretty simple to tune and has worked really well. Now that I've added water/meth injection I'm barely spraying any fuel from the 7th, just a spritz way up in the RPM range (I'm on the stock fuel pump).
I'm also on the stock transmission and agree it holds up fine. I'm intrigued by your shift kit install and may look in to that in the future. ECT has helped, but could be even better.
Sad to see the DT headers weren't fruitful, you're at the same point I am and looking to max out performance.
|
|
|
Reply With Quote
|
|
01-02-2018, 06:21 PM
|
#30
|
|
Elite Member
|
|
Join Date: Oct 2014
Location: Citrus Heights, California
Age: 36
Posts: 7,338
Real Name: Jerod
|
|
|
Elite Member
Join Date: Oct 2014
Location: Citrus Heights, California
Age: 36
Posts: 7,338
Real Name: Jerod
|
Quote:
Originally Posted by Speedy
Great thread.
Curious what benefit the AEM F/IC 6 vs the URD 7th injector kit with the AIC-T with PTB enrichment? I went with the latter and it's been pretty simple to tune and has worked really well. Now that I've added water/meth injection I'm barely spraying any fuel from the 7th, just a spritz way up in the RPM range (I'm on the stock fuel pump).
I'm also on the stock transmission and agree it holds up fine. I'm intrigued by your shift kit install and may look in to that in the future. ECT has helped, but could be even better.
Sad to see the DT headers weren't fruitful, you're at the same point I am and looking to max out performance.
|
I'm not familiar with the AIC-T, so I cannot comment there. The AEM has lots of support both online and from dyno shops. I did not want the Split Second unit since it's harder to tune, especially for closed loop tuning. Worse case scenario if I couldn't dial in a good tune, I know some shops in the area that know the AEM systems well so it's a plan B. Actually, even if I get a decent tune I will probably take it in for a dyno run anyway.
I'm still learning the system and how it works, but the O2 skewing is very simple so far and AEM gives suggestions on what values to start with which is a great help. Makes close loop tuning very doable for me.
The last few things on my potential performance list is new camshafts, port & polish, electric fan (need to ask around on this one) and maybe, MAYBE a 2.0" pulley. Not really sure on that last one.
|
|
|
Reply With Quote
|
 Posting Rules
|
You may not post new threads
You may not post replies
You may not post attachments
You may not edit your posts
HTML code is On
|
|
|
|


 Linear Mode


![Jerod's Supercharged T[u]RD Build](https://www.toyota-4runner.org/images/vendors/CRLED.png)
![Jerod's Supercharged T[u]RD Build](https://www.toyota-4runner.org/images/vendors/baselayer.png)
![Jerod's Supercharged T[u]RD Build](https://www.toyota-4runner.org/images/vendors/suncent.png)
![Jerod's Supercharged T[u]RD Build](https://www.toyota-4runner.org/images/vendors/trail4r.png)
![Jerod's Supercharged T[u]RD Build](https://www.toyota-4runner.org/images/vendors/auxito2.png?abc)
![Jerod's Supercharged T[u]RD Build](https://www.toyota-4runner.org/images/vendors/lasfit2.png?abc)
![Jerod's Supercharged T[u]RD Build](https://www.toyota-4runner.org/images/vendors/4runnerlifestyle2.png)
![Jerod's Supercharged T[u]RD Build](https://www.toyota-4runner.org/images/vendors/boslla.png)
![Jerod's Supercharged T[u]RD Build](https://www.toyota-4runner.org/images/vendors/sherpa.png)
![Jerod's Supercharged T[u]RD Build](https://www.toyota-4runner.org/images/vendors/oemaudioplus.png)
![Jerod's Supercharged T[u]RD Build](https://www.toyota-4runner.org/images/vendors/orangebox.png)
![Jerod's Supercharged T[u]RD Build](https://www.toyota-4runner.org/images/vendors/frontrunner.png)
![Jerod's Supercharged T[u]RD Build](https://www.toyota-4runner.org/images/vendors/bossstrongbox.png)
![Jerod's Supercharged T[u]RD Build](https://www.toyota-4runner.org/images/vendors/urd.png)
![Jerod's Supercharged T[u]RD Build](https://www.toyota-4runner.org/images/vendors/treadwright.png)
![Jerod's Supercharged T[u]RD Build](https://www.toyota-4runner.org/images/vendors/lfd_offroad.png)
![Jerod's Supercharged T[u]RD Build](https://www.toyota-4runner.org/images/vendors/rcioffroad.png?2)
![Jerod's Supercharged T[u]RD Build](https://www.toyota-4runner.org/images/vendors/drzoffroad.png?1)
![Jerod's Supercharged T[u]RD Build](https://www.toyota-4runner.org/images/vendors/wheelersoffroad.png)
![Jerod's Supercharged T[u]RD Build](https://www.toyota-4runner.org/images/vendors/victory4x4.png?1)
![Jerod's Supercharged T[u]RD Build](https://www.toyota-4runner.org/images/vendors/sidetracked.png)
![Jerod's Supercharged T[u]RD Build](https://www.toyota-4runner.org/images/vendors/venomrex.png)
![Jerod's Supercharged T[u]RD Build](https://www.toyota-4runner.org/images/vendors/rpmfab.png)
![Jerod's Supercharged T[u]RD Build](https://www.toyota-4runner.org/images/vendors/adamsrotors.png)
![Jerod's Supercharged T[u]RD Build](https://www.toyota-4runner.org/images/vendors/accessorides.png)
![Jerod's Supercharged T[u]RD Build](https://www.toyota-4runner.org/images/vendors/battleborn.png)
![Jerod's Supercharged T[u]RD Build](https://www.toyota-4runner.org/images/vendors/sso.png)


![Jerod's Supercharged T[u]RD Build](https://www.toyota-4runner.org/images/vendors/cbioffroad.png?xy)
