4th Gen Front brake caliper rebuild for stuck piston

Kmvreter

New member
This work was inspired because I wanted to find the root cause and potential fix for the infamous stuck caliper pistons. This rebuild option is also a way to save some dollars using parts instead of a remanned caliper.

Bottom line: the inner bore diameter between the piston seal and cylinder boot is rusting. This is potentially due to lack of lubrication that would keep the piston lubed and displace any moisture.

Read on if you want the details.

Background:
Here is my original thread - http://www.toyota-4runner.org/maintenance-detailing/36979-front-brake-caliper-pad-replacement.html
I've spent over C$1000 over 5 years on 6 reman calipers. Ordered the OEM caliper seal kit (for entire 8 pistons) and 4 new pistons. Came in at U$85 plus a tube of brake grease and a can of brake cleaner. Ended up using all the boots and rings plus only 3 pistons and seals. I knew from my last check when doing my winter tire rotation that I was coming due for more caliper work with a tight piston.

I'm not sure of the condition or amount of the piston lube under the boot "as new" because I didn't look at this when I bought the truck or any time I put on a remanned caliper. I'm going to guess there isn't much lube there even though it calls for it in the FSM (but doesn't specify how much.) The past lessons learned of exercising the pistons by depressing them at each tire rotation plus more frequent brake fluid flushes weren't doing anything to prevent the stuck piston. I thought give it a shot this way and try to break the replacement cycle. The labour is free because I'm doing the wrenching. Working on the T4R is priceless.

FSM references:
 

Attachments

Last edited:
Register to hide this ad
Started by removing the wheels. Reattach 2 lug nuts to hold the rotor in place.
Remove the brake hardware and pads.
Remove all 4 of the cylinder boots (only my driver's side caliper had spring rings.)

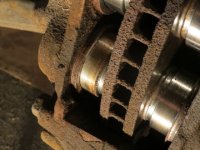
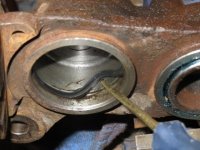
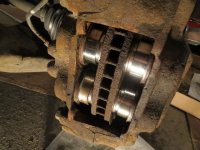
Pic 1: Depress the brake pedal to expand the pistons. DO NOT do this with the caliper removed from the rotor otherwise the pistons will pop completely out of the bores and you will be dealing with a massive brake fluid leak.

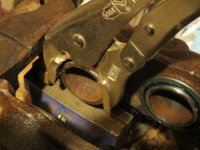
Pic 2: Close up. Notice the rust on the lower inner piston. This piston wasn't completely stuck but was hard to compress.
 

Attachments

  • T4R caliperrebuild1.JPG
    T4R caliperrebuild1.JPG
    108 KB · Views: 16,490
  • T4R caliperrebuild2.JPG
    T4R caliperrebuild2.JPG
    103.3 KB · Views: 12,474
Last edited:
Remove the caliper in order to work on it on the bench. Plug the end of the open brake line with some Glad/Saran wrap and an elastic to minimize brake fluid loss. There will be a lot of brake fluid that comes out of the caliper because all the pistons are extended.
Note: I was warned DO NOT seperate or open the caliper halves. It may be easier to work on the bores this way but you risk a leaking caliper when you put it back together because replacement O-rings aren't readily available.

I didn't remove all of the pistons. I cleaned, inspected and lubed each that was freely moving. Then I manually depressed each back into the bore. You can see how this looks with the right side piston in the first pic below.

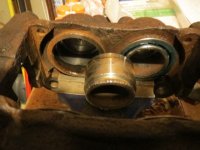
Pic 3: After doing the 3 easy pistons I worked on the lower inner one. What a PITA. This one wasn't even entirely frozen like the driver's side. Tried to use a vice grip to remove it. It was hard to budge and rotate. Ended up using a hammer and drift to knock it out by working my way around (sorry no pic of this.) Time and patience.

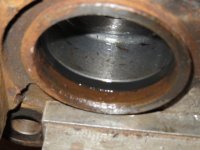
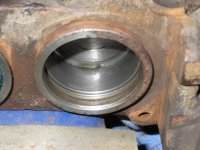
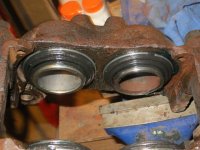
Pic 4: Shows the bore with the piston removed. The piston isn't badly corroded and the surface rust is easily removed but I didn't want to chance it and just used a new piston (plus I chewed up the top pretty good with the grips.)

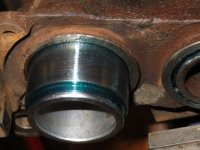
Pic 5: A close-up of the culprit. Notice the rust buildup on the inner bore that causes the diameter to close/decrease and "grab" the piston.
 

Attachments

  • T4R caliperrebuild3.JPG
    T4R caliperrebuild3.JPG
    92.7 KB · Views: 12,229
  • T4R caliperrebuild4.JPG
    T4R caliperrebuild4.JPG
    85.3 KB · Views: 12,865
  • T4R caliperrebuild5.JPG
    T4R caliperrebuild5.JPG
    77.4 KB · Views: 12,132
Last edited:
Pic 6: Removed the bore rust as best as possible with emery cloth. Did this with the old seal in place to keep as much junk as possible out of the groove.
Then remove the old seal.

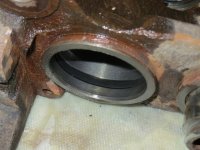
Pic 7: All cleaned up and ready for a new seal. Used liberal amount of lube on the seal.

Pic 8: Comparison with an unrusted bore that had a freely moving piston (pic taken later from driver's side caliper.)
 

Attachments

  • T4R caliperrebuild6.JPG
    T4R caliperrebuild6.JPG
    100.9 KB · Views: 21,319
  • T4R caliperrebuild7.JPG
    T4R caliperrebuild7.JPG
    97.6 KB · Views: 13,909
  • T4R caliperrebuild8.JPG
    T4R caliperrebuild8.JPG
    100.8 KB · Views: 12,012
Last edited:
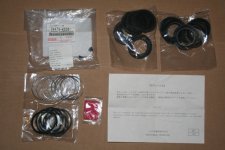
Pic 9: The OEM seal kit. It came with 2 sets of different styles of cylinder boots (see next pic.)

Pic 10: Note explaining cylinder boots. I wasn't able to get a good pic of the 2 styles but there are subtle differences. I decided to use what I assumed was the "new" style becasue it was different than the original boots. Who knows, this may help. It certainly can't hurt.

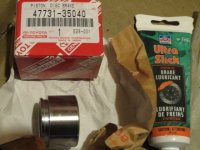
Pic 11: The OEM piston and the brake grease I used. There was a very small packet of Toyota pink grease in the kit. You can buy a larger tube of this but it's an arm & leg at the stealer. The PermaTex works. Be careful to use the right "lithium soap base glycol grease" that is compatible with the seals. DO NOT use white lithium grease.
 

Attachments

  • T4R caliperrebuild9.jpg
    T4R caliperrebuild9.jpg
    131.5 KB · Views: 12,150
  • T4R caliperrebuild10.jpg
    T4R caliperrebuild10.jpg
    94.8 KB · Views: 11,894
  • T4R caliperrebuild11.JPG
    T4R caliperrebuild11.JPG
    92.8 KB · Views: 13,315
Last edited:
Back to the rebuild.

Pic 12: A piston all lubed up before being inserted back into the bore.

Pic 13: New cylinder boots and spring rings attached. Used plenty of lube inside the boot to hopefully prevent moisture from getting in the joint. Caliper is ready to be reinstalled and then button everything back up.

On to the driver's side...
 

Attachments

  • T4R caliperrebuild12.JPG
    T4R caliperrebuild12.JPG
    104.6 KB · Views: 14,217
  • T4R caliperrebuild13.JPG
    T4R caliperrebuild13.JPG
    110.6 KB · Views: 12,457
Last edited:
Lesson learned:
You don't have to wait until you have an actual stuck piston. You might want to consider doing this on a remanned caliper before installing it.

This lubing can also be done with the caliper on the truck as follows:
Remove the pads and boots.
Extend the pistons by depressing the brake pedal.
Lube the pistons and depress them back into the bore but not all the way in. You might want to do one set and temporarily put a pad back in, then the other set because as you press a piston in it will want to extend the others out. You need to hold the pistons from wanting to extend back out.
Reinstall the boots and spring rings.
Reinstall the pad hardware.

I'll be doing this shortened method as an inspection and maintenance item in order to monitor the pistons. I'll keep you posted.

As mentioned, there was no visible amount of lube under the original (reman) boots after use. Hopefully by lubing the pistons, and more importantly the bore joint, it might be successful in preventing the bore rust.
 
Last edited:
Another good write-up. I might used this to service calipers every once in a while rather than wait for them to seize up and replace...

Thanks.
 
Found time for a short update to this thread due to my winter tire rotation.
I did my caliper check by extending and depressing the pistons (one set at a time multiplied by 4 sets.) It's only been since last spring but no stuck or dragging pistons yet.
I'll do another check and on-vehicle piston lube in the spring.
 
Found time for a short update to this thread due to my winter tire rotation.
I did my caliper check by extending and depressing the pistons (one set at a time multiplied by 4 sets.) It's only been since last spring but no stuck or dragging pistons yet.
I'll do another check and on-vehicle piston lube in the spring.

[MENTION=1300]Kmvreter[/MENTION] thanks for posting this and for the update, I'll be doing this preventive maintenance this spring when I overhaul my brake system.
couple quick questions I have...
1) is everything needed for this rebuild included in this kit shown except the piston and permatex or toyota lube?
2) When you reinstalled the front calipers to the hard lines did you need to replace any seals at this connection? if so, are these in the kit above as well?

thanks again, nate
 
Last edited:
[MENTION=1300]Kmvreter[/MENTION] thanks for posting this and for the update, I'll be doing this preventive maintenance this spring when I overhaul my brake system.
couple quick questions I have...
1) is everything needed for this rebuild included in this kit shown except the piston and permatex or toyota lube?
2) When you reinstalled the front calipers to the hard lines did you need to replace any seals at this connection? if so, are these in the kit above as well?

thanks again, nate

Answers:
1) Yes, that kit is everything needed (seals, boots, spring rings, bleeder covers) as shown above in picture 9 in post #5.
2) The brake line fitting screws back into the caliper without any replacement seal.

Keep us posted on your progress.
 
Lesson learned:
You don't have to wait until you have an actual stuck piston. You might want to consider doing this on a remanned caliper before installing it.

This lubing can also be done with the caliper on the truck as follows:
Remove the pads and boots.
Extend the pistons by depressing the brake pedal.
Lube the pistons and depress them back into the bore but not all the way in. You might want to do one set and temporarily put a pad back in, then the other set because as you press a piston in it will want to extend the others out. You need to hold the pistons from wanting to extend back out.
Reinstall the boots and spring rings.
Reinstall the pad hardware.

I'll be doing this shortened method as an ispection and maintenance item in order to monitor the pistons. I'll keep you posted.

As mentioned, there was no visible amount of lube under the original (reman) boots after use. Hopefully by lubing the pistons, and more importantly the bore joint, it might be successful in preventing the bore rust.

curious if I was to do this lubing as a maintenance would i need to replaced the boot and springs? Also, you just used the permatex caliper lube for the maintenance stuff? I dont currently have an issue but I was going to be installing stainless steel lines soon and painting my caliper so I want to service them while I am there. thanks
 
curious if I was to do this lubing as a maintenance would i need to replaced the boot and springs? Also, you just used the permatex caliper lube for the maintenance stuff? I dont currently have an issue but I was going to be installing stainless steel lines soon and painting my caliper so I want to service them while I am there. thanks

No, you would not need to replace the boots and springs as a maintenance item (I did because I bought the kit basically for the new piston seals.)
Yes, just used the Permatex lube.
Let us know how you make out.
 
It looks like RockAuto has similar rebuild kits and pistons. Since I'm not particularly impressed by the OEM build quality I'm pondering using those aftermarket parts. Anybody have thoughts about that?
 
I just wanted to warn anyone doing this that if you are not going to take out the pistons then the pictures in post #2 is too far concerning the amount that the piston can extend safely. at the point the piston is millimeters away from going out of the groove. More than likely the piston will leak and you will have a hard time pushing the piston back into the caliper. Stop just short of post #2's length.

Great writeup
 

Members online

Forum statistics

Threads
278,309
Messages
3,554,065
Members
248,016
Latest member
Advally Service

Trending content

Back
Top