sleepydad
Senior Member
A history of Toyota's from the past I have owned.
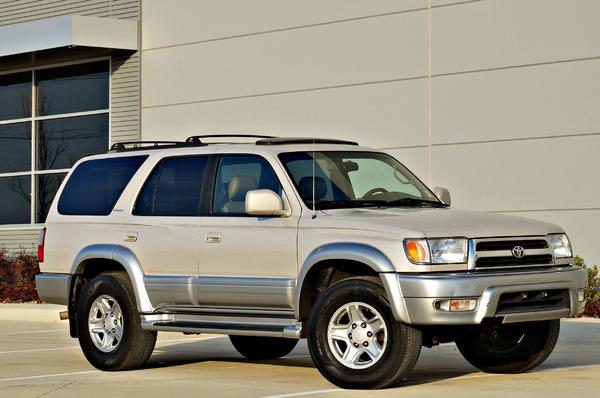
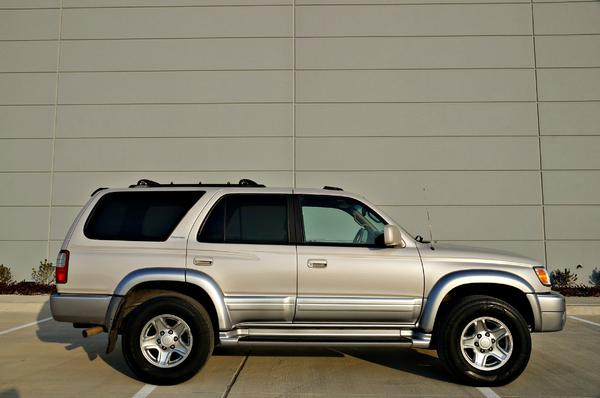
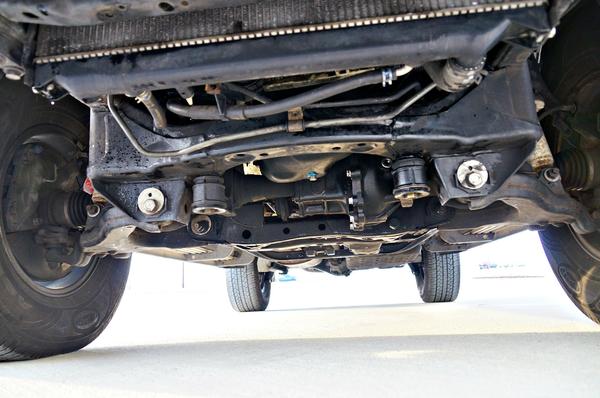
2017 purchased 2000 limited desert dune metallic, of EBAY in Dallas Forth Worth area, flew from MN to Dallas and drove it back to MN. 100% rust free and this truck will never ever be driven in the salt. EVER!
Maintenance
did Timing Belt Kit, and all that extra stuff... so much fun.
Timing belt, Koyo and NSK Idlers, Cam seals,Crank seal,Tensioner,Thermostat/Gasket,Serpentine Belts,Water pump/Gasket
https://www.amazon.com/gp/product/B00I0Z14AW/ref=oh_aui_detailpage_o03_s00?ie=UTF8&psc=1
also replaced the Radiator, hoses.
https://www.amazon.com/gp/product/B0096B9PC8/ref=oh_aui_detailpage_o05_s00?ie=UTF8&psc=1
did valve covers, plugs, pcv, 1/2 moons
https://www.amazon.com/gp/product/B00G52H7YE/ref=oh_aui_detailpage_o07_s00?ie=UTF8&psc=1
Tires and Rims
Body
<a href="!247329!http://www.toyota-4runner.org/3rd-gen-t4rs/247329-2000-limited-sleepydad-build.html#post2851199">Bumpers</a>
<a href="!247329!http://www.toyota-4runner.org/3rd-gen-t4rs/247329-2000-limited-sleepydad-build.html#post2851217">Replaced all the body mounts</a>
<a href="!m247329!http://www.toyota-4runner.org/3rd-gen-t4rs/247329-2000-limited-sleepydad-build-6.html#post3009686">Sport Hood fake Bulge club membership</a>
<a href="!m247329!http://www.toyota-4runner.org/3rd-gen-t4rs/247329-2000-limited-sleepydad-build-6.html#post3009697">Washer nozzle cool kid mod</a>
Mechanical/Drive Train
<a href="!247329!http://www.toyota-4runner.org/3rd-gen-t4rs/247329-2000-limited-sleepydad-build.html#post2851137">Everything starts with tires</a>
<a href="!247329!http://www.toyota-4runner.org/3rd-gen-t4rs/247329-2000-limited-sleepydad-build.html#post2851150">Suspension</a>
<a href="!m247329!http://www.toyota-4runner.org/3rd-gen-t4rs/247329-2000-limited-sleepydad-build-4.html#post2947641">Transfer Case gaskets and shift bushing</a>
Drive Train Front
<a href="!247329!http://www.toyota-4runner.org/3rd-gen-t4rs/247329-2000-limited-sleepydad-build.html#post2851201">1 st gen taco free wheel hub build</a>
<a href="!m247329!http://www.toyota-4runner.org/3rd-gen-t4rs/247329-2000-limited-sleepydad-build-3.html#post2896591">Front UCA and LCA bushing and painting</a>
SOLO motor sports LCA and SPC UCA
Duro Bumps
stock size napa rotors, calipers and pads
Drive Train Rear
<a href="!m247329!http://www.toyota-4runner.org/3rd-gen-t4rs/247329-2000-limited-sleepydad-build-2.html#post2851276">Rear Axles, bearing seals/ARB locker</a>
<a href="!m247329!http://www.toyota-4runner.org/3rd-gen-t4rs/247329-2000-limited-sleepydad-build-2.html#post2858239">Rear links</a>
<a href="!m247329!http://www.toyota-4runner.org/3rd-gen-t4rs/247329-2000-limited-sleepydad-build-2.html#post2866745">The Great Rear disc brake conversion</a>
<a href="!m247329!http://www.toyota-4runner.org/3rd-gen-t4rs/247329-2000-limited-sleepydad-build-2.html#post2868916">rear brake caliper mounting bracket design</a>
<a href="!m247329!http://www.toyota-4runner.org/3rd-gen-t4rs/247329-2000-limited-sleepydad-build-2.html#post2885174">rear brake lines</a>
Engine Aux
<a href="!m247329!http://www.toyota-4runner.org/3rd-gen-t4rs/247329-2000-limited-sleepydad-build-3.html#post2885537">Power Steering gaskets and lines</a>
<a href="!m247329!http://www.toyota-4runner.org/3rd-gen-t4rs/247329-2000-limited-sleepydad-build-3.html#post2896588">steering rack bushy bushy replacement</a>
<a href="!m247329!http://www.toyota-4runner.org/3rd-gen-t4rs/247329-2000-limited-sleepydad-build-3.html#post2924631">throttle cable replacement</a>
<a href="!m247329!http://www.toyota-4runner.org/3rd-gen-t4rs/247329-2000-limited-sleepydad-build-4.html#post2928246">Leaking oil dip stick fix</a>
<a href="!m247329!http://www.toyota-4runner.org/3rd-gen-t4rs/247329-2000-limited-sleepydad-build-2.html#post2858245">AC cluth was toast</a>
<a href="!p3263445!https://www.toyota-4runner.org/3263445-post123.html">LCE performance HIGH OUTPUT ALTERNATOR 160 AMP</a>
Engine Cooling
<a href="!247329!http://www.toyota-4runner.org/3rd-gen-t4rs/247329-2000-limited-sleepydad-build.html#post2851213">in series trans cooler - hayden Old has been updated new link below</a>
<a href="!p3297726!https://www.toyota-4runner.org/3297726-post145.html">hayden+derale thermostatic valve+custom lines</a>
<a href="!m247329!http://www.toyota-4runner.org/3rd-gen-t4rs/247329-2000-limited-sleepydad-build-2.html#post2885185">champion all aluminum CC1998</a>
Engine SuperCharger n exhaust
<a href="!m247329!http://www.toyota-4runner.org/3rd-gen-t4rs/247329-2000-limited-sleepydad-build-4.html#post2928255">Prep and install</a>
<a href="!m247329!http://www.toyota-4runner.org/3rd-gen-t4rs/247329-2000-limited-sleepydad-build-4.html#post2957439">TRD CatBack Exhaust System</a>
Engine
<a href="!m247329!http://www.toyota-4runner.org/3rd-gen-t4rs/247329-2000-limited-sleepydad-build-5.html#post2966183">Knock, Manifold, heater pipes, temp sensors... </a>
<a href="!m247329!http://www.toyota-4runner.org/3rd-gen-t4rs/247329-2000-limited-sleepydad-build-5.html#post2999653">2018 new engine - rebuild from yotashop</a>
Electrical
<a href="!247329!http://www.toyota-4runner.org/3rd-gen-t4rs/247329-2000-limited-sleepydad-build.html#post2851271">drivers side block assembly</a>
<a href="!m247329!http://www.toyota-4runner.org/3rd-gen-t4rs/247329-2000-limited-sleepydad-build-7.html#post3091606">Battery Terminal replacement</a>
Interior Bling
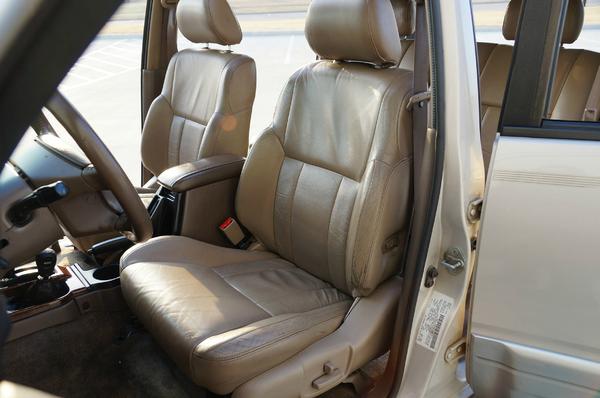
<a href="!247329!http://www.toyota-4runner.org/3rd-gen-t4rs/247329-2000-limited-sleepydad-build.html#post2851244">Front seats refurbish</a>
<a href="!247329!http://www.toyota-4runner.org/3rd-gen-t4rs/247329-2000-limited-sleepydad-build.html#post2851247">Head Liner refurbish</a>
<a href="!247329!http://www.toyota-4runner.org/3rd-gen-t4rs/247329-2000-limited-sleepydad-build.html#post2851263">Carpet</a>
<a href="!m247329!http://www.toyota-4runner.org/3rd-gen-t4rs/247329-2000-limited-sleepydad-build-2.html#post2860355">Back Door garnish</a>
<a href="!m247329!http://www.toyota-4runner.org/3rd-gen-t4rs/247329-2000-limited-sleepydad-build-4.html#post2954127">Back Door lift gate structs</a>
<a href="!m247329!http://www.toyota-4runner.org/3rd-gen-t4rs/247329-2000-limited-sleepydad-build-7.html#post3137306"><img border="0" alt="Steering wheel refurb" src="https://i.imgur.com/p3aPVsUt.jpg">
Interior Bling Stealing from Tacoma
<a href="!m247329!http://www.toyota-4runner.org/3rd-gen-t4rs/247329-2000-limited-sleepydad-build-4.html#post2940357">ram mount A pillar</a>
<a href="!m247329!http://www.toyota-4runner.org/3rd-gen-t4rs/247329-2000-limited-sleepydad-build-4.html#post2940370">door sill (scuff plate) fix</a>
Trip reports
MN
<a href="">Spider Lake Trails</a>
CO
UT
<a href="!p3263440!https://www.toyota-4runner.org/3263440-post121.html">2019 spring break trip</a>
Camping setup
<a href="!m247329!http://www.toyota-4runner.org/3rd-gen-t4rs/247329-2000-limited-sleepydad-build-8.html#post3149776">roof top tent loading and unloading</a>
1992 2nd Gen 30K miles sold to buy pickup. I will always regret selling this truck. good bye sweet prince.\
1996 T100 - 17 years and put 220K before MN salt ate the frame into multiple chunks.
2002 3rd gen black SR5 after 10 years sold this tuck last year with 150K miles because it was falling apart, again due to salt.2017 purchased 2000 limited desert dune metallic, of EBAY in Dallas Forth Worth area, flew from MN to Dallas and drove it back to MN. 100% rust free and this truck will never ever be driven in the salt. EVER!
Maintenance
did Timing Belt Kit, and all that extra stuff... so much fun.
Timing belt, Koyo and NSK Idlers, Cam seals,Crank seal,Tensioner,Thermostat/Gasket,Serpentine Belts,Water pump/Gasket
https://www.amazon.com/gp/product/B00I0Z14AW/ref=oh_aui_detailpage_o03_s00?ie=UTF8&psc=1
also replaced the Radiator, hoses.
https://www.amazon.com/gp/product/B0096B9PC8/ref=oh_aui_detailpage_o05_s00?ie=UTF8&psc=1
did valve covers, plugs, pcv, 1/2 moons
https://www.amazon.com/gp/product/B00G52H7YE/ref=oh_aui_detailpage_o07_s00?ie=UTF8&psc=1
Tires and Rims
Body
<a href="!247329!http://www.toyota-4runner.org/3rd-gen-t4rs/247329-2000-limited-sleepydad-build.html#post2851199">Bumpers</a>
<a href="!247329!http://www.toyota-4runner.org/3rd-gen-t4rs/247329-2000-limited-sleepydad-build.html#post2851217">Replaced all the body mounts</a>
<a href="!m247329!http://www.toyota-4runner.org/3rd-gen-t4rs/247329-2000-limited-sleepydad-build-6.html#post3009686">Sport Hood fake Bulge club membership</a>
<a href="!m247329!http://www.toyota-4runner.org/3rd-gen-t4rs/247329-2000-limited-sleepydad-build-6.html#post3009697">Washer nozzle cool kid mod</a>
Mechanical/Drive Train
<a href="!247329!http://www.toyota-4runner.org/3rd-gen-t4rs/247329-2000-limited-sleepydad-build.html#post2851137">Everything starts with tires</a>
<a href="!247329!http://www.toyota-4runner.org/3rd-gen-t4rs/247329-2000-limited-sleepydad-build.html#post2851150">Suspension</a>
<a href="!m247329!http://www.toyota-4runner.org/3rd-gen-t4rs/247329-2000-limited-sleepydad-build-4.html#post2947641">Transfer Case gaskets and shift bushing</a>
Drive Train Front
<a href="!247329!http://www.toyota-4runner.org/3rd-gen-t4rs/247329-2000-limited-sleepydad-build.html#post2851201">1 st gen taco free wheel hub build</a>
<a href="!m247329!http://www.toyota-4runner.org/3rd-gen-t4rs/247329-2000-limited-sleepydad-build-3.html#post2896591">Front UCA and LCA bushing and painting</a>
SOLO motor sports LCA and SPC UCA
Duro Bumps
stock size napa rotors, calipers and pads
Drive Train Rear
<a href="!m247329!http://www.toyota-4runner.org/3rd-gen-t4rs/247329-2000-limited-sleepydad-build-2.html#post2851276">Rear Axles, bearing seals/ARB locker</a>
<a href="!m247329!http://www.toyota-4runner.org/3rd-gen-t4rs/247329-2000-limited-sleepydad-build-2.html#post2858239">Rear links</a>
<a href="!m247329!http://www.toyota-4runner.org/3rd-gen-t4rs/247329-2000-limited-sleepydad-build-2.html#post2866745">The Great Rear disc brake conversion</a>
<a href="!m247329!http://www.toyota-4runner.org/3rd-gen-t4rs/247329-2000-limited-sleepydad-build-2.html#post2868916">rear brake caliper mounting bracket design</a>
<a href="!m247329!http://www.toyota-4runner.org/3rd-gen-t4rs/247329-2000-limited-sleepydad-build-2.html#post2885174">rear brake lines</a>
Engine Aux
<a href="!m247329!http://www.toyota-4runner.org/3rd-gen-t4rs/247329-2000-limited-sleepydad-build-3.html#post2885537">Power Steering gaskets and lines</a>
<a href="!m247329!http://www.toyota-4runner.org/3rd-gen-t4rs/247329-2000-limited-sleepydad-build-3.html#post2896588">steering rack bushy bushy replacement</a>
<a href="!m247329!http://www.toyota-4runner.org/3rd-gen-t4rs/247329-2000-limited-sleepydad-build-3.html#post2924631">throttle cable replacement</a>
<a href="!m247329!http://www.toyota-4runner.org/3rd-gen-t4rs/247329-2000-limited-sleepydad-build-4.html#post2928246">Leaking oil dip stick fix</a>
<a href="!m247329!http://www.toyota-4runner.org/3rd-gen-t4rs/247329-2000-limited-sleepydad-build-2.html#post2858245">AC cluth was toast</a>
<a href="!p3263445!https://www.toyota-4runner.org/3263445-post123.html">LCE performance HIGH OUTPUT ALTERNATOR 160 AMP</a>
Engine Cooling
<a href="!247329!http://www.toyota-4runner.org/3rd-gen-t4rs/247329-2000-limited-sleepydad-build.html#post2851213">in series trans cooler - hayden Old has been updated new link below</a>
<a href="!p3297726!https://www.toyota-4runner.org/3297726-post145.html">hayden+derale thermostatic valve+custom lines</a>
<a href="!m247329!http://www.toyota-4runner.org/3rd-gen-t4rs/247329-2000-limited-sleepydad-build-2.html#post2885185">champion all aluminum CC1998</a>
Engine SuperCharger n exhaust
<a href="!m247329!http://www.toyota-4runner.org/3rd-gen-t4rs/247329-2000-limited-sleepydad-build-4.html#post2928255">Prep and install</a>
<a href="!m247329!http://www.toyota-4runner.org/3rd-gen-t4rs/247329-2000-limited-sleepydad-build-4.html#post2957439">TRD CatBack Exhaust System</a>
Engine
<a href="!m247329!http://www.toyota-4runner.org/3rd-gen-t4rs/247329-2000-limited-sleepydad-build-5.html#post2966183">Knock, Manifold, heater pipes, temp sensors... </a>
<a href="!m247329!http://www.toyota-4runner.org/3rd-gen-t4rs/247329-2000-limited-sleepydad-build-5.html#post2999653">2018 new engine - rebuild from yotashop</a>
Electrical
<a href="!247329!http://www.toyota-4runner.org/3rd-gen-t4rs/247329-2000-limited-sleepydad-build.html#post2851271">drivers side block assembly</a>
<a href="!m247329!http://www.toyota-4runner.org/3rd-gen-t4rs/247329-2000-limited-sleepydad-build-7.html#post3091606">Battery Terminal replacement</a>
Interior Bling
<a href="!247329!http://www.toyota-4runner.org/3rd-gen-t4rs/247329-2000-limited-sleepydad-build.html#post2851244">Front seats refurbish</a>
<a href="!247329!http://www.toyota-4runner.org/3rd-gen-t4rs/247329-2000-limited-sleepydad-build.html#post2851247">Head Liner refurbish</a>
<a href="!247329!http://www.toyota-4runner.org/3rd-gen-t4rs/247329-2000-limited-sleepydad-build.html#post2851263">Carpet</a>
<a href="!m247329!http://www.toyota-4runner.org/3rd-gen-t4rs/247329-2000-limited-sleepydad-build-2.html#post2860355">Back Door garnish</a>
<a href="!m247329!http://www.toyota-4runner.org/3rd-gen-t4rs/247329-2000-limited-sleepydad-build-4.html#post2954127">Back Door lift gate structs</a>
<a href="!m247329!http://www.toyota-4runner.org/3rd-gen-t4rs/247329-2000-limited-sleepydad-build-7.html#post3137306"><img border="0" alt="Steering wheel refurb" src="https://i.imgur.com/p3aPVsUt.jpg">
Interior Bling Stealing from Tacoma
<a href="!m247329!http://www.toyota-4runner.org/3rd-gen-t4rs/247329-2000-limited-sleepydad-build-4.html#post2940357">ram mount A pillar</a>
<a href="!m247329!http://www.toyota-4runner.org/3rd-gen-t4rs/247329-2000-limited-sleepydad-build-4.html#post2940370">door sill (scuff plate) fix</a>
Trip reports
MN
<a href="">Spider Lake Trails</a>
CO
UT
<a href="!p3263440!https://www.toyota-4runner.org/3263440-post121.html">2019 spring break trip</a>
Camping setup
<a href="!m247329!http://www.toyota-4runner.org/3rd-gen-t4rs/247329-2000-limited-sleepydad-build-8.html#post3149776">roof top tent loading and unloading</a>
Last edited: