Warn M8000 and Shrockworks Bumper

All, just resurrecting my original thread. I still need to relocate my solenoid, however, my options are expanding as I'm beginning to second guess my thoughts on "needing" a dual battery setup. Mounting either inside the bumper or in the bay as a few others have seems to be a good option.

This won't happen anytime soon as there's too much fun to be had in the upcoming months!

Did you end up relocating the solenoid? I have a Shrockworks bumper and I just picked up an M8000-S winch. Thinking about that position next to the battery the way Ritchie did it...
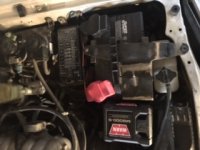
 
I did. Made a bracket for it And hung it off the battery. Let me know if you want more pics
 

Attachments

  • 544B37A4-146A-4ABE-8283-A671ACD00281.jpeg
    544B37A4-146A-4ABE-8283-A671ACD00281.jpeg
    28.8 KB · Views: 775
3RD GEN Shrockworks / Winch Control Mounting

I am so sorry! Passenger side!!!

32190659813_ae67a194ec_b.jpg

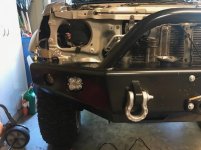
After A LOT of deliberation and being a bit annoyed like [MENTION=116467]Rock_Rat[/MENTION], I did the same as [MENTION=101060]Spunk[/MENTION]. I ultimately thought it was by far and away the better location to keep the engine area open enough for other options and make it easy to remove the bumper in one piece, but also a HUGE PITA to do.

The most effective way I found to make it fit was to install the bumper first and then remove the passenger headlight assembly. Once that was done I could drop the control pack into the bumper cavity behind the fog light and spin it into place. I may eventually do a full writeup, but only the next time I have to take the bumper off, here is the overview. There are some differences because I bought a VR8000, paid $300 new, so it was hard to skip.

  1. Clock the winch
  2. Remove the control pack from the winch
  3. Install the winch into the bumper
  4. Install the bumper (I don't see how you can mount the control pack in this area and accommodate the tight tolerances starting off the vehicle)
  5. Use 2-4 AWG to extend the length of the three control leads (Yellow/Blue/Green) from the control pack to the winch by about 8 inches BUT DO NOT reassemble the CP just yet, other than putting the plastic/metal case back on - leave the control leads off. Keep the original wires for the Big-4 upgrade if you want.
  6. 'Dry-fitting'
    • Remove the grill and the passenger headlight assembly
    • Using the Shrockworks solenoid bracket: back out the top bolt on the SW bumper bracket and mount the solenoid bracket loosely into the same void as the fog/turn lights. DO NOT TIGHTEN. I can't recall, but I think I had to open up the bracket mounting point for this to work.
    • Mount the control pack to the WARN mounting plate (designed for ZEON winches, WAR97890). M8000 may not have something like this so you may need to make your own. You will ultimately need to drill new mounting holes in this WARN plate to identify the final install location by whatever amount you need, but at $9 it was worth the $ to have something mostly right. This is where 'dry fitting' the assembly into the final mounting location is required to accommodate your setup.
    • This is the tricky bit. Drop the CP into the cavity between the windshield washer reservoir and the foglight and mostly blind spin it around until the CP remote port is facing the reservoir/radiator. This places the control socket in the most accessible location and puts the control leads closest to the mouse-hole (there is a large chase/mouse-hole in the front of the internal bumper support).
    • Be aware that the control leads will need room to flex to make it through the bumper's structure (mouse-hole). So don't tight fit this to the bracket. YOU MAY CHOOSE to reassemble the CP (install the control leads) to perform this fitting, but it only enhances the PITA status. I ultimately did this, but only after first gaining valuable insight without the leads installed, YMMV.
    • Once your good, mark-up/make a mental note of where you need to drill new holes in the CP plate and remove the kit from the bumper.
  7. Remove the CP from the WARN plate and drill your holes, or make your own bracket as you see fit. I JB welded some SS screws to the plate and used self-locking nuts to keep this in place during final tightening.
  8. Reassemble the CP if you haven't already, and mount it to the CP bracket. You can do final tightening for this assembly.
  9. Put everything back into place just like you had it and tighten down. To be very clear, apart from the CP plate being tight to the CP, EVERYTHING ELSE HAS TO BE KEPT LOOSE UNTIL YOU GET IT INTO PLACE. then while it's in the bumper, where you can't see anything, and operate mostly by feel tighten it all up... PITA.
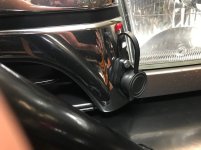
  10. I used the WARN remote socket extension kit (100154) to place the socket in a location the may very well be temporary. I drilled an install location into the lower driver's side grill. It lets me operate the winch from outside the vehicle or cab with the handheld. I'll also install hardwired in-cab controls later.

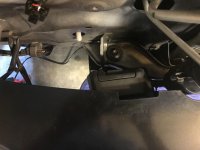
NOTE: In final assembled locations, the CP is rock solid and very square to the body. So this seems to work well and has held up so far. The image below shows the CP slightly ajar because I only have two hands and it is resting on the fog light and the body of the truck so I could take the photo. I did ultimately place a little Velcro fuzz on the radiator support below the CP where the CP could conceivably tap due to vibration. Also, when a full writeup does occur you may be able to do this installation without the bumper on the truck - or attempt it even without the writeup. But to get to this point required some exploratory poking around. If curious I ordered 1" shackle mounts from SW when I bought the bumper.
 

Attachments

  • IMG_1156.jpg
    IMG_1156.jpg
    62.7 KB · Views: 794
  • IMG_1153.jpg
    IMG_1153.jpg
    53.2 KB · Views: 865
  • IMG_1154.jpg
    IMG_1154.jpg
    128.9 KB · Views: 781
  • IMG_1418.jpg
    IMG_1418.jpg
    110.3 KB · Views: 817
Last edited:
(I still wish the fairlead hole was central though)

I did talk to Mark at SW about that. He can center the hole if you want, but it limits the number of winches you can use as most are offset due to the drive motor on the winch and the limited space to the internals of the bumper (structural gussets) — which makes perfect sense. Once I understood clearly why, my obsessive compulsive nature was able to let it go.
 
Last edited:
Not sure what the new solenoid packs are like.
The old 1990's unit, you could pull it apart and extend the wires to the in/out remote/wired plug.

So you could then mount the big box where ever it fit and 'extend' the wires to the most convient location for the plug.
With just some extra wire laying around the garage. (cheap)

Funny how the 4th gen is so different in the front.
The grill section is part of the hood and just moves out of the way when you pop the hood.
Can drop the winch right in, easy peasy.
I used to pull mine out in the summer just for the +.3mpg i would get.
Gave up after all the extra weight i have added killed the mpg gain.

Cut off the end of the rear coil inner bumps? After a Airlift1000 (airbags) install.
Makes a nice little cable stop for your winch line... for free. Rubber puck with hole.
 
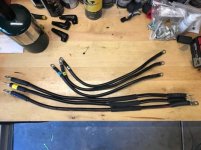
I had a local shop weigh in and they did an amazing job of fabricating a bracket for my controller as well as longer cables. Love the way this turned out.
d0a9e58c2f024f48fdd545a9cbde6a6f.jpg
734102989a3f3abf12afb0c993385201.jpg


Sent from my SM-G965U1 using Tapatalk
 
I relocated my control box with $5 worth of aluminum flat bar from Home Depot and a spare screw from the skid plate (the truck's body already had the hole pre-tapped). I also bought longer cable from a welding supply store to hook it all up.

20200617-121515.jpg

20200617-114754.jpg

20200617-121225.jpg
 

Members online

Forum statistics

Threads
278,312
Messages
3,554,085
Members
248,016
Latest member
Advally Service

Trending content

Back
Top