JZiggy's "Grown Up" 4Runner Build

Thanks Jordan,

I was under the impression that the stock 15" steel wheels would clear the 231 calipers, thus avoiding the clearance problems. If one of the stock wheels could be nominated as a new spare (assuming it fits in the spare cavity), I would have a new steel spare that would fit in any corner.

Wheel fitment with Tundra Brakes - YotaTech Forums

The stock steel wheels that came mounted on my 2002 4Runner will clear the 231mm Tundra calipers, but my stock spare steel wheel (black one) doesn't fit over the calipers.

Have you heard otherwise?

Of course, one downside to this approach is that it would be more difficult to sell the remaining three steel wheels if I poached one to be my new spare.

I'm liking the 199 option more now.

Scott
 
I went through the referenced thread and the various options for incorporating this feature, but they all seem to involve diodes. The schematic you drew has no diodes - did you do something different?

I ended up removing this turn signal mod and taking the wiring back to factory. The signal backfeed caused issues with my trailer light controller and some other little things. A different solution is required!
 
I was under the impression that the stock 15" steel wheels would clear the 231 calipers, thus avoiding the clearance problems. If one of the stock wheels could be nominated as a new spare (assuming it fits in the spare cavity), I would have a new steel spare that would fit in any corner.
Scott
I'm pretty sure they are talking about a stock 16" steelie. I can't think of a 15" wheel that would fit, but I don't know everything (or anything, whatever, heh).

Out of curiosity I did a quick google and found this site (the blurb about 4Runners only coming with 16s...no, but...):
Which Wheels/Rims Fit the Tundra Brake Upgrade (13WL 231mm rotors) on a Tacoma? (or 3rd gen 4Runner) – ADVENTURETACO
it has, pretty far down the page, has an interesting template to help one determine if the 231 is even a possibility with their rim.
 
Last edited:
Thanks for sharing that. At least for 2001, I thought the only steel option was the 15" wheels on the SR5 base model. I wasn't aware of a 16" steel wheel option.

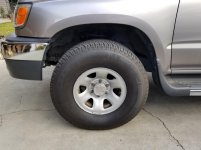
According to this brochure, the SR5 standard package included "P225/75R15 tires on 6-spoke 15” styled steel wheels"

https://www.top4runners.com/runhist/3rdgen/2001_4runner.pdf

Here's a picture of my wheels. The previous owner installed installed a set of 31x10.50R15s.

Maybe I'll have to try the template method to be sure.

Thanks,
Scott
 

Attachments

  • 20201224_144651_resized.jpg
    20201224_144651_resized.jpg
    83.9 KB · Views: 371
Slider covers work as intended. After a couple miles down dirt roads with some mud puddles we still have clean sides.

wQWtuO0.jpg


Lmhncq8.jpg
 
Those slider covers are pretty slick! Here's a thought if you want it though, you might want to drill small drain holes so water doesn't pool up when it rains/snows/gets washed etc.

Maybe it drains just fine though, I guess it depends on how tight all your tolerances are.

Keep up the good work!

I can't want for my door check rebuild kit to get here in two more months
 
Those slider covers are pretty slick! Here's a thought if you want it though, you might want to drill small drain holes so water doesn't pool up when it rains/snows/gets washed etc.

Maybe it drains just fine though, I guess it depends on how tight all your tolerances are.

Keep up the good work!

I can't want for my door check rebuild kit to get here in two more months

Thanks! I actually have drain slots cut on the center bends. The bend is spaced away from the slider with those felt tabs. Water drains out very readily!
 
Just a fun one I wanted to share from my Death Valley trip back in 2019. Timmy showed this footage in his recent Dec 2020 trip and I grabbed a screenshot. This was a 50 mile tow through Death Valley to Furnace Creek (nearest gas station) for a buddy's truck that had broken down. I'm not sure the 3RZ even quite forgave me for making it do that.

y7GRdro.png
 
Finally got a workable solution for the "side markers work as blinkers" need. I followed the writeups from [MENTION=5345]habanero[/MENTION] and others as a guide.

1/2" hole right about here

nx1UeAh.jpg


Had these sockets laying around. They are all rubber so I trimmed the twist-lock mechanism down to be a push-in barbed style.

hY9DXZC.jpg


Wired in parallel with the blinker bulb. Since the blinker still has an incandescent bulb the flasher circuit isn't confused by the LED. This LED is nice and bright white and shows up well.

j2qUkcw.jpg
 
Just a fun one I wanted to share from my Death Valley trip back in 2019. Timmy showed this footage in his recent Dec 2020 trip and I grabbed a screenshot. This was a 50 mile tow through Death Valley to Furnace Creek (nearest gas station) for a buddy's truck that had broken down. I'm not sure the 3RZ even quite forgave me for making it do that.

y7GRdro.png


I threw that into the video. I had it on my iPhone and captured this vid as you guys passed by. It was the worst of times, it was the best of times. but overall a good trip. I'm glad he broke down on the flat part of the drive.. pulling him through some of that terrain could have been a lot more "fun"


.
 
My driver's side switch panel had some cracked snaps from years of being leaned on. It was starting to creak and get annoying. I wanted to get a factory fresh plastic bezel and put the old switches in there since they are in fine shape.

I guess I used the wrong part number (74232-35190) cuz I got a wood trim version! I decided to just run it anyway to add a little class to my poor old base model.

9MWriOV.jpg
 
I have to ask if you have ever paid extra for the TBN number? How long do you run the oil?

Mobil 1 5w40 is good oil.....:cheer2:

Hey there! I ran a TBN once and was still at 5.5 after 5k miles. Since it decays at a decreasing rate I feel comfortable with up to 7.5k runs at least from a TBN perspective. I'm trying to "creep up" on longer oil change intervals with 7.5k being a good target.

Yes and the M1 is the turbo diesel truck oil. Definitely good stuff!
 
I finally drunk the kool aid and sprung for retrofits.

BX Built bi-LED kit, Apollo 2 shrouds, no other frills or rainbow sprinkles. Side note, BX has great customer service and a highly knowledgeable and engaged owner. I enjoyed doing business with them and they were super helpful. **3/7/23 Edit: shame that BX Built went out of business and screwed all the customers that were waiting for their retrofits. Also a bummer to know that if I have an issue with these I won't be able to warranty them :rain:

Previous setup was a basic headlight relay setup with Hella 100W bulbs in stock OEM housings. Better than stock lights but not that much better.

Started with some used OEM housings I bought on this forum. Using BX's guide I baked for about 20 min at 235F and the lenses pulled right off. I used a flat screwdriver to get it started but it hardly needed it.

TIP: Put the lens facing DOWN and pull the housing upward off of the lens. That way the extra butyl tape will hang downward and won't slop onto the chrome inside the housing... impossible to get it back off without taking the chrome plating with it.

TtB5L5S.jpg


I used a heat gun and small flat screwdriver to schlorp out the leftover butyl. Some of it was pretty crusty. That was by far the most tedious part of the process.

x55QZU1.jpg


Install into the buckets

RhWyAwF.jpg


Projectors installed with the lock nut pretty tight but not all the way. Use the biggest (H4) adapter washer in the kit. There are two others you don't need for other types of housings.

xQAK8HK.jpg


Install on truck. Project onto a flat surface and rotate the projectors until the cutoffs are parallel and level. Great time for shadow puppets. Once they're level take them off and tighten down the lock ring.

aVepyG4.jpg


VeovdgU.jpg


Time to put the shrouds on. The projector has these 5 little receivers for snapfit tabs on the shrouds

Huj1Xyi.jpg


mi9KpRY.jpg


BX says to put a little adhesive, so I put a dab of Hondabond in the receiver of each one. Snap the shroud into the place.

eG8RIhM.jpg


ctAMMqT.jpg


Chances are the force of install of the shrouds disrupted the leveling process from earlier. I'd suggest putting the shrouds on FIRST and then doing the leveling procedure.

Time to clean the housings and lenses before they get glued together. I found that the Sprayway glass cleaner worked great and did not take off the chrome. Where the butyl got on the housing I had to use some WD-40 which ended up taking the chrome with it. It's not that noticeable once it's all together, oh well.

The Morimoto RetroRubber in gray is a perfect match and worked well

EEeC5LM.jpg


The bead is pretty thick so I stretched it to about 1.5x its length before stuffing into the housing channel. I later learned even less would have done, so I suggest stretching to about 2x

vbWcQe7.jpg


Press the glass on while everything is cold and keep them squeezed together. These cheapo spring clamps from Harbor Freight worked great. I found if you took one vinyl sleeve off the metal end fit on the glass side very well.

lSQQHVi.jpg


Pop back in the oven at 235F for about 15-20 min. Morimoto says 270F but I went with BX's recommendation... lower temp is better.

Scrape the excess from where the clips go and pop the clips on. There was a good amount of squeezage both inside and outside -- a little too much butyl but not a problem.

QKhWcvg.jpg


5qwdaSn.jpg


l2K5Blo.jpg


Trim the excess butyl once it's cool or a little warm (too stick when hot) and reinstall into the buckets.

YDsDc6w.jpg


to be continued....
 
Last edited:

Members online

No members online now.

Forum statistics

Threads
278,306
Messages
3,554,045
Members
248,016
Latest member
Advally Service

Trending content

Back
Top