Convert your 4Runner to a comfy solo camper for about $250

L4Time

New member
Post 1/3

After reading many accounts of people using their 4Runners as mini-campers, I decided to give it a try. I’ve just gotten back from my second 3 night trip, and I am pleased as punch with the results.

For anyone else out there who has been curious about this, I thought I’d post a brief write up of how I did it and add a list of materials. You should be able to build something like this yourself in a few hours after work for less than $250. (However, if you don’t already have basic camping equipment such as sleeping bag/pad, stove, etc., (like me), you’ll need to buy all that stuff as well. That all added up to about another $500. I’ll add my final equipment list at the end.)

I happen to have a 2008 Sport, but my impression is that this approach may be a good option for newer 5th generation 4Runners, too.
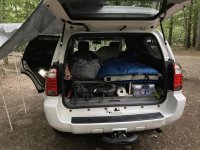
Photo Sep 13, 6 44 50 PM.jpg

Project Parameters

These days, I don’t have access to a garage or a collection of power tools, so I needed a solution that I could build using off-the-shelf components and hand tools. Since my 4Runner is also my daily driver, I also wanted to avoid any permanent modifications to the vehicle, and the camper elements had to be easy to store, install, and remove for last minute camping weekends.

So my priorities were:
1. Sleeping comfort for one adult
2. Privacy and security in campgrounds
3. Good ventilation
4. Inexpensive
5. Easy to install, remove and store
6. No major alterations to the vehicle
7. Light weight materials for MPG and ease of storage

Additional Notes:
1. This probably isn’t the best design if you are planning on doing serious overland camping, but I’m sure clever people can improve on it.
2. The end result is a small space. If you are claustrophobic, bigger than 6’/200lbs, or not very limber, this solution may not be for you.

Interior Components
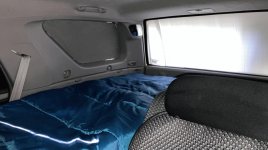
I decided to build the bunk space the same width as the larger of the two fold down rear seats, which is about 32” wide in my 2008 4th Gen. This promised a comfortably wide sleeping area, and I could use the folded seat to support the head of the bunk. I could also leave the other rear seat in place where it acts as a “living room” and entry point for the bunk.

Sleeping Platform
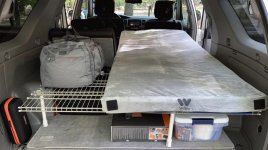
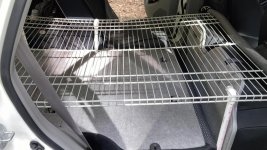
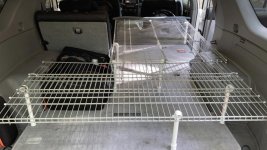
For this, I used standard ClosetMaid 48” x 16” wire shelf sections. When zip-tied together, and properly supported using 8” lengths of ½” PVC pipe, elbows and #12 hose clamps, they can form a remarkably strong and lightweight platform. I didn’t plan it this way, but I found that wire shelving sections have enough “give” to feel like a box spring, making the sleeping surface very comfortable.

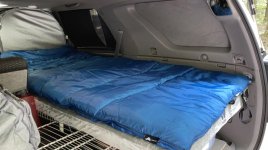
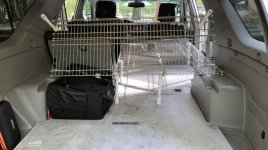
Two 4’ sections zip-tied back to back form the upper end of the bunk. Another 4’ section is attached crosswise to them spanning the cargo area to support the legs. One last section is added at the rear and loosely zip-tied to the spanning section to support the feet. This also allows the rear-most section to slide forward, and both spanning sections can be tipped up for access to the storage area underneath.

I placed a cheap 6’ yoga pad on the shelving section to protect a sleeping pad/air mattress from any sharp points. This would also be important as insulation under an air mattress. I opted for a more expensive 3” memory foam mattress, and I’m very glad I did.
IMG_3380.jpg
IMG_3385.jpg

This results in quite a lot of storage space under the platform.
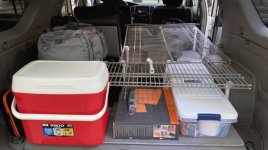
IMG_3387.jpg
IMG_3389.jpg
IMG_3391.jpg

The left rear seat becomes a useful and fairly spacious area with the drivers seat moved forward.
IMG_3392.jpg

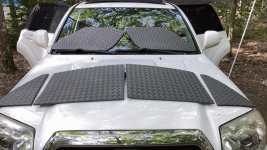
Adding a privacy screen up front, stick-up AAA lights and a rechargeable fan makes it comfy.
IMG_3393.jpg
 

Attachments

  • Photo Sep 13, 6 44 50 PM.jpg
    Photo Sep 13, 6 44 50 PM.jpg
    135.2 KB · Views: 14,887
  • IMG_3385.jpg
    IMG_3385.jpg
    135.9 KB · Views: 9,246
  • IMG_3387.jpg
    IMG_3387.jpg
    125 KB · Views: 9,419
  • IMG_3389.jpg
    IMG_3389.jpg
    140 KB · Views: 9,155
  • IMG_3391.jpg
    IMG_3391.jpg
    135.1 KB · Views: 11,575
  • IMG_3392.jpg
    IMG_3392.jpg
    130.5 KB · Views: 9,042
  • IMG_3393.jpg
    IMG_3393.jpg
    129.8 KB · Views: 9,544
  • IMG_3380.jpg
    IMG_3380.jpg
    140 KB · Views: 9,339
Register to hide this ad
Part 2/3

Privacy
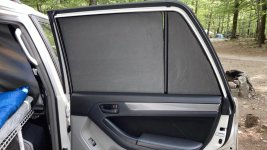
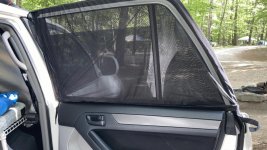
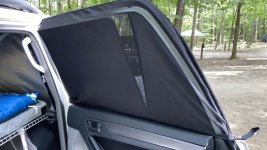
Finding a simple way to temporarily “black-out” the windows in the sleeping area was a challenge. For the side windows, I settled on using those EVS foam interlocking exercise mats and cutting them to fit snugly in the window frames. The result works beautifully- not only for privacy and keeping it dark, but also for thermal and sound insulation.

However this aspect took me the most time of the whole project. My advice is to find someone in your life who knows how to trace a pattern from the window shapes and transfer it to the foam mats. I can’t sew, upholster or make sails, so this was a challenge. The best tool I found was a rotary razor knife used to cut fabric or paper for scrap-booking. At least the windows are bilaterally symmetrical, so if you get one to fit nicely, you can just trace it out for the other side.

IMG_3395.jpg
IMG_3400.jpg
IMG_3402.jpg

For the back window, I decided not to use the EVS foam but opted for corrugated white plastic signage material. This can be popped into the window frame in three segments. It provides some insulation, but also makes it seem less cave-like inside. It does get bright in the morning, though, so be conscious of where the sun will rise when you park.
IMG_3408.jpg
 

Attachments

  • IMG_3395.jpg
    IMG_3395.jpg
    142 KB · Views: 8,982
  • IMG_3400.jpg
    IMG_3400.jpg
    135.3 KB · Views: 8,927
  • IMG_3402.jpg
    IMG_3402.jpg
    121.6 KB · Views: 10,181
  • IMG_3408.jpg
    IMG_3408.jpg
    115.7 KB · Views: 9,095
Nicely done! Very useful and temporary, can obviously be installed removed in a reasonable amount of time for the daily driver/occasional camper type.
 
Part 3/3

Ventilation and Exterior Components
I learned here from other people’s experiences that good ventilation is extremely important. My approach used simple off-the-shelf products that worked great. The rear door windows can be opened 3-4 inches under the screening, but the foam window inserts can tip back to allow airflow while maintaining privacy.
IMG_3394.jpg
IMG_3401.jpg

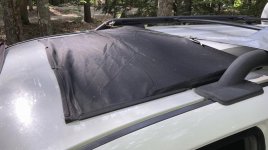
I also found a 40” x 26” magnetic sunroof screen that is a smidge too small but still usable. The small camping fan works wonders.
IMG_3403.jpg

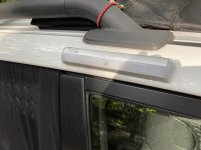
For a bit of added security, I added three battery powered motion sensing lights on the sides and rear. They attach magnetically and work great to illuminate the area around the truck. (If I’m ever locked inside at night and things look sketchy outside, I can climb into the driver seat from inside and bug out.)
Photo Sep 14, 4 04 05 PM.jpg
Photo Sep 12, 8 06 29 PM.jpg

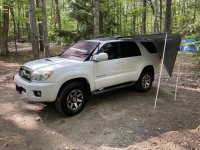
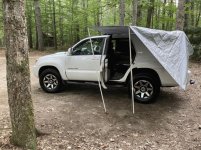
For a some exterior coverage from rain and sun, I used a 6’ x 8’ tarp bungied to the opposite roof rail and supported by six more 2’ x ½” PVC sections with couplers and hose barbs on top. (I plan to replace this with a white 6’ x 10’ or 12’ for more covered outside space and to keep the sun off the roof.) The windshield cover can keep some heat out, if need be, but I haven’t used it much.
Photo Sep 14, 3 50 17 PM.jpg
Photo Sep 13, 6 23 01 PM.jpg

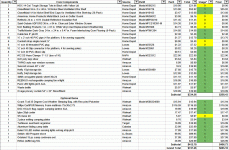
Below is my parts list, so far. (Items with a yellow “0” in the Usage column were things I bought, but ended up not using.) As you can see, I spent quite a bit prototyping, and I had to reacquire most of my camping gear, but overall this has turned out to be an inexpensive way to do some safe and comfortable weekend solo camping in my daily driver.

Thanks for reading all of this. Looking forward to hearing your suggestions!

Capture.GIF
 

Attachments

  • IMG_3394.jpg
    IMG_3394.jpg
    138 KB · Views: 8,874
  • IMG_3401.jpg
    IMG_3401.jpg
    136.4 KB · Views: 8,721
  • IMG_3403.jpg
    IMG_3403.jpg
    128 KB · Views: 8,807
  • Photo Sep 13, 6 23 01 PM.jpg
    Photo Sep 13, 6 23 01 PM.jpg
    144 KB · Views: 9,116
  • Photo Sep 14, 4 04 05 PM.jpg
    Photo Sep 14, 4 04 05 PM.jpg
    133.9 KB · Views: 8,919
  • Photo Sep 12, 8 06 29 PM.jpg
    Photo Sep 12, 8 06 29 PM.jpg
    107.8 KB · Views: 8,680
  • Photo Sep 14, 3 50 17 PM.jpg
    Photo Sep 14, 3 50 17 PM.jpg
    141 KB · Views: 8,941
  • Capture.GIF
    Capture.GIF
    91 KB · Views: 8,683
Last edited:
Just realized I forgot an important detail:

The support leg directly below the front passenger seat goes all the way to the floor. I don't have the exact length of the 1/2" PVC section handy, but I think it was about 22".

It's the one on the lower right in this pic:

IMG_3382.jpg
 

Attachments

  • IMG_3382.jpg
    IMG_3382.jpg
    141.2 KB · Views: 8,555
Very nice, and creative!

I did the same to my 2019 for my multi month camping adventure for 2020.

I ended up just doing a leveling platform with 2 pull put tables since i didn't want to raise the height of where i am sleeping being im almost 6' tall.

I already had all the camping equipment and had some scrap wood so it cost me almost nothing to make the leveling bed and table platform.

I started with just the sleeping side:

G5OFhpOl.jpg


And ended up doing a little longer one for the storage side:

esn3Jfyl.jpg


And fully set up for a rain storm:

76RukEIl.jpg


I absolutely love camping out of the back of my 4R, its perfect for camping:

OO48GEkl.jpg


aBhbXMGl.jpg
 
Last edited:
I opened and read this thread thinking it would be some trashy hack job and I was completely wrong. Nice write up and I really like your unique approach using the wire shelving.

Regarding your privacy foam, I have been looking at ways to add that when I leave a car at a trailhead and want to keep prying eyes out. The foam mats was a huge surprise to me. Nice work.
 
Thanks for the kind words, Randy! It was a fun project, and I'm getting a lot of camping in recently.

Yes, the foam inserts are working perfectly, and the amount of thermal insulation they provide is remarkable. I had difficulty in tracing and cutting them to fit well, but I'm sure others with different experience won't have a problem.

One other lesson learned is to use larger diameter PVC for some of the support legs and elbows. The 1/2" elbows can pop up between the wire grid if they aren't held in place with hose clamps.

I also switched to a 9' x 12' tarp for more exterior workspace, and found that Nite-Ize gear ties work great for securing it to my roof rack.
 
The foam window insert are brilliant. Thanks for the idea! I could see folks buying these as a finished product.
 
The foam window insert are brilliant. Thanks for the idea! I could see folks buying these as a finished product.


Thanks! If someone comes up with a better way to size and cut them, let us know.

Funny- selling these as an aftermarket item crossed my mind, too. I suppose if there are CAD drawings of all the variations of manufacture/model so that they could be cut on demand for many different vehicles, that might work.

I learned from another project that cutting PVC and similar materials using a laser isn't really feasible. It tends to destroy the laser for some reason. So they would need to be hand cut or shaped using some sort of die. Major machinery.

Maybe 3D printed? Can that even be done with flexible, foam-like materials?

Edit:

Actually, I guess this is just like a dress pattern. If the correct dimensions could be printed on large format paper, a set of those for any vehicle could be easily sold for people to trace on their own foam.

hmmm...

Toyota 4Runner (2009) 3D Model - 3D CAD Browser
 
Last edited:
Could you use close cell foam? Slightly oversized so it friction fits in place.

Again, great idea. I plan to make some over the winter.
 
i guess it just have the right amount of space, a place to sleep and you can drive it anywhere. it's not too big or too small in my opinion. if you needed more space, you can always install something on the roof for your extra luggage.

It's been great!

Is it just me or do these 4Runners have an aura of adventure and creativity that rubs off on its owners?
 
Post 1/3

After reading many accounts of people using their 4Runners as mini-campers, I decided to give it a try. I’ve just gotten back from my second 3 night trip, and I am pleased as punch with the results.

For anyone else out there who has been curious about this, I thought I’d post a brief write up of how I did it and add a list of materials. You should be able to build something like this yourself in a few hours after work for less than $250. (However, if you don’t already have basic camping equipment such as sleeping bag/pad, stove, etc., (like me), you’ll need to buy all that stuff as well. That all added up to about another $500. I’ll add my final equipment list at the end.)

I happen to have a 2008 Sport, but my impression is that this approach may be a good option for newer 5th generation 4Runners, too.

View attachment 387134

Project Parameters

These days, I don’t have access to a garage or a collection of power tools, so I needed a solution that I could build using off-the-shelf components and hand tools. Since my 4Runner is also my daily driver, I also wanted to avoid any permanent modifications to the vehicle, and the camper elements had to be easy to store, install, and remove for last minute camping weekends.

So my priorities were:
1. Sleeping comfort for one adult
2. Privacy and security in campgrounds
3. Good ventilation
4. Inexpensive
5. Easy to install, remove and store
6. No major alterations to the vehicle
7. Light weight materials for MPG and ease of storage

Additional Notes:
1. This probably isn’t the best design if you are planning on doing serious overland camping, but I’m sure clever people can improve on it.
2. The end result is a small space. If you are claustrophobic, bigger than 6’/200lbs, or not very limber, this solution may not be for you.

Interior Components
I decided to build the bunk space the same width as the larger of the two fold down rear seats, which is about 32” wide in my 2008 4th Gen. This promised a comfortably wide sleeping area, and I could use the folded seat to support the head of the bunk. I could also leave the other rear seat in place where it acts as a “living room” and entry point for the bunk.

Sleeping Platform
For this, I used standard ClosetMaid 48” x 16” wire shelf sections. When zip-tied together, and properly supported using 8” lengths of ½” PVC pipe, elbows and #12 hose clamps, they can form a remarkably strong and lightweight platform. I didn’t plan it this way, but I found that wire shelving sections have enough “give” to feel like a box spring, making the sleeping surface very comfortable.

Two 4’ sections zip-tied back to back form the upper end of the bunk. Another 4’ section is attached crosswise to them spanning the cargo area to support the legs. One last section is added at the rear and loosely zip-tied to the spanning section to support the feet. This also allows the rear-most section to slide forward, and both spanning sections can be tipped up for access to the storage area underneath.

I placed a cheap 6’ yoga pad on the shelving section to protect a sleeping pad/air mattress from any sharp points. This would also be important as insulation under an air mattress. I opted for a more expensive 3” memory foam mattress, and I’m very glad I did.

View attachment 387142
View attachment 387136

This results in quite a lot of storage space under the platform.
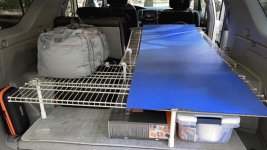
View attachment 387137
View attachment 387138
View attachment 387139

The left rear seat becomes a useful and fairly spacious area with the drivers seat moved forward.
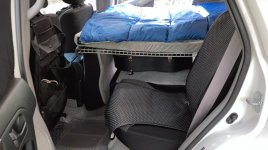
View attachment 387140

Adding a privacy screen up front, stick-up AAA lights and a rechargeable fan makes it comfy.
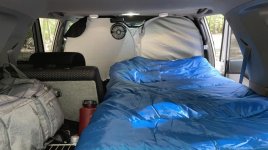
View attachment 387141
Good ideas here, I bought a portable awning from moonshade to compliment.
 
I was considering that, too. I decided to try the simple tarp solution first to see how it works out.

Plus I'm cheap! :D
 

Members online

Forum statistics

Threads
278,316
Messages
3,554,105
Members
248,016
Latest member
Advally Service

Trending content

Back
Top