thebrandon
New member
I thought I would post my experience purchasing online from CBI Off Road Fab, and the installation and overall impression of the new ditch light brackets I received. I'm not affiliated with them in any way.
Ordering online is a very important shopping experience for any business and its customers. The flow from beginning to end needs to be seamless and smooth and make sense. I felt the overall process was simple enough, and immediately after order received an email confirmation of my order. The next day I received shipping info and my tracking number.
You can buy the brackets here with the option to add lights and a switch - T4R3 Ditch Light Brackets | CBI Offroad Fab
One thing that did surprise me was the cost of shipping this tiny package. It was a couple cents shy of $16 for standard ground shipping. Not outrageous, but seemed a little much for such a tiny package in my opinion. I've shipped bigger and heavier things for less myself. Maybe I spoiled myself with Amazon Prime? The shipping speed was reasonable though. I believe I ordered these on a Thursday, received my shipping notification Friday, and the package was delivered the following Tuesday. I can definitely live with that.
The instructions on the website were very helpful. And can be found here - http://www.cbioffroadfab.com/wp-content/product-installs/t4r3-ditch-light-brackets.pdf
This is a pretty straight forward install, but I still thought it would be nice to glance over their suggestions. I was able to do the install without removing the cowling though, which saved a decent amount of time. I also did a different cut than they suggested. Both should work just fine.
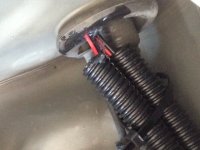
My cut. If I did their cut it would have taken a bit too much off towards the inside of the truck. My cut probably took a little too much off the backside, but it left room for the thick wires and insulation from the lights I chose.

Space behind the bracket with room for wires

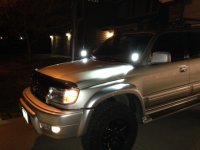
Here they are on the 4runner

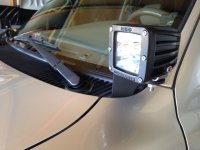
This is the only weird thing, but not something I can blame on the brackets at all. It's just one of those things to keep in mind if you are looking at getting these yourself. I couldn't find a way to adjust these at all to have the light clear the antenna, which means it might be time for a stubby antenna.

Overall I was happy with my order and the amount of time it took to receive it. The brackets are thick, and a quality made product and come painted ready to install with new hardware. You could probably rest a small child on these without them bending, so they would have no trouble holding up any light you decide to put on them. I would suggest these to anyone interest in a similar set up, even though there really aren't any other options out there for these.
Ordering online is a very important shopping experience for any business and its customers. The flow from beginning to end needs to be seamless and smooth and make sense. I felt the overall process was simple enough, and immediately after order received an email confirmation of my order. The next day I received shipping info and my tracking number.
You can buy the brackets here with the option to add lights and a switch - T4R3 Ditch Light Brackets | CBI Offroad Fab
One thing that did surprise me was the cost of shipping this tiny package. It was a couple cents shy of $16 for standard ground shipping. Not outrageous, but seemed a little much for such a tiny package in my opinion. I've shipped bigger and heavier things for less myself. Maybe I spoiled myself with Amazon Prime? The shipping speed was reasonable though. I believe I ordered these on a Thursday, received my shipping notification Friday, and the package was delivered the following Tuesday. I can definitely live with that.
The instructions on the website were very helpful. And can be found here - http://www.cbioffroadfab.com/wp-content/product-installs/t4r3-ditch-light-brackets.pdf
This is a pretty straight forward install, but I still thought it would be nice to glance over their suggestions. I was able to do the install without removing the cowling though, which saved a decent amount of time. I also did a different cut than they suggested. Both should work just fine.
My cut. If I did their cut it would have taken a bit too much off towards the inside of the truck. My cut probably took a little too much off the backside, but it left room for the thick wires and insulation from the lights I chose.
Space behind the bracket with room for wires
Here they are on the 4runner
This is the only weird thing, but not something I can blame on the brackets at all. It's just one of those things to keep in mind if you are looking at getting these yourself. I couldn't find a way to adjust these at all to have the light clear the antenna, which means it might be time for a stubby antenna.
Overall I was happy with my order and the amount of time it took to receive it. The brackets are thick, and a quality made product and come painted ready to install with new hardware. You could probably rest a small child on these without them bending, so they would have no trouble holding up any light you decide to put on them. I would suggest these to anyone interest in a similar set up, even though there really aren't any other options out there for these.


 . The cowling is a pretty soft plastic/rubber, so cutting it was very easy while it was still attached. once you have the fender pulled back you will see for yourself, there is plenty of room to work with. Just make sure you use something sharp and go SLOW so you don't cut too much or make a wrong cut, because then you may end up with a hack job or buying yourself a new cowling which defeats the purpose of not taking it off! A utility knife, or even a good steak knife should be good enough. Realigning everything was easy too. My truck was a little dirty, so seeing the lines on where the fender was when I unbolted it was simple enough to line it back up. If you are a little off you probably wont even notice it. These have a lot of room for error when putting it back together. It just depends on how pretty you want it to be
  .
.