 01-16-2021, 06:21 PM
|
#1
|
 |
Member
|
|
Join Date: Nov 2020
Location: Trinity Alps Wilderness
Age: 60
Posts: 151
Real Name: Doc
|
|
|
Member
Join Date: Nov 2020
Location: Trinity Alps Wilderness
Age: 60
Posts: 151
Real Name: Doc
|
Front Bump Stop - Relocation?
Well, today this rookie broke off a front bump stop bolt. The break occurred just inside the bolt well, without a sharp bolt edge sticking out. In other words, the old mounting plate is flush.
So my question is this:
Can the new bump stop be relocated to the original bump stop plate on the LCA, by drilling a new hole, threading it, and Loctiting it, so that the bump stop is aligned to hit against its prior bracket location? (I've mocked up the proposed new mounting point in the image below.)
If so, this would allow easier access to the front bump stops if changing them out later, as well as saving time trying to get the old bolt out.
What are your thoughts and concerns here?
Much obliged for your input!
__________________
Stock 2008 Driftwood V8 4WD Limited with X-REAS, est. late 2020. Build page to come...

|

|
 Reply With Quote Reply With Quote
|
|
01-16-2021, 06:52 PM
|
#2
|
|
Junior Member
|
|
Join Date: Mar 2017
Age: 51
Posts: 22
|
|
|
Junior Member
Join Date: Mar 2017
Age: 51
Posts: 22
|
I just used an air hammer with a punch and knocked the welded nut out of hole and just used a new nut and held it with wrench and tightened bolt down. Easy and quick
Sent from my iPhone using Tapatalk
|

|
Reply With Quote
|
|
01-16-2021, 07:03 PM
|
#3
|
 |
Senior Member
|
|
Join Date: May 2014
Location: Rio Rancho, New Mexico
Posts: 2,052
|
|
|
Senior Member
Join Date: May 2014
Location: Rio Rancho, New Mexico
Posts: 2,052
|
@ alia176
can point you to his solution
Sent from my SM-G986U using Tapatalk
|
|
|
Reply With Quote
|
|
01-16-2021, 07:35 PM
|
#4
|
|
Member
|
|
Join Date: Nov 2020
Location: Trinity Alps Wilderness
Age: 60
Posts: 151
Real Name: Doc
|
|
|
Member
Join Date: Nov 2020
Location: Trinity Alps Wilderness
Age: 60
Posts: 151
Real Name: Doc
|
Thanks, fellas.
Blue: You make that sound easy! A good hammer, duct tape, and bailing wire can save the day. 
Montijo: Thanks. I saw that thread from back in November, where rivnuts were discussed. But there wasn't a conclusion/solution at the end of it, other than the drilling and extraction that most threads on the subject entail.
Still, I'm curious about the location question, not having a lot of mechanical experience. Why are the bump stops mounted above and not on the LCA? Is it a matter of concern over tearing them off while offroading? Or maybe a matter of LCA integrity (although it has other holes)? Doesn't look like that location would impact the function of other hardware or lines under there. All thoughts on this welcome!
__________________
Stock 2008 Driftwood V8 4WD Limited with X-REAS, est. late 2020. Build page to come...
Last edited by Wild Thing; 01-16-2021 at 07:43 PM.
|
|
|
Reply With Quote
|
|
01-16-2021, 10:09 PM
|
#5
|
|
Senior Member
|
|
Join Date: May 2014
Location: Rio Rancho, New Mexico
Posts: 2,052
|
|
|
Senior Member
Join Date: May 2014
Location: Rio Rancho, New Mexico
Posts: 2,052
|
Quote:
Originally Posted by Wild Thing

Thanks, fellas.
Blue: You make that sound easy! A good hammer, duct tape, and bailing wire can save the day. 
Montijo: Thanks. I saw that thread from back in November, where rivnuts were discussed. But there wasn't a conclusion/solution at the end of it, other than the drilling and extraction that most threads on the subject entail.
Still, I'm curious about the location question, not having a lot of mechanical experience. Why are the bump stops mounted above and not on the LCA? Is it a matter of concern over tearing them off while offroading? Or maybe a matter of LCA integrity (although it has other holes)? Doesn't look like that location would impact the function of other hardware or lines under there. All thoughts on this welcome! |
He ended up drilling a hole above where the nut is welded that catches the bolt. Got the weld nut off and replaced with a regular nut.
Sent from my SM-G986U using Tapatalk
|
|
|
Reply With Quote
|
|
01-17-2021, 08:48 PM
|
#6
|
|
Senior Member
|
|
Join Date: Jan 2015
Location: East Mountains, NM
Posts: 1,211
|
|
|
Senior Member
Join Date: Jan 2015
Location: East Mountains, NM
Posts: 1,211
|
sorry, I'm late to the party. Spent few hours recovering a 3rd gen from the edge of a cliff yesterday and got home wiped out.
As was explained, I drilled a hole directly on top of where the broken bolt lives using a step bit. Once the hole was big enough, I used a pry bar to work the captive nut (with four sides) from its location. The captive nuts in our vehicles are usually spot welded on four sides so they're easy to knock lose with perseverance.
The last pic shows the placement of a socket.
__________________
2003 Sport V8 Icon 2" rear, Bilstein 6112 front with 700# king springs, Gibson cat back, Magnaflow cross pipe. OBA, DIY sliders, etc
1996 FZJ80 landcruiser with whole bunch of stuff, including a Turbo.
1997 4Runner SR5 - daughter's ride, slowly getting built up
Last edited by alia176; 01-18-2021 at 11:21 AM.
|
|
|
Reply With Quote
|
|
01-17-2021, 10:39 PM
|
#7
|
|
Member
|
|
Join Date: Nov 2020
Location: Trinity Alps Wilderness
Age: 60
Posts: 151
Real Name: Doc
|
|
|
Member
Join Date: Nov 2020
Location: Trinity Alps Wilderness
Age: 60
Posts: 151
Real Name: Doc
|
Thanks for your input, Alia. The description and photos give me a better idea of what the nut location looks like and what you did. It helps. I have a right-angle drill on order to give that a shot with an extractor before trying your method. Tried heating it with a torch and gettin' a center punch to the sheared bolt today, but the LCA gets in the way and would have to be detached. May end up finding the same thing with the drill.
Never a dull day!
__________________
Stock 2008 Driftwood V8 4WD Limited with X-REAS, est. late 2020. Build page to come...
Last edited by Wild Thing; 01-17-2021 at 10:50 PM.
|
|
|
Reply With Quote
|
|
01-18-2021, 11:20 AM
|
#8
|
|
Senior Member
|
|
Join Date: Jan 2015
Location: East Mountains, NM
Posts: 1,211
|
|
|
Senior Member
Join Date: Jan 2015
Location: East Mountains, NM
Posts: 1,211
|
You're welcome. I tried the same thing with a right angle pneumatic drill then moved on to the removal of the captive nut. Do soak that broken bolt with PB Blaster for a week so that it might turn easier.
If you do go the route of knocking out that captive nut, I'd think you can use a hammer and a round punch and smack it in the upward direction. Just whale on it until the captive nut breaks loose. This might be less frustrating than drilling out but that's just my opinion.
Good luck amigo.
__________________
2003 Sport V8 Icon 2" rear, Bilstein 6112 front with 700# king springs, Gibson cat back, Magnaflow cross pipe. OBA, DIY sliders, etc
1996 FZJ80 landcruiser with whole bunch of stuff, including a Turbo.
1997 4Runner SR5 - daughter's ride, slowly getting built up
|
|
|
Reply With Quote
|
|
01-18-2021, 12:33 PM
|
#9
|
|
Senior Member
|
|
Join Date: May 2014
Location: Rio Rancho, New Mexico
Posts: 2,052
|
|
|
Senior Member
Join Date: May 2014
Location: Rio Rancho, New Mexico
Posts: 2,052
|
Quote:
Originally Posted by alia176
sorry, I'm late to the party. Spent few hours recovering a 3rd gen from the edge of a cliff yesterday and got home wiped out.
|
I saw the photos on mud, holy smokes that must have been scary!
Sent from my SM-G986U using Tapatalk
|
|
|
Reply With Quote
|
|
02-11-2021, 07:43 PM
|
#10
|
|
Member
|
|
Join Date: Nov 2020
Location: Trinity Alps Wilderness
Age: 60
Posts: 151
Real Name: Doc
|
|
|
Member
Join Date: Nov 2020
Location: Trinity Alps Wilderness
Age: 60
Posts: 151
Real Name: Doc
|
Just a follow-up on this thread, with another question after some better news on the passenger side...
After breakin' off the driver side front bump stop bolt, the passenger side came out intact and fairly easy with PB Blaster and judicious elbow grease on the pipe wrench (see pic below). However, with the new Energy Suspension bump stop, there's no integral metal base plate on which to use a wrench to tighten it in. Just a bolt in the bottom of the rubber. Turning by hand, the new bolt would only make it halfway into the bracket before stopping. An attempt to turn it with channel locks felt pretty dicey - like I'd loosen the bolt within the new bump. Instead, I JB Welded a stack of leftover washers together to create a redneck spacer, applied liberal Loctite to the bolt threads, and tightened it in by hand (see image below). We'll see how she holds up. 
Now, back to the drivers side broken front bump stop bolt... To access the broken bolt in the bump stop bracket, I raised the front of the rig and dropped the lower control arm as far as it would go while still connected. But a new right angle drill with bit still will not fit between the LCA and the broken bolt. I can drill it out easily (based on a recent rear bump stop bolt), but need the bit to be in line with the bolt. So, being a rookie, my question is this:
What's the simplest way to lower the LCA to give me more room for the drill and bit? Would "simply" removing the two 19mm balljoint bolts on the bottom of the knuckle assembly be enough to give me another inch or two of droop? Or would I need to remove the bottom shock bolt as well?
Much obliged for you input!

__________________
Stock 2008 Driftwood V8 4WD Limited with X-REAS, est. late 2020. Build page to come...
Last edited by Wild Thing; 02-11-2021 at 08:49 PM.
|
|
|
Reply With Quote
|
|
02-11-2021, 09:21 PM
|
#11
|
 |
Senior Member
|
|
Join Date: Sep 2019
Location: Lafayette, IN
Posts: 1,032
|
|
|
Senior Member
Join Date: Sep 2019
Location: Lafayette, IN
Posts: 1,032
|
Quote:
Originally Posted by Wild Thing
Just a follow-up on this thread, with another question after some better news on the passenger side...
After breakin' off the driver side front bump stop bolt, the passenger side came out intact and fairly easy with PB Blaster and judicious elbow grease on the pipe wrench (see pic below). However, with the new Energy Suspension bump stop, there's no integral metal base plate on which to use a wrench to tighten it in. Just a bolt in the bottom of the rubber. Turning by hand, the new bolt would only make it halfway into the bracket before stopping. An attempt to turn it with channel locks felt pretty dicey - like I'd loosen the bolt within the new bump. Instead, I JB Welded a stack of leftover washers together to create a redneck spacer, applied liberal Loctite to the bolt threads, and tightened it in by hand (see image below). We'll see how she holds up.
Now, back to the drivers side broken front bump stop bolt... To access the broken bolt in the bump stop bracket, I raised the front of the rig and dropped the lower control arm as far as it would go while still connected. But a new right angle drill with bit still will not fit between the LCA and the broken bolt. I can drill it out easily (based on a recent rear bump stop bolt), but need the bit to be in line with the bolt. So, being a rookie, my question is this:
What's the simplest way to lower the LCA to give me more room for the drill and bit? Would "simply" removing the two 19mm balljoint bolts on the bottom of the knuckle assembly be enough to give me another inch or two of droop? Or would I need to remove the bottom shock bolt as well?
Much obliged for you input!
|
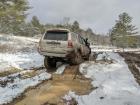
I'm trying to remember how far the LCA will swing down without much extra effort haha. To get it to swing lower, you would definitely need to remove the two 19mm ball joint bracket bolts and the 19mm on the lower shock mount. Mine is pretty crusty, not sure how much yours is, and I had no problem with any of these bolts. Thankfully they're nice and chunky. From there, it should come down further, but may have to press against bushings wanting to come up. Shouldn't really be a problem for a quick drill I think
This is mine with one side of one cam cut out and how far I had it down. Hopefully this will give you an idea of about how far it will come down when unbolted from spindle

|
|
|
Reply With Quote
|
|
02-11-2021, 09:32 PM
|
#12
|
|
Member
|
|
Join Date: Nov 2020
Location: Trinity Alps Wilderness
Age: 60
Posts: 151
Real Name: Doc
|
|
|
Member
Join Date: Nov 2020
Location: Trinity Alps Wilderness
Age: 60
Posts: 151
Real Name: Doc
|
That's a real helpful picture. Thanks, Y. That much droop should be just enough to allow the bit to enter the bolt vertically. Then it's just steppin' up the bit size incrementally. Good deal! 
Quote:
Originally Posted by y=mx+b
I'm trying to remember how far the LCA will swing down without much extra effort haha. To get it to swing lower, you would definitely need to remove the two 19mm ball joint bracket bolts and the 19mm on the lower shock mount. Mine is pretty crusty, not sure how much yours is, and I had no problem with any of these bolts. Thankfully they're nice and chunky. From there, it should come down further, but may have to press against bushings wanting to come up. Shouldn't really be a problem for a quick drill I think
This is mine with one side of one cam cut out and how far I had it down. Hopefully this will give you an idea of about how far it will come down when unbolted from spindle
|
__________________
Stock 2008 Driftwood V8 4WD Limited with X-REAS, est. late 2020. Build page to come...
|
|
|
Reply With Quote
|
|
02-11-2021, 09:35 PM
|
#13
|
|
Senior Member
|
|
Join Date: Sep 2019
Location: Lafayette, IN
Posts: 1,032
|
|
|
Senior Member
Join Date: Sep 2019
Location: Lafayette, IN
Posts: 1,032
|
Quote:
Originally Posted by Wild Thing
That's a real helpful picture. Thanks, Y. That much droop should be just enough to allow the bit to enter the bolt vertically. Then it's just steppin' up the bit size incrementally. Good deal! |
No problem, I've got a zillion pictures for all my projects for this reason haha. I'm not the greatest explainer, but pics the tell a lot!
|
|
|
Reply With Quote
|
|
02-12-2021, 10:16 AM
|
#14
|
|
Member
|
|
Join Date: Aug 2020
Posts: 53
|
|
|
Member
Join Date: Aug 2020
Posts: 53
|
FWIW, when I recently did my suspension, removing the lower shock bolt and the 2 19mm around the lower ball joint allowed me to get that LCA almost perfectly vertical - so plenty of space.
|
|
|
Reply With Quote
|
 Posting Rules
|
You may not post new threads
You may not post replies
You may not post attachments
You may not edit your posts
HTML code is On
|
|
|
|


 Linear Mode


