4RExplorer
New member
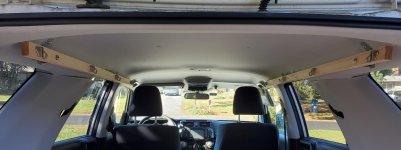
I found some really nice stainless steel coat hooks that have spring-loaded levers that close off the hook opening, like carabiners. So I got 8 of these hooks and made two oak rails to mount them to, along with some brackets to mount the rails above the windows on each side of the vehicle. Each oak rail goes approximately from the B-pillar to 8" forward of the rear hatch. These 8 hooks will support a net to store light things up against the headliner.
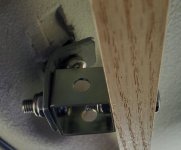
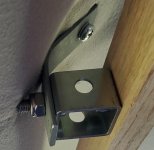
Each bracket consists of a bent part that bolts to the 4Runner body, and a square part that bolts to the oak rail.
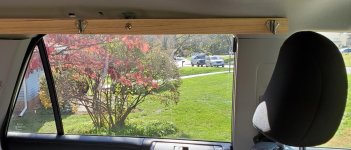
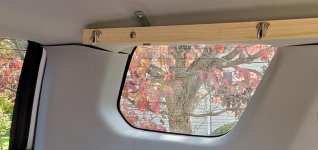
Pictures below: from the open rear hatch; front part of the driver's side rail; rear part of the driver's side rail; close-up of the front bracket; close-up of the rear bracket. To get the rail level, the bent part of the rear bracket is longer than the bent part of the front bracket.
Some specs and construction details:
Each oak rail is 3/4" x 1 1/2" x 60", and there are 4 hooks per rail, spaced 19" apart. The rails are about 37" apart at the rear and 40" apart at the front.
In each bracket, the bent part is 1/8" thick mild steel, and the square part is cut from 1 1/4" x 1 1/4" square steel tubing pre-punched with holes. Steel bar and punched steel tubing are from Home Depot.
All purchased bolts were Phillips drive, panhead M8 x 1.25 stainless steel, with matching nylon insert lock nuts. 35mm bolts were used to attach the oak rails to the square parts of the brackets. 20mm bolts were used to attach the square part to the bent part of each bracket.
In the rear brackets, OEM bolts were used to attach the bent part of the bracket to the OEM welded nut in the 4Runner body. In the front brackets, 20mm bolts were used to attach the bent part to the M8 x 1.25 nut installed here:
https://www.toyota-4runner.org/5th-gen-t4rs/301277-threaded-nut-above-2nd-row-windows.html
The 1 1/4" x 1 1/4" square steel tubing is of ideal dimension. It holds the oak rail far enough away from the curved headliner that a 5' run of oak rail will fit, except that I had to shave off some of the front corner (near the B-pillar) with a plane and rasp. (If the oak rails are attached directly to the bent part of the brackets, omitting the square parts entirely, then the rail has to be shortened to maybe 4' or less to fit, due to the curvature of the headliner.) The pre-punched holes in the square tubing are big enough for the M8 bolts and also for the screwdriver needed to drive them. The opening of the square tubing is just big enough for a wrench to hold an M8 nut inside the square part when bolting the oak rail to it. The opening is also big enough to allow a Phillips screwdriver to go in from below to secure the front bracket to the 4Runner body.
Each bracket consists of a bent part that bolts to the 4Runner body, and a square part that bolts to the oak rail.
Pictures below: from the open rear hatch; front part of the driver's side rail; rear part of the driver's side rail; close-up of the front bracket; close-up of the rear bracket. To get the rail level, the bent part of the rear bracket is longer than the bent part of the front bracket.
Some specs and construction details:
Each oak rail is 3/4" x 1 1/2" x 60", and there are 4 hooks per rail, spaced 19" apart. The rails are about 37" apart at the rear and 40" apart at the front.
In each bracket, the bent part is 1/8" thick mild steel, and the square part is cut from 1 1/4" x 1 1/4" square steel tubing pre-punched with holes. Steel bar and punched steel tubing are from Home Depot.
All purchased bolts were Phillips drive, panhead M8 x 1.25 stainless steel, with matching nylon insert lock nuts. 35mm bolts were used to attach the oak rails to the square parts of the brackets. 20mm bolts were used to attach the square part to the bent part of each bracket.
In the rear brackets, OEM bolts were used to attach the bent part of the bracket to the OEM welded nut in the 4Runner body. In the front brackets, 20mm bolts were used to attach the bent part to the M8 x 1.25 nut installed here:
https://www.toyota-4runner.org/5th-gen-t4rs/301277-threaded-nut-above-2nd-row-windows.html
The 1 1/4" x 1 1/4" square steel tubing is of ideal dimension. It holds the oak rail far enough away from the curved headliner that a 5' run of oak rail will fit, except that I had to shave off some of the front corner (near the B-pillar) with a plane and rasp. (If the oak rails are attached directly to the bent part of the brackets, omitting the square parts entirely, then the rail has to be shortened to maybe 4' or less to fit, due to the curvature of the headliner.) The pre-punched holes in the square tubing are big enough for the M8 bolts and also for the screwdriver needed to drive them. The opening of the square tubing is just big enough for a wrench to hold an M8 nut inside the square part when bolting the oak rail to it. The opening is also big enough to allow a Phillips screwdriver to go in from below to secure the front bracket to the 4Runner body.