2" Toytec Body Lift Installation

mtbtim

Elite Member
Hey Dudes,
[MENTION=102606]infamousRNR[/MENTION] and I have a new video for you. We installed a 2" Toytec Body Lift for [MENTION=146244]phokingchink[/MENTION]. It's a long one, but if you want to know exactly what you need to do to be successful installing your body lift on your 3rd Gen, it's worth sitting through the whole thing. Plus, it's entertaining, soooooooooooo
Sit Back and Relax and Enjoy the Show!

Peace out,
Timmy the Toolman

<iframe width="560" height="315" src="https://www.youtube.com/embed/B9tD2iRlF7Y" frameborder="0" allowfullscreen></iframe>
 
Register to hide this ad
NICE work! Might be worth mentioning that the front bumper stays in the same place after a body lift leaving you with a beautiful 2" gap between body and front bumper. On my 1" I was able to drill new holes in the brackets to close the gap, but I don't think that would work with a 2 incher. That's what she said.
 
NICE work! Might be worth mentioning that the front bumper stays in the same place after a body lift leaving you with a beautiful 2" gap between body and front bumper. On my 1" I was able to drill new holes in the brackets to close the gap, but I don't think that would work with a 2 incher. That's what she said.

Good point Fred. I'll make mention of that in the video description.
 
Last edited:
.... On my 1" I was able to drill new holes in the brackets to close the gap, but I don't think that would work with a 2 incher. That's what she said.


Before.. beautiful 2" body gap

2dc06e1e1891c7984acbb83f77aa8df1.jpg


Drilled new holes in front brackets

3b9844a679459fa347df262aa08e80eb.jpg


7cf0b6d963ece6450a0118db02f4aeb5.jpg


Side relocation brackets

94d3c51e2d99e1758ba23591a3a25b62.jpg


c17eeeb5d1f7f5a3ae2386298fa9bacb.jpg


Bad quality pic but after the new holes and brackets

c5c8ee3de07006c39ad879deee466dc9.jpg
 
Nice video. Just fyi about lowering the radiator, if you bend the tab on the radiator out of the way and use the drop brackets, the studs on the drop bracket will fit through the original holes on the body. What I did was lightly tighten the drop brackets to the radiator so that I could swivel the brackets on the radiator until the studs lined up with the radiator holes on the body. Once I had the studs lined up with the radiator holes on the body, I tightened the brackets on the radiator so it was secure.
 
Nice video. Just fyi about lowering the radiator, if you bend the tab on the radiator out of the way and use the drop brackets, the studs on the drop bracket will fit through the original holes on the body. What I did was lightly tighten the drop brackets to the radiator so that I could swivel the brackets on the radiator until the studs lined up with the radiator holes on the body. Once I had the studs lined up with the radiator holes on the body, I tightened the brackets on the radiator so it was secure.

But, that's just for securing the upper part of the radiator. The instructions Toytec gives for this part of the lift is pretty poor and I had a conversation with them regarding it and I was assured they were going to rewrite the instructions and include pictures where the drop brackets go.

What we did with utilizing one of the existing holes in the body for the tabs to fit through accomplishes the same thing the drop brackets do. My biggest gripe about the Toytec instructions is there isn't any notation that you might be forced to drill in order to properly secure the bottom part of the radiator. If you don't secure the bottom of the radiator, it's going to flop around and cause damage over time. [MENTION=116877]fourfive[/MENTION], how did you secure the lower part of your radiator? Since none of the existing body holes would work for securing the bottom of the radiator, I saw no choice but to drill holes through the body and the radiator bracket and use a couple small bolts and nuts to secure it.
 
how did you secure the lower part of your radiator? Since none of the existing body holes would work for securing the bottom of the radiator, I saw no choice but to drill holes through the body and the radiator bracket and use a couple small bolts and nuts to secure it.

I loosely installed the bracket onto the lower part of the radiator so that I could get the stud on the bracket to line up with the mounting hole on the body. Once the stud was lined up with the lower mounting hole on the body, I tightened the bracket onto the radiator so it was secure. Then I secured the stud to the body. I did the same thing on the top mounting points.

I agree that the instructions for installing the radiator drop brackets weren't very clear. I spent about 30min just staring at my radiator and drop brackets trying to figure out how to get everything installed.


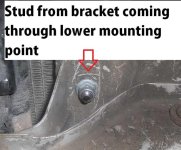
Not my picture but the red arrow is pointing to the stud on the bracket where it comes through the lower mounting point on the body.
radiator drop.jpg


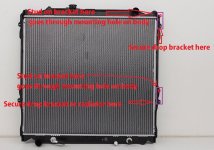
Picture of how my drop brackets are positioned on my radiator and the orientation of the studs on the bracket.
radiator.jpg
 

Attachments

  • radiator drop.jpg
    radiator drop.jpg
    54.5 KB · Views: 3,582
  • radiator.jpg
    radiator.jpg
    135.8 KB · Views: 3,469
I loosely installed the bracket onto the lower part of the radiator so that I could get the stud on the bracket to line up with the mounting hole on the body. Once the stud was lined up with the lower mounting hole on the body, I tightened the bracket onto the radiator so it was secure. Then I secured the stud to the body. I did the same thing on the top mounting points.

I agree that the instructions for installing the radiator drop brackets weren't very clear. I spent about 30min just staring at my radiator and drop brackets trying to figure out how to get everything installed.


Not my picture but the red arrow is pointing to the stud on the bracket where it comes through the lower mounting point on the body.
View attachment 234187


Picture of how my drop brackets are positioned on my radiator and the orientation of the studs on the bracket.
View attachment 234189

Ok, are you saying Toytec sent 4 mounting brackets. The kit Eric got only had 2 brackets. This is why we were so confused as to how you properly secure the radiator with only 2 brackets.
 
Wow! Another fantastic video Tim! You guys do a great job filming and describing what you are doing, and what tools you are using. These videos really go a long way to make someone who might be very new to turning wrenches, like myself, lol, the confidence to try to work on their vehicles. Thanks again for making the extra effort to document this work. I have seen a fair amount of videos that do a pretty good job, but then get to a technical part or something difficult, and the next thing you see is the finished product. Like..

-Step one
-Step two
-intentionally left black
-something happens
-Profit!

But I dig how you take your time and talk through it A to Z. Well done.
 
The 4Crawler kits come with Bumper lift brackets, and steering column extensions.

I didn't bother with the radiator drop, as I have an electric fan anyway.
 
Ok, are you saying Toytec sent 4 mounting brackets. The kit Eric got only had 2 brackets. This is why we were so confused as to how you properly secure the radiator with only 2 brackets.

I got mine through 4crawler but the radiator drop brackets are ordered separately as an option for the very reason you mentioned in your video about there being another set of factory holes 2" lower. But yes when I ordered the drop brackets I had 4 brackets come in. However, I initially just used 2 brackets on the lower mounting points so I didn't have to bend the radiator tab out of the way. After I had my radiator lowered only using 2 of the brackets on the lower mounting points I was looking at the 2 extra drop brackets I had and thought, well since I have them.... So I ended up installing them on top also.
 
I got mine through 4crawler but the radiator drop brackets are ordered separately as an option for the very reason you mentioned in your video about there being another set of factory holes 2" lower. But yes when I ordered the drop brackets I had 4 brackets come in. However, I initially just used 2 brackets on the lower mounting points so I didn't have to bend the radiator tab out of the way. After I had my radiator lowered only using 2 of the brackets on the lower mounting points I was looking at the 2 extra drop brackets I had and thought, well since I have them.... So I ended up installing them on top also.

Once we came up with the solution for the top bracket mounts without having to bend the radiator bracket tabs out of the way by using the existing holes in the body, Sean actually mentioned using the 2 drop brackets we hadn't used yet in the fashion you describe. What I didn't like about this option, is the upper part of the radiator bracket would be sucked against the body in the normal OEM fashion but the bottom would now have a bolt head between the radiator bracket and the body. Maybe I was being too anal, but I didn't like that option of having the radiator pushed out a little due to now having a bolt head between the radiator bracket and the body. Drilling took more time, but I like the fact that the radiator is sucked against the body just like it was before the body lift.

Thanks for the responses and the pictures showing how we were suppose to use the drop brackets. I can't remember the name of the guy I spoke with at Toytec, but I sure hope he follows through with revising the instructions giving a much better description of what you're suppose to do and provides plenty of pictures so people aren't left scratching their head on how they're suppose to accomplish it. And, they probably should send 4 drop brackets and instead of 2.
 
Last edited:
Wow! Another fantastic video Tim! You guys do a great job filming and describing what you are doing, and what tools you are using. These videos really go a long way to make someone who might be very new to turning wrenches, like myself, lol, the confidence to try to work on their vehicles. Thanks again for making the extra effort to document this work. I have seen a fair amount of videos that do a pretty good job, but then get to a technical part or something difficult, and the next thing you see is the finished product. Like..

-Step one
-Step two
-intentionally left black
-something happens
-Profit!

But I dig how you take your time and talk through it A to Z. Well done.

You know Ryder, your experience with repair/mod videos was ours as well. When Sean and I started making videos together, we agreed we would try our hardest not to skip crucial steps and leave the viewer guessing. This is the reason why our videos are longer than most because we go to great lengths to make sure people have everything they'll need to be successful including tools needed, torque specs and part numbers. Sean does an excellent job of editing out unnecessary footage and speeding things up where he can without losing important content, but it's our opinion we'd rather have a longer video that's comprehensive than a shorter video that's lacking crucial details.

Our next video will be a long one as well. We installed a complete Toytec Suspension Lift for Eric after we worked on the radiator drop for the second time. This lift video will show the usual replacement of front coilovers, rear springs and shocks but it will also include replacing the OEM UCAs with Total Chaos UCAs which is fairly involved because you have to remove the upper balljoint and replace it with the special Total Chaos sleeve. We also replace the brake lines front and rear with extended lines, we added rear bump stop extenders and replaced the OEM panhard bar with an adjustable one.

Glad you're liking what we're doing.
 
Well you have a good thing going and are of great help to the community. And good job editing Sean! I feel that leaving your videos long also gives a better perspective on how long the task might take. Cheers!
 
Would you need to adjust the radiator for a 1" body lift?

I did not, however I had to take the lower part of the fan shroud off because my fan was slightly rubbing on it. The lower part comes off pretty easy. Didn't notice a difference in AC temp or anything from that either.

I think 4crawler makes 1" drop brackets, but Toytec does not.
 
Would you need to adjust the radiator for a 1" body lift?

4crawler's site states up to a 2" body lift, they haven't seen any significant temp differences. I got the bumper and radiator brackets because they were cheap and made it easier for me to just bolt on the brackets. His site has A LOT of information but it's been very good & helpful information. He also discusses ways to adjust the bumper and radiator if you don't want to buy his brackets or if you want to make your own.
 

Members online

Forum statistics

Threads
278,314
Messages
3,554,096
Members
248,016
Latest member
Advally Service

Trending content

Back
Top