2" Toytec Body Lift Installation

[MENTION=120071]mtbtim[/MENTION] [MENTION=146244]phokingchink[/MENTION] [MENTION=102606]infamousRNR[/MENTION]

Nice work on the video. I recall Eric had a long laundry list of items he wanted done did you make plans to do anything else? I wouldn't mind bringing a six pack by and joining in the fun some weekend.

Regarding the radiator relocation I wanted to share these instructions from 4Crawler's web site. Because I used their BL pucks and poly bushings I also used their RD drop and BP raise brackets. The install went well for me and I did not have to drill out (note his instructions do say you 'may need to drill the flange'). Not going to lie it was a PITA getting those brackets in there though. But that's the nature of the game and how much room there is not the products themselves.

Body Lift Installation Instructions

On another note a big deciding factor for me on going with 4Crawler BL was; during my research I noted that they do mark and package all the items for the correct location. The pucks, bolts & poly bushings (if you upgrade to those) are all marked for their correct location. I didn't want to be guessing at it as I heard that adds even more time to what is already a time consuming mod. Not challenging, just time consuming.

Nice job once again Tim and Sean. You guys are awesome Bay Area neighbors! I hope Eric brought you guys more of those awesome egg rolls to go with all that beer in his truck..!
 
Tim aka [MENTION=120071]mtbtim[/MENTION] back at it again. I seriously watched 4 hours worth of videos last night hah
 
Im curious to see before and after pics of [MENTION=146244]phokingchink[/MENTION] 's rig. I saw someone got a nice set of f5s with dynapro mts lol
 
A big thanks to [MENTION=120071]mtbtim[/MENTION] and [MENTION=102606]infamousRNR[/MENTION] for helping me with the body lift. I didn't think this 2 inch job would be such a pain in the ass. That's what she said. But it ended up taking up pretty much the whole day. Like Tim had mentioned, the instructions were just shy of horrible. We didn't know where each bolt went since there were different sets of different sizes and we eventually just figured it out as we went.

As for the long laundry list of upgrades, we have pretty much tackled all of what I had on my list. I have been browsing T4R for a while now and I keep on reading how once a list is finished, another longer list will just appear out of thin air. I just put in an order for endlinks from [MENTION=98153]MStudt[/MENTION], a cv reboot kit, and LBJs. One of my cv boots blew out after the suspension lift on top of this body lift and I'm actually taking a trip to Tahoe this weekend. Thankfully, Tim was able to jerry-rig some zip ties on the boot for it to hold until I get back.

I cannot thank Tim and Sean enough for all the help and knowledge they have provided me.
 
Im curious to see before and after pics of [MENTION=146244]phokingchink[/MENTION] 's rig. I saw someone got a nice set of f5s with dynapro mts lol

Jay,

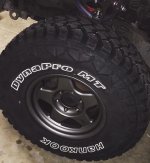
I don't think I took any before pics. :ybrick: I've been pretty busy lately too with work and playing in the snow :dance: Here's my dynapro mt on f5.
 

Attachments

  • wheel.jpg
    wheel.jpg
    68.6 KB · Views: 392
A big thanks to [MENTION=120071]mtbtim[/MENTION] and [MENTION=102606]infamousRNR[/MENTION] As for the long laundry list of upgrades, we have pretty much tackled all of what I had on my list. I have been browsing T4R for a while now and I keep on reading how once a list is finished, another longer list will just appear out of thin air. I just put in an order for endlinks from [MENTION=98153]MStudt[/MENTION], a cv reboot kit, and LBJs. One of my cv boots blew out after the suspension lift on top of this body lift and I'm actually taking a trip to Tahoe this weekend. Thankfully, Tim was able to jerry-rig some zip ties on the boot for it to hold until I get back.

I cannot thank Tim and Sean enough for all the help and knowledge they have provided me.

Holy sheet Eric you did also get the Sus lift in as well...?? What company did you go with? I didn't notice that in the BL video. And those are your new tires and wheels on your rig? When did you install the UCA's...? Dude you have GOT to post up an after pic if you've done all that already...!!?

No doubt Tim and Sean are a couple of hella cool guys.
 
Holy sheet Eric you did also get the Sus lift in as well...?? What company did you go with? I didn't notice that in the BL video. And those are your new tires and wheels on your rig? When did you install the UCA's...? Dude you have GOT to post up an after pic if you've done all that already...!!?

No doubt Tim and Sean are a couple of hella cool guys.

Haha yeah I got the suspension lift in there as well as the UCA's. I think I'll hold off on the pics so you guys will have to wait until Sean is finished editing the video on the job. The rest of the crap on my laundry list was completed in 1 day. Tim, Sean and I pulled a 12 hour day and Tim even did an at-home alignment for me because my wheels were literally like \ / and he did an unbelievable job. I'll post the specs on what he had my alignement at vs how much needed to be corrected at the shop. Yes those are my new tires on my new wheels. Tires are Hankook DynaPro MT03 295/75/16 on 16" SCS F5's [MENTION=88453]SCSPerformance[/MENTION].

I went with Toytec for the suspension lift by the way.
 
Jay,

I don't think I took any before pics. :ybrick: I've been pretty busy lately too with work and playing in the snow :dance: Here's my dynapro mt on f5.

Dude looks good but wheres the whole rig?!?i want a pick of that! Btw [MENTION=133775]Snowden[/MENTION]. Wheres that pic of your rear bumper?
 
Last edited:
I just used your video to aid my 1" body lift install. Thanks for making these videos! I have some input on tightening all the mounts up at the end. In your video you torqued the one side then the other. After doing this I feel like by tightening one side first your compressing the factory rubber mounts down a bit, then when you get to the other side the mounts have slightly more tension now since the loose side of the body is being raised up slightly. I found I was hitting 25 ft lbs very easily on the last side of mounts because of the extra tension caused by the other side lifting the side of the body. When I was finished the side that I torqued first seemed to sit slightly lower than the other side. It's slight but I notice it. If someone wanted to eliminate this possible issue they could torque the mounts as if you would a valve cover or cylinder head and tq the front left, rear right, front right, rear left, then middle ones left & right same method. This may not apply to everyone, I might have just had some squishy factory mounts but just throwing in my 0.2 cents.
 
Last edited:
Would you need to adjust the radiator for a 1" body lift?

No. all you need is a spacer for the steering. You dont even need to take the front bumper off if you have a long enough socket extension for the front 2 body mounts.

PSA: Remember people, do the body lift before bumpers & sliders! LOL
 

Members online

No members online now.

Forum statistics

Threads
278,316
Messages
3,554,112
Members
248,016
Latest member
Advally Service

Trending content

Back
Top