2001 SR5 Mirror adjustment switch

Deej101

New member
Does this come apart so that I can effectively clean it? It seems like the rocker part should pop off and throw a spring or two out, but I can't discern where and how to apply pressure to pop it off, and don't wanna break it...

(it's already out of the door panel, fyi)
 
Register to hide this ad
It is a very common Toyota part, why not get a good quality used one on eBay?
-Charlie
Because it isn't broken; I just want to clean it thoroughly. I avoid adding to landfill when possible.

So how do I properly disassemble it? After I break it, then I'll consider replacing it (and even then I'll try to repair it first).
 
I cleaned mine out recently, but I didn't feel it was necessary to open it up. A handful of cotton swabs dipped in rubbing alcohol followed with compressed air got all of the crud out of the nooks and crannies.

I did notice some tabs on the backside. Maybe with a small pocket flat head would allow you access to the internals?
 
I cleaned mine out recently, but I didn't feel it was necessary to open it up. A handful of cotton swabs dipped in rubbing alcohol followed with compressed air got all of the crud out of the nooks and crannies.

I did notice some tabs on the backside. Maybe with a small pocket flat head would allow you access to the internals?
Yeah, I've already tried all that, even hitting it with my canned electronics cleaner.

This vehicle hasn't been cleaned properly in over 20 years, and now I live in a very rural dusty area!

No doubt I'll end up breaking it if I keep trying...
 
Does this come apart so that I can effectively clean it? It seems like the rocker part should pop off and throw a spring or two out, but I can't discern where and how to apply pressure to pop it off, and don't wanna break it...

(it's already out of the door panel, fyi)

I have a bunch of spares of these, so I went ahead and pulled one apart for you. I'm not sure exactly which part you're lost on this, so I am going to link you to a photo album that shows the disassembly via pictures.

1996-2002 4Runner Mirror Switch Disassembly - Google Photos

Do this at your own risk as it is REALLY easy to damage the internal parts. If you're going to do it, make sure that you only pull the final washer that holds the entire thing together from the top or bottom as I show it in the pictures (It will break or shear part of the plastic off and won't hold itself back together if you don't).

Let me know if you have questions.
 
I have a bunch of spares of these, so I went ahead and pulled one apart for you. I'm not sure exactly which part you're lost on this, so I am going to link you to a photo album that shows the disassembly via pictures.

1996-2002 4Runner Mirror Switch Disassembly - Google Photos

Do this at your own risk as it is REALLY easy to damage the internal parts. If you're going to do it, make sure that you only pull the final washer that holds the entire thing together from the top or bottom as I show it in the pictures (It will break or shear part of the plastic off and won't hold itself back together if you don't).

Let me know if you have questions.
WOW. That is amazing and fantastic of you to do, thank you so much!

I was approaching it from the reverse side, just trying to remove the plastic cover that sits over by the electronics.

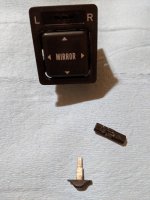
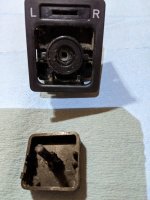
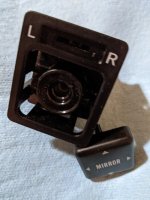
Just prior to seeing your post, I had finally managed to pull it apart, by first pulling the slider straight out, which then allowed better access to the rocker piece so that I could pry it off carefully without snapping something.

Pics show the pieces I'm talking about. That level of disassembly was sufficient for the cleaning I was going for--but your pics will be invaluable for anyone who needs to fix the innerds.

After you clean one switch, it's impossible to not want to do them all... so now all my switches are in pieces and clean. The only other one I'm having a question about is the rear window switch; specifically, the orientation of the two metal "see-saw" contact pieces--no pics yet, can update later. I haven't yet searched to see if there are posted pics of that switch anywhere.

Thanks again for such a thorough documentation on the mirror switch, truly above and beyond!
 

Attachments

  • PXL_20210818_194547710_1.jpg
    PXL_20210818_194547710_1.jpg
    98.5 KB · Views: 259
  • PXL_20210818_194644968_1.jpg
    PXL_20210818_194644968_1.jpg
    94.7 KB · Views: 257
  • PXL_20210818_203056777_1.jpg
    PXL_20210818_203056777_1.jpg
    82.4 KB · Views: 246
I have a bunch of spares of these, so I went ahead and pulled one apart for you. I'm not sure exactly which part you're lost on this, so I am going to link you to a photo album that shows the disassembly via pictures.

1996-2002 4Runner Mirror Switch Disassembly - Google Photos

Do this at your own risk as it is REALLY easy to damage the internal parts. If you're going to do it, make sure that you only pull the final washer that holds the entire thing together from the top or bottom as I show it in the pictures (It will break or shear part of the plastic off and won't hold itself back together if you don't).

Let me know if you have questions.

It's these sorts of posts and users that makes this forum so helpful. Thanks for providing all that info. I might even go clean mine now.
 
WOW. That is amazing and fantastic of you to do, thank you so much!

I was approaching it from the reverse side, just trying to remove the plastic cover that sits over by the electronics.

Just prior to seeing your post, I had finally managed to pull it apart, by first pulling the slider straight out, which then allowed better access to the rocker piece so that I could pry it off carefully without snapping something.

Pics show the pieces I'm talking about. That level of disassembly was sufficient for the cleaning I was going for--but your pics will be invaluable for anyone who needs to fix the innerds.

After you clean one switch, it's impossible to not want to do them all... so now all my switches are in pieces and clean. The only other one I'm having a question about is the rear window switch; specifically, the orientation of the two metal "see-saw" contact pieces--no pics yet, can update later. I haven't yet searched to see if there are posted pics of that switch anywhere.

Thanks again for such a thorough documentation on the mirror switch, truly above and beyond!

It seems like a piece where a faceplate should unclip to be able to clean everything, but the darn thing is all one solid piece. So long as your orientation stayed clocked with that washer piece and the window switch actually clicks in, that should work perfectly for you.

I assumed that the slider piece was clipped in because mine didn't come out until I pried it out. It was actually just gummed up with a bunch of junk haha. Once that slider is out, you actually have decent access to the section where it clips in. I would suggest that everyone else did disassemble it fully as I did because the plastic could break prying on it from the top side.

I updated the photo album with pictures showing the disassembly of the L-R selector side as you showed in your pics, so thanks for that info.

I understand the process of looking at everything and meticulously trying to make it all perfect with these rigs we grow to love. It was the same for me and restoring faded plastic that turned grey over time. Once you see what a good-looking solid black panel looks like nothing else will ever suffice.

I have an extra 4 of those rear window switches sitting in the passenger seat right now. You lucked out with my timing of hitting the local junkyards haha! I'll try to successfully pull one apart for you, but they are incredibly easy to break. Depending on what shape they are to begin with really dictates if they will ever go back together again. The bright side of this is that they can be bought new online from China (actually really good quality too) for $5-10. I probably have close to 20 spares of them because they work on all 5 of the Toyotas I have (T4Rs, RAV4s, FJ80 LC and likely several other cars), but you would have much less hassle buying them online if you break one.
 
It's these sorts of posts and users that makes this forum so helpful. Thanks for providing all that info. I might even go clean mine now.

I have always been grateful for all of the people on this forum who went out of their way to make guides on how to do the nitty-gritty stuff. As I have had plenty of humbling experiences destroying expensive electronics, this is especially the case on stuff that is easy to mess up/break. I hope your panel cleans up nice!
 
Okay, here is a photo album with a few videos for the orientation: 1996-2002 4Runner Rear Window Switch Disassembly + Cleaning - Google Photos

A few tips:
-Don't wedge on the thin plastic holding the button to the faceplate. Push the tabs at a similar angle to what I show or it will snap the plastic off (requires decent force)
-Separating the white electronics piece is a PITA for most of these. The method I show using the pick to help wedge it down (1 side at a time) is the only way I have never broken this. It will require enough force to break it free the first time for you to think it's going to break in half. Take it slow and steady and you will be fine.
-Glass cleaner works really well to clean the plastic stuff up.
-I used a pick and an alcohol-based cleaner to scratch off the burnt gunk off the electrical contacts.
-Make sure your button actuates smoothly and sounds nearly identical to the video I posted. If the sound doesn't match or it binds, the metal contact pieces fell out of place when you clipped the white electrical piece back on. Sometimes you can fix it with a pick, but you normally have to take the piece back off if they flip upside down.

 
Okay, here is a photo album with a few videos for the orientation: 1996-2002 4Runner Rear Window Switch Disassembly + Cleaning - Google Photos

A few tips:
-Don't wedge on the thin plastic holding the button to the faceplate. Push the tabs at a similar angle to what I show or it will snap the plastic off (requires decent force)
-Separating the white electronics piece is a PITA for most of these. The method I show using the pick to help wedge it down (1 side at a time) is the only way I have never broken this. It will require enough force to break it free the first time for you to think it's going to break in half. Take it slow and steady and you will be fine.
-Glass cleaner works really well to clean the plastic stuff up.
-I used a pick and an alcohol-based cleaner to scratch off the burnt gunk off the electrical contacts.
-Make sure your button actuates smoothly and sounds nearly identical to the video I posted. If the sound doesn't match or it binds, the metal contact pieces fell out of place when you clipped the white electrical piece back on. Sometimes you can fix it with a pick, but you normally have to take the piece back off if they flip upside down.
Another beautifully documented photo-tutorial, thank you.

I managed to crack the black inner housing, but after reassembly, it is held together fine by the outer housing--figure it has lasted 20 years before this first cleaning, so won't likely be needing to get in there again, hah.

I use a pencil eraser for cleaning the carbon off the contacts, it works great; followed by qtips/70% etoh wipedown.

Amost all switches serviced and reinstalled--still have the front passenger window switch to put back together. It looks different than all the others, might have been replaced with a different year switch or something, not sure yet, haven't researched yet.

Thanks again, so much.
 

Members online

Forum statistics

Threads
278,307
Messages
3,554,050
Members
248,016
Latest member
Advally Service

Trending content

Back
Top