Thanks to the many threads on cooler installs. BigFishAllDay's was helpful but one thing that threw me for a loop was the orientation of the hard tranny lines. Some sources say passenger side is the sending line others say the one that's more forward is. For me this was the driver's side. Thanks to HopeLessDiamond for pointing out a good source on the accuracy of the lines in this link to Tim's video of the install (directly to part of video about line orientation)
I went with the bigger 70264 vs the more popular 70268. I figured why not go bigger since it has the low temp bypass. I decided to go a little against the grain here and go in line with the radiator. Dr Coffee's point on keeping the immersion aspect of cooling/heating in the radiator is a valid point, but also B&M directly states in instructions that the preferred method is in line with radiator, after the radiator cooler of course. But many people cap off the trans cooler in fear of the pink milkshake.
I took the milkshake out of the equation by getting a Champion Radiator, all aluminum with welded fittings. No corrosion to occur within the trans cooler. A radiator for the rest of this vehicles life and I get to reap the benefits of using the radiator to warm trans fluid in the mornings upon first startup and get addition cooling with it in line with the Supercooler.
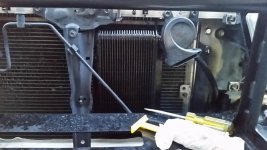
I mounted it on the driver's side just due to spacing. It was more convenient as well since I am using the trans cooler in the radiator.
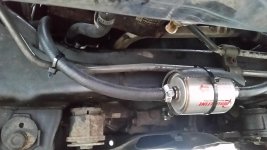
I also put a Magnefine filter on the return line just before it gets back into the transmission hard lines.
Things to note:
The lower passenger side bolt for the radiator sucks. I have an ARB bumper and I found that if I laid on my back looking up to it, my right hand could easily get to the bolt with a socket under the bumper. IDK about OEM bumpers though.
Also, the Champion is a bit wider than OEM and due to this, it seems to interfere with the electrical wiring bundles just in front of the radiator at the body. I dealt with this by using 3 flat washers at every bolt to give a little spacer. I also had to get M8-1.25 x 40 mm bolts to replace my OEM bolts as they were too short to reach the nutserts. In hindsight, 30mm would have been plenty as the stock is about 15 or 16 mm. But they don't interfere with anything, so whatever. Fan shroud bolts went in easily.
The prongs that hold it up also needed to be bent but it was aluminum so easy to bend. I also widened the body holes for the radiator bolts as the new radiator nutserts lining up was every so slightly too narrow (about 1/8" both sides)
The kit comes with 5/16" ID tubing and while it could have worked, I went with 3/8" from the auto store like most people on here. Even that was tight as I had to remove one connection due to error and needed to cut the thing off!
Definitely slice off the tubing from the hard line vs pulling really hard. Save your hands.
I had red coolant in here, plus some universal yellow stuff so I went ahead and did a full flush before doing this mod, just to be sure. I did a full drain first, then ran the hose through every connection until clean water came out, then pulled the thermostat out, reassembled and filled with water through the old radiator, ran the cart until 180 then a final drain before the swap took place.
My OEM radiator seemed fine, but this was one of those "I should just do this in case of..." mods.
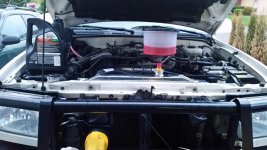
Definitely get one of those Lisle spill free funnels. I've used it now three times on all my vehicles and it's AWESOME. No more mess with coolant fills. You can also use it for power steering flushes.
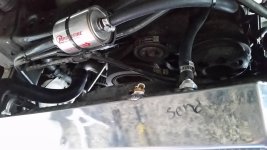
I went ahead and labeled the send and return line on my radiator itself just in case I forget one day haha.
So as an overview:
1. Drain
2. Flush water through every line into the block and radiator
3. pull thermostat
4. fill with water and run car 15 minutes to dilute anything else
5. drain and pull thermostat housing for cleaning (it had coolant gunk on there)
6. Undo fan shroud, trans cooler lines, hoses, unbolt radiator and remove
7. Install B&M on driver's side using zip ties included.
8. Reinstall thermostat (OEM with gasket) and torque housing down to 168 in lbs, or 14 ft lbs.
9. put fan shroud back in, lower radiator in and bolt in place. Torque is 23 ft lbs formally but since I used washers I just went to it was tight.
10. Install fan shroud, connect hoses to radiator (new OEM)
11. route trans cooler lines. Forward hard line goes directly into radiator trans cooler. Exiting follows up through hole in the body (lined with 3/4" heater hose notched every inch) into the top of the Supercooler, oriented sideways. Exiting the bottom, back through the hose-lined hole, following hard lines under the belts into a Magnefine, 3/8" barbs. Then back into return line (the further back hard line).
12. Zip tie hoses and Magnefine in place, using spare 3/4" heater hose for protectinge at friction points.
What wasn't in the kit that I needed:
10' 3/8" ID cooler hose (I used about 8.5 feet)
1' 3/4" heater hose
Toyota red coolant, 2 gallons
Distilled water, 2 gallons (together I have water and coolant leftover as it only used 2.375 gallons of 50/50)
About 2 qts ATF fluid for the cooler and longer lines
4 M8-1.25 bolts that are longer than OEM (40mm is too long, go with 30mm)
12 M8 flat washers
Hose clamps if your OEM ones aren't good
all in all, it wasn't that hard to do, but it was time consuming as things were hard to reach, stuck in place, etc. the usual thing that happens on a 16 year old rig.
I went with the bigger 70264 vs the more popular 70268. I figured why not go bigger since it has the low temp bypass. I decided to go a little against the grain here and go in line with the radiator. Dr Coffee's point on keeping the immersion aspect of cooling/heating in the radiator is a valid point, but also B&M directly states in instructions that the preferred method is in line with radiator, after the radiator cooler of course. But many people cap off the trans cooler in fear of the pink milkshake.
I took the milkshake out of the equation by getting a Champion Radiator, all aluminum with welded fittings. No corrosion to occur within the trans cooler. A radiator for the rest of this vehicles life and I get to reap the benefits of using the radiator to warm trans fluid in the mornings upon first startup and get addition cooling with it in line with the Supercooler.
I mounted it on the driver's side just due to spacing. It was more convenient as well since I am using the trans cooler in the radiator.
I also put a Magnefine filter on the return line just before it gets back into the transmission hard lines.
Things to note:
The lower passenger side bolt for the radiator sucks. I have an ARB bumper and I found that if I laid on my back looking up to it, my right hand could easily get to the bolt with a socket under the bumper. IDK about OEM bumpers though.
Also, the Champion is a bit wider than OEM and due to this, it seems to interfere with the electrical wiring bundles just in front of the radiator at the body. I dealt with this by using 3 flat washers at every bolt to give a little spacer. I also had to get M8-1.25 x 40 mm bolts to replace my OEM bolts as they were too short to reach the nutserts. In hindsight, 30mm would have been plenty as the stock is about 15 or 16 mm. But they don't interfere with anything, so whatever. Fan shroud bolts went in easily.
The prongs that hold it up also needed to be bent but it was aluminum so easy to bend. I also widened the body holes for the radiator bolts as the new radiator nutserts lining up was every so slightly too narrow (about 1/8" both sides)
The kit comes with 5/16" ID tubing and while it could have worked, I went with 3/8" from the auto store like most people on here. Even that was tight as I had to remove one connection due to error and needed to cut the thing off!
Definitely slice off the tubing from the hard line vs pulling really hard. Save your hands.
I had red coolant in here, plus some universal yellow stuff so I went ahead and did a full flush before doing this mod, just to be sure. I did a full drain first, then ran the hose through every connection until clean water came out, then pulled the thermostat out, reassembled and filled with water through the old radiator, ran the cart until 180 then a final drain before the swap took place.
My OEM radiator seemed fine, but this was one of those "I should just do this in case of..." mods.
Definitely get one of those Lisle spill free funnels. I've used it now three times on all my vehicles and it's AWESOME. No more mess with coolant fills. You can also use it for power steering flushes.
I went ahead and labeled the send and return line on my radiator itself just in case I forget one day haha.
So as an overview:
1. Drain
2. Flush water through every line into the block and radiator
3. pull thermostat
4. fill with water and run car 15 minutes to dilute anything else
5. drain and pull thermostat housing for cleaning (it had coolant gunk on there)
6. Undo fan shroud, trans cooler lines, hoses, unbolt radiator and remove
7. Install B&M on driver's side using zip ties included.
8. Reinstall thermostat (OEM with gasket) and torque housing down to 168 in lbs, or 14 ft lbs.
9. put fan shroud back in, lower radiator in and bolt in place. Torque is 23 ft lbs formally but since I used washers I just went to it was tight.
10. Install fan shroud, connect hoses to radiator (new OEM)
11. route trans cooler lines. Forward hard line goes directly into radiator trans cooler. Exiting follows up through hole in the body (lined with 3/4" heater hose notched every inch) into the top of the Supercooler, oriented sideways. Exiting the bottom, back through the hose-lined hole, following hard lines under the belts into a Magnefine, 3/8" barbs. Then back into return line (the further back hard line).
12. Zip tie hoses and Magnefine in place, using spare 3/4" heater hose for protectinge at friction points.
What wasn't in the kit that I needed:
10' 3/8" ID cooler hose (I used about 8.5 feet)
1' 3/4" heater hose
Toyota red coolant, 2 gallons
Distilled water, 2 gallons (together I have water and coolant leftover as it only used 2.375 gallons of 50/50)
About 2 qts ATF fluid for the cooler and longer lines
4 M8-1.25 bolts that are longer than OEM (40mm is too long, go with 30mm)
12 M8 flat washers
Hose clamps if your OEM ones aren't good
all in all, it wasn't that hard to do, but it was time consuming as things were hard to reach, stuck in place, etc. the usual thing that happens on a 16 year old rig.