
2012 T4R LTE Rear Seat Removal

Michael Siener

New member
I have an upcoming, long, road trip and will need to be hauling 3 large Yeti coolers as well as other gear. My life will be much simpler if I can easily, completely remove one portion (the "40" portion of a 60/40 rear seat) of the rear seating (behind the driver seat) to gain more vertical space in the car. Just curious if anyone has done this for any reason; and if it's a fairly simple matter of just removing bolts (any special tools required?) or more involved/difficult. Thanks in advance for any help!
 
Register to hide this ad
I have an upcoming, long, road trip and will need to be hauling 3 large Yeti coolers as well as other gear. My life will be much simpler if I can easily, completely remove one portion (the "40" portion of a 60/40 rear seat) of the rear seating (behind the driver seat) to gain more vertical space in the car. Just curious if anyone has done this for any reason; and if it's a fairly simple matter of just removing bolts (any special tools required?) or more involved/difficult. Thanks in advance for any help!

It's not that hard and I've had my rear seats completely out a few times and the hardest part is that spring loaded hinged carpet piece and getting the plastic hinge covers on and off. I take out my rear seat bottoms all the time to gain more room and they come out real easy with 2 bolts per side.

Here is from the repair manual, but minus the pics ,we have to download in the "Mods Sticky" under TIS FSM for 2010 4Runner but they havn't changed much since then.

In the Toyota Repair Manual it's under......... Interior/Seat/ REAR NO. 1 SEAT ASSEMBLY (for 60/40 Split Double-folding Seat Type LH Side)
REMOVAL


CAUTION:
Wear protective gloves. Sharp areas on the parts may injure your hands.

1. REMOVE REAR SEAT CUSHION HINGE COVER
(a) Using a moulding remover, detach the 3 claws and remove the cover.

2. REMOVE REAR SEAT CUSHION HINGE COVER LH
(a) Using a moulding remover, detach the 3 claws and remove the cover.

3. REMOVE REAR SEAT CUSHION ASSEMBLY LH
(a) Pull the rear seat cushion band and release the lock.

(b) Remove the 2 bolts and seat cushion.

NOTICE:
Be careful not to damage the vehicle body.

4. REMOVE REAR SEAT HEADREST ASSEMBLY
(a) Remove the headrest.

5. REMOVE REAR SEATBACK COVER
(a) Press the seatback lock release button to release the lock and fold down the seatback.
(b) Using a screwdriver, detach the 4 claws and remove the cover.

HINT:
Tape the screwdriver tip before use.

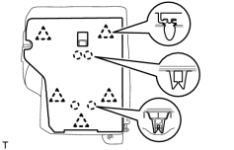
6. REMOVE REAR SEATBACK BOARD CARPET ASSEMBLY LH
(a) for Plastic Seatback Board:
(1) Detach the 3 claws and clip, and then remove the carpet.
(2) Using a clip remover, detach the 4 clips.
(3) Detach the 2 claws and remove the carpet.

(b) for Seatback Board with Carpet:
(1) Using a clip remover, detach the 5 clips.
(2) Detach the 4 claws and remove the carpet.

7. REMOVE REAR SEATBACK ASSEMBLY LH
(a) Remove the 2 bolts that secure the seatback to the floor.

(b) Fold down the seatback, remove the bolt from the hinge, and then remove the seatback.

NOTICE:
Be careful not to damage the vehicle body.


Here's the pic for the seatback board carpet(step 6(b)) as most have it rather then the plain plastic one except bare bones SR5's ........
 

Attachments

  • B237977.png
    B237977.png
    17.7 KB · Views: 1,283
Last edited:
Sorry to resurrect an old thread, but I'm having a helluva time getting the hinge covers back in place... Are there any tricks to getting them reattached?
 

Members online

Forum statistics

Threads
278,316
Messages
3,554,120
Members
248,016
Latest member
Advally Service

Trending content

Back
Top