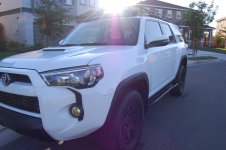
2014 Stupid Grey Pieces...Paint? Plasti-dip?

Atticus

New member
Hello all,

So I've seen several people who have painted the stupid grey piece on the front/back bumpers. Can anyone elaborate on how exactly this was accomplished? I'm thinking of trying the plasi-dipping rattle cans. But if anyone has better ideas please let me know.

I'm getting some scratches fixed on the passenger side next week. I tried to talk the body shop guy into painting the front and back bumpers but he said it really wasn't going to be worth it. Said anytime there is a chip it would look bad due to the grey original paint.

Thanks in advance
 
Register to hide this ad
I guess the 1st question I have is this:

Do you plan to mod your T4R? If so, do any of those mods include a front & rear bumper?

Plasti-dip will probably get you the best overall results (and can be reapplied should you get nicks, cuts, scratches, etc) until such time that you do a front & rear bumper. :D
 
Well I was going to get that new bumper that just came out, but it is way more expensive than I had thought it was going to be.... so at this point, no.

So I'll probably Plasti-dip and make it look as good as I can.
 
Plastdip is the way to go. I did it within 24 hours of owning my TE. 3 cans for the front and rear total will get you 5-6 coats with the last 2 being heavy coats to get an even finish
 
I had my bumpers vinyl wrapped. Honestly, after having them wrapped, I think it looks like crap. I may try plasti-dipping next but will probably end up painting with matte clear bra over that. Who knows, it may drive me to just go all out and do custom bumpers front and rear.
 
i tried out plastidip the other day on the front
(1can)

20140818_105822_zps0c6059bd.jpg~original
 
Thank you all for the replies.

F1scher - did you dip the rear bumper as well?

fmulino - that is the bumper I was referring to above.
 
I color matched my bumper inserts, emblems and rear hatch handle. Here is my experience.

Removing the pieces isnt too bad. I did mine and it took me about 45 minutes to dissasemble and reassemble the surrounding areas.

Front has 13 clips and is as quite easy. Remove the top plastic cover and reach all the top clips. Then go underneath and remove the 2 10mm screws and reach your hand under the bumper cover to reach the side and bottom clips. Really simple in my honest opinion.

Rear was a lil bit of a MOFO but definately do-able (Just need patience). It was a tight space and i wasnt about to remove the rear bumper so i managed to get it done. The rear has 14 clips that are placed similarly to the front. Need good finger strength cuz your hand is inverted in some situations. The rear has 2 10mm screws and 2 pop rivets that provide a gap to squeeze your hand through. Then to get to the top ones you need to remove the side pieces connecting the mudflap to the bottom of the bumper (5 screws each side). Squeeze your hand under the bumper cover and work your way around to all the clips.

Good luck!

Mike..

Doesnt have any install pics but this is the end result.

http://www.toyota-4runner.org/5th-gen-t4rs/174847-build-thread-ebony.html
 
[MENTION=108915]F1scher[/MENTION] what color dip did you use? Looks good, I liked the black on my roof rails (Mag Grey truck) but was not sold on the look of the black for the front and rear trim panels. Might give that dark grey a shot.

Thanks
 

Members online

Forum statistics

Threads
278,316
Messages
3,554,111
Members
248,016
Latest member
Advally Service

Trending content

Back
Top