AuH2O-64
New member
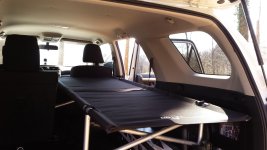
I have looked at others sleep platforms and decided to build one myself. I want to post the exact dimensions and major supplies, to save others some of the leg work for a 5th gen 4Runner. This will make an 80" (6'8") long Sleeping Deck with front seats all the way up, rear seat back folded down, and rear seat bottom folded forward.

MATERIALS
(1) 4'X8' sheet 3/4" thick Plywood
(1) 6'X8' Carpet and Carpet Padding
(4) 3/4"dia x 12"L Galvanized Pipe
(2) 3/4"dia x 24"L Galvanized Pipe
(6) Pipe Flanges and Rubber Feet
(1 of ea) 54"L and 48"L 2"x6" Lumber
(2) Hinges
(4) 5/16"dia thread Turn Buckle
(4) 5/16"dia x 3"L carriage Bolts, Washers, Wing Nuts
(and) Bunch of wood screws and staples
TOOLS
Circular blade style pipe cutter. Cordless driver to pre-drill and drive screws. Staple gun. Saw horses. I did everything with circular saw and jig saw. Table saw would be better.
CONSTRUCTION
Basically there are three pieces: Rear-Base-Section, Mid-Section, and Front-Support
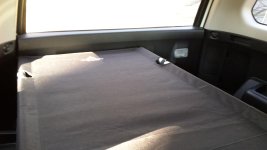
(a) Rear-Base-Section 48"w x 37"L. Has (4) 12" legs and secured by turn buckles. 2"x6" Flange on forward leading edge sticking out 1-1/2" has bolt holes to secure Mid-Section with carriage bolts. Cut rear end to custom fit rear hatch contour with back seat up.


(b) Mid-Section 54"w x 29"L with 3"w x 8"L triangles cut out of rearward corners. Has bolt holes for carriage bolts all four corners. Rests on Base Flange and Front-Support. Has hinged Front-Section 54"w x 14"L with 4"w x 10"L triangles cut out of forward corners.


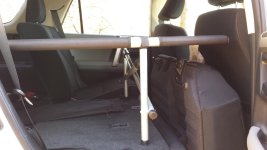
(c) Front-Support is a 52" long 2"x"6 with two 21-1/2" legs. It has relief cuts to contour to seat bottoms in folded position. It supports 1" of Mid-Section secured by carriage bolts and 5" of Front-Section to prevent over rotation of hinges.


BUILD
You can get all the pieces out of one sheet of plywood, with the proper layout. I painted the exposed plywood and pipe legs. The carpet has 1-2 layers of carpet pad under it and a flap to cover the hinge. I used the biggest dia / longest length possiple wood screws for attaching pipe flanges and 2"x6" flange on Base-Section and Front Support. I pre-drilled pilot holes for all wood screws. I put thin boards under leg supports to spread the load and level the components to each other. The Base-Section clears the wheel humps and the Front-Support clears the folded seat bottoms.
USE
The Base-Section can remain in the back of the vehicle with rear seats in-use. It needs to be tied down to the cargo latch points to stay balanced and stabilize the system when Mid-Section is attached. The Front-Section is hinged, to allow for maximum sleeping length with front seats all the way up, and front seats all the way back for driving. Mid-Section and Front-Support can be removed and placed in back to use all five seats. The whole thing can be removed and legs unscrewed for flat storage.
OPTIONS
This is just the basic outline of what you need. The platform height can be lowered to gain more head room by taking out rear seat bottoms and narrowing the Base-Section to fit between wheel humps. This write up is for leaving seat bottoms in vehicle.
MATERIALS
(1) 4'X8' sheet 3/4" thick Plywood
(1) 6'X8' Carpet and Carpet Padding
(4) 3/4"dia x 12"L Galvanized Pipe
(2) 3/4"dia x 24"L Galvanized Pipe
(6) Pipe Flanges and Rubber Feet
(1 of ea) 54"L and 48"L 2"x6" Lumber
(2) Hinges
(4) 5/16"dia thread Turn Buckle
(4) 5/16"dia x 3"L carriage Bolts, Washers, Wing Nuts
(and) Bunch of wood screws and staples
TOOLS
Circular blade style pipe cutter. Cordless driver to pre-drill and drive screws. Staple gun. Saw horses. I did everything with circular saw and jig saw. Table saw would be better.
CONSTRUCTION
Basically there are three pieces: Rear-Base-Section, Mid-Section, and Front-Support
(a) Rear-Base-Section 48"w x 37"L. Has (4) 12" legs and secured by turn buckles. 2"x6" Flange on forward leading edge sticking out 1-1/2" has bolt holes to secure Mid-Section with carriage bolts. Cut rear end to custom fit rear hatch contour with back seat up.
(b) Mid-Section 54"w x 29"L with 3"w x 8"L triangles cut out of rearward corners. Has bolt holes for carriage bolts all four corners. Rests on Base Flange and Front-Support. Has hinged Front-Section 54"w x 14"L with 4"w x 10"L triangles cut out of forward corners.
(c) Front-Support is a 52" long 2"x"6 with two 21-1/2" legs. It has relief cuts to contour to seat bottoms in folded position. It supports 1" of Mid-Section secured by carriage bolts and 5" of Front-Section to prevent over rotation of hinges.
BUILD
You can get all the pieces out of one sheet of plywood, with the proper layout. I painted the exposed plywood and pipe legs. The carpet has 1-2 layers of carpet pad under it and a flap to cover the hinge. I used the biggest dia / longest length possiple wood screws for attaching pipe flanges and 2"x6" flange on Base-Section and Front Support. I pre-drilled pilot holes for all wood screws. I put thin boards under leg supports to spread the load and level the components to each other. The Base-Section clears the wheel humps and the Front-Support clears the folded seat bottoms.
USE
The Base-Section can remain in the back of the vehicle with rear seats in-use. It needs to be tied down to the cargo latch points to stay balanced and stabilize the system when Mid-Section is attached. The Front-Section is hinged, to allow for maximum sleeping length with front seats all the way up, and front seats all the way back for driving. Mid-Section and Front-Support can be removed and placed in back to use all five seats. The whole thing can be removed and legs unscrewed for flat storage.
OPTIONS
This is just the basic outline of what you need. The platform height can be lowered to gain more head room by taking out rear seat bottoms and narrowing the Base-Section to fit between wheel humps. This write up is for leaving seat bottoms in vehicle.
Last edited: