4Runner Kitchen

CSL

New member
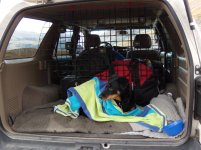
So I have been testing out and going through multiple generations of my cargo area build. It started out as a grate I bought off craigslist so that our gear wouldn’t fly forward and kill us. The dog was a little pup at the time so he sat by the kids feet:
before-1.jpg~original


Then I added a simple shelf on one side for the dog and gear below. When I did this I modified the wire grate so that it did not go to the floor and take up space.
after-1.jpg~original

grate.jpg~original


Not soon after I modified my cargo mat to fit the dog area and put in a 7 gallon water jug and shelf above.
storage.jpg~original


Then I added the slide-out-and-fold-down table:
table.jpg~original


Next I added a slide out drawer on the left side of the cargo area, but I don’t have a picture of that. That is the transformation of the last year and a half. Here is the thread with more details about these builds:


I just got an Engle fridge, and it did not fit well with my cargo build. So I took out the drawer and table and built a new one. I spent the ENTIRE weekend working on this, so I have to give credit to my wife, who handled the rest of the household responsibilities. But, this version is ready now for our trip to the sand dunes next week!

Here it is before you load the fridge:
6a138f0d.jpg~original


Now with the fridge loaded. The design puts the heavy fridge as low as possible and all the way to the back of the cargo area (front of the vehicle). This is the best spot, “center of gravity-speaking” for it. I designed the slide so that it sits on the cargo floor. This way the weight of the fridge is right on the vehicle and not stressing the slides. I glued a sheet of metal on the bottom of the floor the fridge sits on, so it slides better on the carpet.
1b5d1c35.jpg~original


Once you load the fridge, you can insert the drawer and bucket, with wing nuts:
899d6356.jpg~original

d404347c.jpg~original


Now it’s loaded and ready for camping! I found that I always have paper towels and baby wipes “wet wipey’s” laying around the back of the rig (remember, three little kids with me almost always). So I built a hinged door with storage that has a spot for paper towels, wet wipes, dog poop bags, tissues, garbage bags and toilet paper.
cab5d407.jpg~original


I can still open the top of the upper storage area with everything closed up.
ee42cdcc.jpg~original
 
Register to hide this ad
Behind the wall of toiletries, is a space for “hopefully” 5 backpacks of clothes, a shoe bag and jacket bag:
c465b340.jpg~original


On the left side of the slide-out is a folding table and shelf with various items…also a spot for the folding dog bowls and leash.
7f85b9ef.jpg~original


On the right side of the slide-out I cut out some “extra” wood, trying to make it lighter, and realized if I screwed a piece of metal on the front, I could store more stuff. So…I did, and I fit three folding silverware knifes, scissors, a can opener, wine opener, steak knife and cheese grater. I used every bit of space I could:
f0dda9a0.jpg~original


I made a slot above the folding table to store more stuff…spatula, grill brush, salt n pepper shakers, etc…
c287f9ef.jpg~original


I can open the fridge pretty far, and if needed, the lid easily removes. I ordered the 70/30 split top basket for the fridge to make it more user friendly. The split baskets should be able to pull out just fine:
2508653a.jpg~original


There is a table that folds out, right next to the water spigot. The next part of this build I will tinker with will be a built-in folding sink under the water spigot. I can store a cutting board behind the table area too!
125b127d.jpg~original


There is a shelf above the water tank that holds a bunch of stuff…a 12-inch skillet, bottle of whiskey, lantern, bag of headlamps, etc.
8538459a.jpg~original

204e7ce4.jpg~original


I slide the grill underneath the heavy floor mat in the dogs area…works great!
6a4393c8.jpg~original


On the right side of the slide-out, I left the area open for now. I am not sure what I will do with this area. With the removal of the cargo liner on the side, I have a lot of space here to work with.
d692249b.jpg~original


Heres a pic of the whole thing.
ea9cee4d.jpg~original


I weighed the various parts of this build and the total weight, without gear, is about 50 to 55 lbs. I am going to try some ways to lighten it in the future. I am also going to try to find a way to build in or at least store a single burner stove.
I didn't paint anything or really finish it off that nicely, because it is still a test versoin in my mind. It's getting close though...


So this is where it stands now…but I will keep tinkering with it. Needless to say…I am so freaking excited out this new build!!
 
This is pimp. I've been considering something similiar, and if I do I will be ruthlessly ransacking your pics for inspiration. :D
 
That's about all I need in an apartment.... ever thought of renting it out? :)

Mike
 
that thing is awesome. good job.
hows the driving though with blind spots or looking out the back?
you must have a mall dog to fit in that smaller area.
 
This is pimp. I've been considering something similiar, and if I do I will be ruthlessly ransacking your pics for inspiration. :D
Please do! I searched the web a ton to get ideas, expeditionportal was one of them. I love adding to the internet collection of ideas out there.

That's about all I need in an apartment.... ever thought of renting it out? :)

Mike
Ha! nice...to bad there's no bedroom - gotta do a tent!

looks nice man :thumb3:. Did you make it removable?
Everything is screwed together, but it's not really designed to be removable. I have a truck and a minivan too, so I don't really think I would ever need to remove it.

that thing is awesome. good job.
hows the driving though with blind spots or looking out the back?
you must have a mall dog to fit in that smaller area.
Thanks. Yeah, I gave up on the rear view mirror a long time ago...I just use the side mirrors.

Our dog is an 80 lb lab mix. He loves his spot, and as SOON as I open the back to start packing the rig, he jumps in and waits. I think he knows it's "his" spot.

Here is some photo proof of how well he fits. He can stand, sit, lay down and get up and turn around...none of the other passengers in the vehicle can do that...

9a4540b2.jpg~original

29986192.jpg~original


I tried to get a shot of him turning around inside
6cf5ff1e.jpg~original

e3e61434.jpg~original
 
CSL,

This 4Runner Kitchen is awesome...thank you for sharing!!

Time to add this Thread to your Signature.
 
I think your dog thought you were taking him camping, he's pissed now.

Nice Kitchen!!!

Yeah...he was pissed. I made him jump in and out about 3 or 4 times trying to get the "action shots". He looked at me really weird when I headed back inside the house. Doh!

Oh, well...I will make it up to him this weekend! ha!
 
Very nice setup! I am in the process of trying to redesign my cargo box I built a few months ago. I may steal some design ideas from you if you don't mind!
 
Very nice setup! I am in the process of trying to redesign my cargo box I built a few months ago. I may steal some design ideas from you if you don't mind!

Sure, but one catch...

...you got to post up pics of your build!
 
when CSL is offline he is deviously planning

Dang- everything but the kitchen sink! Nice setup-my dog does the same thing- every time the back end opens up she is right in there just assuming a mountain trip is underway.

Good use of the KennelAire doggie divider that is what I run also. Here Lilly is covered up she was shivering that day it was a bit chilly in the High Country-last Labor Day weekend near Mount Lincoln I believe.
 

Attachments

  • LaborDayWknd09 and Minolta rangefinder 049.jpg
    LaborDayWknd09 and Minolta rangefinder 049.jpg
    134.1 KB · Views: 3,177
Nice! She's got a mansion back there...better not let my mut see that picture. :)

The kitchen sink is still on the drawing board, but is not too far off!
 
Unbelievable.... You are extremely talented! I'm really diggin the efficiency of your design, especially how you incorporated storage cubbies into the sides of the drawers. Excellent work! and, thank you for sharing. I'm planning to build some sort of storage/sleep platform this summer and I'm hoping I can implement some of your design elements into my build.
 
Unbelievable.... You are extremely talented! I'm really diggin the efficiency of your design, especially how you incorporated storage cubbies into the sides of the drawers. Excellent work! and, thank you for sharing. I'm planning to build some sort of storage/sleep platform this summer and I'm hoping I can implement some of your design elements into my build.
Thanks. Yeah, the design kept growing as I was building it. After trying it out on a trip last weekend, I already want to modify it some more. I hope it can give you some ideas, I like it when I can contribute to someone elses builds.

Very impressive, nice work.
Thanks!

That is so awesome and as practical as it gets, I love it! Cute dog.
Thanks! Ruff-ruff says thanks too (named by the kids)
 

Members online

Forum statistics

Threads
278,305
Messages
3,554,042
Members
248,016
Latest member
Advally Service

Trending content

Back
Top