97 - Broken Thermostat Housing. Any Experience?

anormalflame

New member
1997 4Runner SR5 4WD 3.4

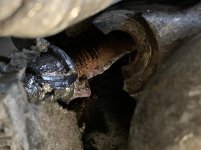
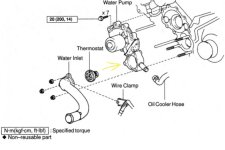
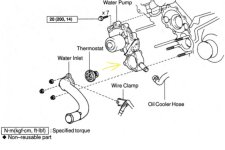
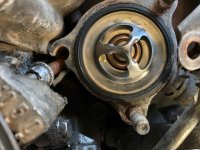
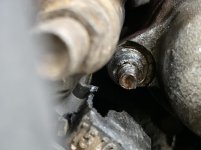
I was battling the rounded off thermostat nut closest to the timing belt cover to replace the thermostat after a coolant flush. Then finally the bolt broke free, but unfortunately it broke the thermostat housing the bolt was attached to in the process. Now the bolt is stiff and pointed downwards. I can still twist it out it seems, and I have a replacement, but I want to see if anyone can give me pointers what the hell I need to do before moving forward. Gonna go pick up a replacement thermostat housing now. Really hoping this isn't a major **** up.

See photos. Before / After

TIA
 

Attachments
  • IMG_9439.jpg
    IMG_9439.jpg
    131.4 KB · Views: 1,924
  • IMG_9445.jpg
    IMG_9445.jpg
    130.9 KB · Views: 1,284
Last edited:
Register to hide this ad
So from your description you have bent the stud. So remove the rest of the thermostat housing. With the room you have you could try a pair of vice grips or a tiny pipe wrench I have pipe wrench that is 6" long for things like this. Remember that both tools are directional in how they bite. I would avoid trying to straighten the stud but do what you got to do. A spray of PB blaster and letting it soak could help. Another method is taking the old nut off and using to nuts jammed together if you set the box end of the extra when 12 mm wrench on before the nut or use a line wrench you could get more bite. Heat may be difficult to use in this spot. :playball:
 
So from your description you have bent the stud. So remove the rest of the thermostat housing. With the room you have you could try a pair of vice grips or a tiny pipe wrench I have pipe wrench that is 6" long for things like this. Remember that both tools are directional in how they bite. I would avoid trying to straighten the stud but do what you got to do. A spray of PB blaster and letting it soak could help. Another method is taking the old nut off and using to nuts jammed together if you set the box end of the extra when 12 mm wrench on before the nut or use a line wrench you could get more bite. Heat may be difficult to use in this spot. :playball:


no first hand experience here but...


once he gets the old nut off the stud it doesn't look like the stud will have enough healthy threads for two nuts to go on safely...

I agree on NOT trying to straighten the stud as you could ruin the threads that the stud go into/

PB blaster or some type of penetrating oil sounds mandatory in this situation as you want that crusty stud to be free without much force messing up the internal threads on the block.

maybe some heat will be your friend to get that stud removed but it will be difficult to get in there unless you have already removed the items that are mostly in the way...

do you have anything to weld with? welding on a big nut on the end in there might help to remove

.
 
Last edited:
no first hand experience here but...


once he gets the old nut off the stud it doesn't look like the stud will have enough healthy threads for two nuts to go on safely...

I agree on NOT trying to straighten the stud as you could ruin the threads that the stud go into/

PB blaster or some type of penetrating oil sounds mandatory in this situation as you want that crusty stud to be free without much force messing up the internal threads on the block.

maybe some heat will be your friend to get that stud removed but it will be difficult to get in there unless you have already removed the items that are mostly in the way...

do you have anything to weld with? welding on a bit nut on the end there might help to slowly wiggle the stud until it gets loose enough to remove


.

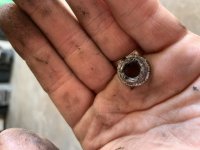
I have removed the nut with vice grip pliers. Worst rounded nut I’ve seen. Tried to do the same for the bolt, but it won’t budge. Gonna try PB blaster. I’m not a welder nor do I have anything or anyone to do it. ESP since we’re under quarantine.

I was worried I’d have to replace the water pump as well as the thermostat housing, but I think I can get away with replacing the housing and the bolt and it should be fine.
 

Attachments

  • 59F72C6C-6452-4554-8E4F-B24F6CBD1553.jpeg
    59F72C6C-6452-4554-8E4F-B24F6CBD1553.jpeg
    87.3 KB · Views: 1,235
So from your description you have bent the stud. So remove the rest of the thermostat housing. With the room you have you could try a pair of vice grips or a tiny pipe wrench I have pipe wrench that is 6" long for things like this. Remember that both tools are directional in how they bite. I would avoid trying to straighten the stud but do what you got to do. A spray of PB blaster and letting it soak could help. Another method is taking the old nut off and using to nuts jammed together if you set the box end of the extra when 12 mm wrench on before the nut or use a line wrench you could get more bite. Heat may be difficult to use in this spot. :playball:

See above response
 
This may call for you to remove the water pump to be able to get some grip on the stud, which in turn means the timing belt has to come off. You don’t want it to break off in the block.
 
This may call for you to remove the water pump to be able to get some grip on the stud, which in turn means the timing belt has to come off. You don’t want it to break off in the block.

That’s what I’m trying to avoid. Hopefully it still has enough for the thermostat housing to grip on with the new stud.
 
I really thing the double nut is the first place to go. Get a Die to clean the threads if use a good wrench not a real cheapy one if you have a 6 point that would be the best. Spray with PB then Clean the threads put wrench over the stud put your first nut on the stud place your second nut on stud use another wrench or a socket and turn them so they run into each other. Now use the wrench you put on first try to unspin the stud if the nuts turn and the stud does not tighten the nuts a little tighter and try again.

If you have to take the water pump off you could try heat if your doing this enlist the help of some one who has done this before. :director:
 
I really thing the double nut is the first place to go. Get a Die to clean the threads if use a good wrench not a real cheapy one if you have a 6 point that would be the best. Spray with PB then Clean the threads put wrench over the stud put your first nut on the stud place your second nut on stud use another wrench or a socket and turn them so they run into each other. Now use the wrench you put on first try to unspin the stud if the nuts turn and the stud does not tighten the nuts a little tighter and try again.

If you have to take the water pump off you could try heat if your doing this enlist the help of some one who has done this before. :director:

Hopefully it won’t come to taking off the water pump. I’m just worried because of the housing of the stud on the water pump broke off with the thermostat housing piece that broke. I’m thinking the new stud / nut could lock into the new thermostat housing to prevent it from leaking and equally tightening down over the thermostat.
 

Attachments

  • 8D297A81-C939-489B-A40E-9C043891F8BE.jpg
    8D297A81-C939-489B-A40E-9C043891F8BE.jpg
    70.6 KB · Views: 3,233
I have a confession. In my first, and so far, only Timing Belt replacement, I was still using a long-since junked beam bar torque wrench in that range and managed to overtorque and snap one of those studs right at the housing. No hope to get it out. It was a long weekend and I decided to just finish the job and go back in and fix it later.

I put it all back together with only two of the three nuts securing the thermostat housing. That was 2010, and 96k miles ago. (I decided to do these TBs at 120k intervals, and swap all associated parts when I do.) It works fine and has not leaked a drop. I have looked from time-to-time. No residue....nada. I have the new replacement stud sitting in the shop, and when I hit 240K, I will make it right when I do the TB. Only 24K to go.


So there's an option. Obviously, YMMV....
 
Last edited:
I have a confession. In my first, and so far, only Timing Belt replacement, I was still using a long-since junked beam bar torque wrench in that range and managed to overtorque and snap one of those studs right at the housing. No hope to get it out. It was a long weekend and I decided to just finish the job and go back in and fix it later.

I put it all back together with only two of the three nuts securing the thermostat housing. That was 2010, and 96k miles ago. (I decided to do these TBs at 120k intervals, and swap all associated parts when I do.) It works fine and has not leaked a drop. I have looked from time-to-time. No residue....nada. I have the stud sitting in the shop, and when I hit 240K, I will make it right when I do the TB. Only 24K to go.


So there's an option. Obviously, YMMV....

I buttoned it back up and put everything back together except the bent stud. I cranked it up and it’s leaking significantly. I’ll have to get that stud out and swap it. Gonna tackle it tomorrow. When the new thermostat housing gets here, I’ll put that on and hopefully won’t have to worry about the water pump for now.

I’ll just replace the water pump when I do my TB if all goes according to plan tomorrow.

All this for a rounded nut. -_-
 
That’s what I’m trying to avoid. Hopefully it still has enough for the thermostat housing to grip on with the new stud.

You don't have to remove the timing belt to remove the water pump. There's a handy little tool that compresses the tensioner, allowing you to put the pin back in and then slip the belt (after holding it in place with clamps on the camshaft & crankshaft gears) off the water pump. I've done it and it works well for a water pump only fix.

Amazon.com: Schley (SCH97300) Toyota Timing Belt Tensioner Compressor: Automotive.
 
You don't have to remove the timing belt to remove the water pump. There's a handy little tool that compresses the tensioner, allowing you to put the pin back in and then slip the belt (after holding it in place with clamps on the camshaft & crankshaft gears) off the water pump. I've done it and it works well for a water pump only fix.

Amazon.com: Schley (SCH97300) Toyota Timing Belt Tensioner Compressor: Automotive.

Interesting. I’ll have to try to find a video of this process if it comes down to putting in a new water pump now.
 
Interesting. I’ll have to try to find a video of this process if it comes down to putting in a new water pump now.

No video that I am aware of. It just goes in between the tensioner pulley and the water pump pulley. You then get a box wrench and slowly turn the center nut, which slowly expands the tool. The tensioner fluid will release and then you can line up the pin holes (comes with a pin) and you put it in. Now you have enough slack to slip the timing belt off the water pump and you're home free. Saves a lot of time having to remove the tensioner completely, timing belt, etc etc.

I did this because I was fixing up a botched water pump job. Some mechanic didn't remove the pits and uneven gasket surface and just slapped a ton of sealant all over the water pump. Surprise, that didn't work and it leaked really bad. Timing belt was just replaced so it was a water pump only job.
 
I have to ask [MENTION=115347]gamefreakgc[/MENTION] if there was a lot of coolant that got onto the belt down past the pump. I just plain forgot about the tensioner tool the other day.
 
I have to ask [MENTION=115347]gamefreakgc[/MENTION] if there was a lot of coolant that got onto the belt down past the pump. I just plain forgot about the tensioner tool the other day.

Not in this case. It was leaking due to a rusty/pitted water pump surface on the block so all the coolant was leaking down below the belt and out near the oil pan. Before I used the tensioner tool, I pulled the thermostat to drain out all coolant in the block.
 
no first hand experience here but...


once he gets the old nut off the stud it doesn't look like the stud will have enough healthy threads for two nuts to go on safely...

I agree on NOT trying to straighten the stud as you could ruin the threads that the stud go into/

PB blaster or some type of penetrating oil sounds mandatory in this situation as you want that crusty stud to be free without much force messing up the internal threads on the block.

maybe some heat will be your friend to get that stud removed but it will be difficult to get in there unless you have already removed the items that are mostly in the way...

do you have anything to weld with? welding on a big nut on the end in there might help to remove

.

As you may have seen, I got the nut off. The stud is still bent. I’m waiting for the new thermostat housing to come in now.

As far as heat, do you recommend I torch the end of the stud to heat it up and try to turn it out with vice grip pliers? I can’t exactly heat up near the engine where the stud is coming from. Do you think this should be enough? The stud appears pretty rusted.

Once the new thermostat housing gets here I plan on finishing the job. Hopefully I can thread the new stud in and slip it through the new housing and put a nut on and that’ll be enough to hold so I don’t have to replace the water pump that also broke where the stud slides through. The timing belt is new enough where I shouldn’t need to replace it. Plus it’s a hell of a job I really don’t want to do right now.

[MENTION=164664]brillo_76[/MENTION]
[MENTION=10169]TheDurk[/MENTION]
 

Attachments

  • 0954773B-82BF-4669-B68F-4C5D03E34841.jpg
    0954773B-82BF-4669-B68F-4C5D03E34841.jpg
    70.6 KB · Views: 2,519
Using heat the idea is to heat the block not the stud. Start with the PB and use the double nut method first. If the water pump was leaking might as well pull it and re gasket it or replace as needed for PM along with the belt. Check the pulleys if you know the history and they feel good you could pass on those and the hydraulic damper:surfer:.
 
Using heat the idea is to heat the block not the stud. Start with the PB and use the double nut method first. If the water pump was leaking might as well pull it and re gasket it or replace as needed for PM along with the belt. Check the pulleys if you know the history and they feel good you could pass on those and the hydraulic damper:surfer:.

The water pump was never leaking. The reason for all of this was a rounded nut on the stud in question. I had flushed the system and couldn't get the nut back off to put in the new thermostat. I managed to break the water inlet (thermostat housing) and the housing for the stud on the water pump in the process. I wasn't able to do the double nut method when I tried the other day due to the extent that the stud was bent. I can give it another shot once the new thermostat housing gets here, but I'm trying to avoid messing up the threads in the block. If it comes to the heat method, I'm not sure how i'll heat the block with the water pump still on. There's hardly any space to maneuver as it is. Really hoping I don't have to get this water pump off and replace it right now.
 

Attachments

  • bolt.jpg
    bolt.jpg
    90 KB · Views: 1,920

Members online

Forum statistics

Threads
278,312
Messages
3,554,083
Members
248,016
Latest member
Advally Service

Trending content

Back
Top