A Live Update from Mebe4running's Cave Operation

Sheesh! Not what I expected based on your email. I thought you had a collection of boxes delivered. Make sure you get all the surface rust. May want to grab a can of rust inhibitor.

Sorry you're a bit far to swing by and give you a hand. Hopefully you'll get it all buttoned up before the trip.

Okki
 
Sheesh! Not what I expected based on your email. I thought you had a collection of boxes delivered. Make sure you get all the surface rust. May want to grab a can of rust inhibitor.

Sorry you're a bit far to swing by and give you a hand. Hopefully you'll get it all buttoned up before the trip.

Okki

Thanks Okki... its certainly going to be a long one!
 
Sh!t McGit, what a mess! I had the same thing happen with my 98 Ram - my interior was a much easier tear down though.

Definitely prime time for some mods though! You should take the opportunity to pull a couple spare wires from the engine bay to a spot in the back for any future accessories you might install.
 
Sh*t that sucks, if you we're closer I would give you a hand. Any permanent damage or parts that you will need to replace you think?
 
Sh*t that sucks, if you we're closer I would give you a hand. Any permanent damage or parts that you will need to replace you think?

Thanks appreciate it! Its all going to be fine..... if i can put it back together again that is :) Glad to have addressed the issue straight away though!
 
Thanks appreciate it! Its all going to be fine..... if i can put it back together again that is :) Glad to have addressed the issue straight away though!

Bummer with the water leaking in.It has to be leaking from above and running down. It can't leak in enough to notice on those rear flapper vents down low unless you submerge the truck.Check your rack mounts too as water goes in those roof channels and will run right thru the roof bolt holes and get in.

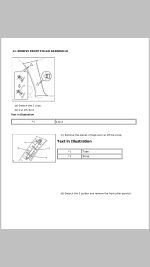
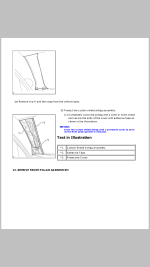
You probably already got it off but as far as the "A" piller garnish panel,I never took mine the whole way off because as you stated there are plastic clips that will only let it come off so far.I believe they are like that to catch it so it doesn't hit you in the face if the pillar air bag blows.

You just grab a hold of it and pull to initially detach the clips .I have the repair manual on my phone now as I just got a Note 2 phone that has a 80GB hard drive. Just take a screenshot of the page and it downloads straight to my drop box so I can post a pic. Here's the manual reference for removal from my phone.
 

Attachments

  • 2013-01-19 17.14.28.png
    2013-01-19 17.14.28.png
    74.1 KB · Views: 553
  • 2013-01-19 17.14.59.png
    2013-01-19 17.14.59.png
    96.8 KB · Views: 569
Bummer with the water leaking in.It has to be leaking from above and running down. It can't leak in enough to notice on those rear flapper vents down low unless you submerge the truck.Check your rack mounts too as water goes in those roof channels and will run right thru the roof bolt holes and get in.

You probably already got it off but as far as the "A" piller garnish panel,I never took mine the whole way off because as you stated there are plastic clips that will only let it come off so far.I believe they are like that to catch it so it doesn't hit you in the face if the pillar air bag blows.

You just grab a hold of it and pull to initially detach the clips .I have the repair manual on my phone now as I just got a Note 2 phone that has a 80GB hard drive. Just take a screenshot of the page and it downloads straight to my drop box so I can post a pic. Here's the manual reference for removal from my phone.

Your the man! Thank you sir!

You are correct (surprise) that the water came in from above (the roof) and not the white ventilation sides. Rack mounts where bone dry. So it was the rubber grommet by the rear hatch door.

I believe your right as to the a-pillars and the plastic clips. It seems from personal speculation, that when the Side Certain Airbag is deployed it pushes the a-pillar clear enough to fully inflate. The black plastic clip labeled *1 Clip A was exactly what I was having trouble with and as you well stated seems to hold back the a-pillar allowing it a limited travel distance so it doesn't smack in the face, hence why its hard to unfasten, but I got there albeit an hour later!

Out of interest, what repair manual was that from? I have the one you kindly put together, in fact I have it printed and bounded but was able to that diagram?

Note 2, nice! I have the S3 with a 64 GB Micro SD + the 16 GB internal memory. Truly amazing devices!

Thanks Again Harper7!
 
Out of interest, what repair manual was that from? I have the one you kindly put together, in fact I have it printed and bounded but was able to that diagram?

Note 2, nice! I have the S3 with a 64 GB Micro SD + the 16 GB internal memory. Truly amazing devices!

Thanks Again Harper7!

Nashman69g gets all the credit for the repair manual and I put up the parts manual.
I do have the Repair manual in PDF from the Nashman. His html version is way better on a pc and doesn't work on the phone but the pdf version does.Just put it on you sd card and download the Adobe reader app. Here's the link to download it in pdf form from my google drive.It is about 205mb ....... https://docs.google.com/file/d/0B6zBu2SN9Qn5MmZmMzc3YTMtY2Y5ZS00YWVlLWI5ZmItZGExN2NlZGJjNWFi/edit


I'm lovin the Note 2 with Sprint LTE of as I'm coming off a GS2 that just had 4G WiMax. We have a LTE tower close and have download speeds of 10+ mbs download speeds inside the building wirelessly tethered to my laptop here at work. Rooted it within 2 hrs of owning it and put the JellyBomb 4.2.1 ROM on it.[ROM] JellyBomb ver. 12.1.0 -[LK8] The GS3 version of the ROM is out too as I rooted a bunch of peoples phones here at work and put it on them too.
 
Nashman69g gets all the credit for the repair manual and I put up the parts manual.
I do have the Repair manual in PDF from the Nashman. His html version is way better on a pc and doesn't work on the phone but the pdf version does.Just put it on you sd card and download the Adobe reader app. Here's the link to download it in pdf form from my google drive.It is about 205mb ....... https://docs.google.com/file/d/0B6zBu2SN9Qn5MmZmMzc3YTMtY2Y5ZS00YWVlLWI5ZmItZGExN2NlZGJjNWFi/edit


I'm lovin the Note 2 with Sprint LTE of as I'm coming off a GS2 that just had 4G WiMax. We have a LTE tower close and have download speeds of 10+ mbs download speeds inside the building wirelessly tethered to my laptop here at work. Rooted it within 2 hrs of owning it and put the JellyBomb 4.2.1 ROM on it.[ROM] JellyBomb ver. 12.1.0 -[LK8] The GS3 version of the ROM is out too as I rooted a bunch of peoples phones here at work and put it on them too.

Whoops, my bad. Thanks got it downloaded now!

The JellyBomb look's awesome. Any quirks or glitches; like random shutdowns?
 
This looks terrible... Good thing you have a great attitude about it and you're not scared to take everything apart to fix it the right way.

When you get done this weekend and everything's is nice and dry and sound proof and all the cables are organized and ran the way you want... Could you take some picks of the before leaking spot and post any advice to avoid this situation.:hiding:

I have seen a lot of people poke a small hole in the wire bundle to feed wire from the water channel to the hatch... Which Is what i planned on doing since I would be too scared to cut a hole in the XM fin and run them though there... And never heard this happening only happing from the mounting bolts for the roof rack.

On and the rack and light set-up looks great!
 
This looks terrible... Good thing you have a great attitude about it and you're not scared to take everything apart to fix it the right way.

When you get done this weekend and everything's is nice and dry and sound proof and all the cables are organized and ran the way you want... Could you take some picks of the before leaking spot and post any advice to avoid this situation.:hiding:

I have seen a lot of people poke a small hole in the wire bundle to feed wire from the water channel to the hatch... Which Is what i planned on doing since I would be too scared to cut a hole in the XM fin and run them though there... And never heard this happening only happing from the mounting bolts for the roof rack.

On and the rack and light set-up looks great!

Feet up and beer inhand, at last!

All went well.... I didnt BREAK anything! Crying miracle as there was a lot of " I THINK it goes this way.... no, its this way, oh... its that way!" kind of actions as I removed piece by piece of my interior.

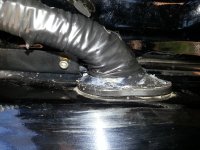
The source of leak was JUST the rubber grommet on the rear hatch. I made a hole big enough to accommodate roughly 5'8" in circumference of bundled wire. The issue was there was a small hole behind the back that I did see that was left uncovered, allowing water to enter the interior of the truck.

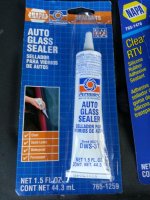
As I had the interior headliner off allowing it to dry properly I took full advantage to seal the opening from the interior and used some Auto Glass Sealer and Clear RTV all around the wires and grommet. Then from the outside I did the same and applied electrical tape, then additionally applied a second coat of RTV. This by no means is the best way but from my stand point it was sufficient enough that water wouldn't protrude through the interior again. Next time around I would do it differently. Not 100% how but not the way I did it the first place, thats for sure! Hope that Helps!

 

Attachments

  • 20130118_155828.jpg
    20130118_155828.jpg
    132.8 KB · Views: 357
  • 20130120_124320.jpg
    20130120_124320.jpg
    136.6 KB · Views: 362
Last edited:
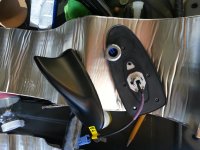
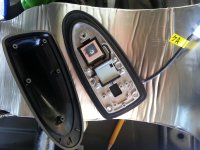
I would be too scared to cut a hole in the XM fin and run them though there

Just for future reference if you ever decided to run wires through the fin.

Here you can see size what size hole you'd be running the wires through.
 

Attachments

  • 20130119_112734 copy.jpg
    20130119_112734 copy.jpg
    129.9 KB · Views: 346
  • 20130119_112719.jpg
    20130119_112719.jpg
    127.8 KB · Views: 351
Feet up and beer inhand, at last!

All went well.... I didnt BREAK anything! Crying miracle as there was a lot of " I THINK it goes this way.... no, its this way, oh... its that way!" kind of actions as I removed piece by piece of my interior.

The source of leak was JUST the rubber grommet on the rear hatch. I made a hole big enough to accommodate roughly 5'8" in circumference of bundled wire. The issue was there was a small hole behind the back that I did see that was left uncovered, allowing water to enter the interior of the truck.

As I had the interior headliner off allowing it to dry properly I took full advantage to seal the opening from the interior and used some Auto Glass Sealer and Clear RTV all around the wires and grommet. Then from the outside I did the same and applied electrical tape, then additionally applied a second coat of RTV. This by no means is the best way but from my stand point it was sufficient enough that water wouldn't protrude through the interior again. Next time around I would do it differently. Not 100% how but not the way I did it the first place, thats for sure! Hope that Helps!
It's a big help... Thanks for taking the time to post this. I plan on mounting a few lights in the future and those wires combined with thickness of a CB cable so ill make sure to seal it up.... It doesn't rain too often in LV but when it does it floods.
 
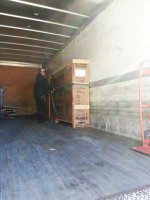
The tent has finally arrived!!!!! 8 months later!!!!

Now I just need to find the time to open it and install it! :)

Pics hopefully by Sunday/Monday!
 

Attachments

  • Tent-TRUCK.jpg
    Tent-TRUCK.jpg
    131.3 KB · Views: 259
Last edited:
This made my decision to run my rack light wires to the front of the rack and then down the front windshield a little easier. Although for my HAM antenna I did run the coax through the washer fluid rubber tube on the right. I cut a small slit and slid the coax through then electrical tape the crap out of it. I did it mid way so don't think I will have much leaking.

I also really like the fact you took a photo of the guy unloading the tent from the truck.

:rofl:

And this has to be the coolest photo.

77966d1356144385-live-update-mebe4runnings-cave-operation-_mg_4510.jpg
 

Members online

No members online now.

Forum statistics

Threads
278,315
Messages
3,554,104
Members
248,016
Latest member
Advally Service

Trending content

Back
Top