Here is a link that was helpful.
The end of DIY car maintenance and how I replaced the e-locker motor on my 2010 4Runner - Daniel D. McKinnonDaniel D. McKinnon
From the manual:
Toyota 4Runner: Reassembly - Rear Differential Carrier Assembly(w/ Differential Lock) - Service Manual
Tools needed:
12mm socket/wrench
14mm socket/wrench
Larger flat head/pry bar
Small flat head
jack
jack stands
PB blaster
pliers
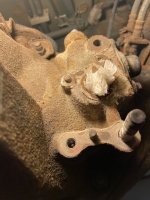
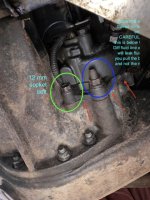
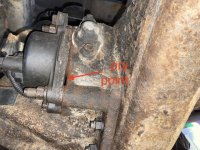
Step 1: Unlike many other components on my truck this was not overly impacted by salt/elements. Use PB Blaster or equivalent to the 3 bolts/nuts, see photo. I did not need to remove the plastic cap. This seems like a tight spot but there is plenty of room to work below and from above. I do not have the spare, so there is more head room, really only need to acces s the 2 plugs and breather from above. I have the rci gas tank skid and still had more than enough room to wrench, remove the motor and access the locker fork port.
Step 2: Set your rear wheels off the ground and secure safely with jack stands etc. You will need to be able to move the wheels to help align. I moved it in and out of 4H and 4L and 2H. Obviously kept it in Neutral with engine on, but just moving the key to on position was fine to manipulate the actuator.
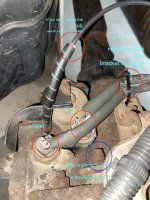
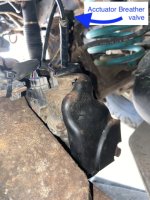
Step 3: Unplug the top 2 wire connection~lock confirmation sensor, 5 wire power/sensor, and the actuator breather tube, just pull it out where I marked in red circle. Do note where the breather is, pretty low if you consider a Diff breather mod. I will be moving this up to match my diff breather.
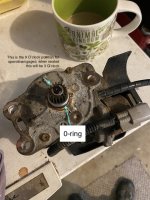
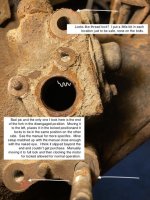
Step 4: Unscrew the 3 nuts/bolts. The 2 marked blue are guide pins threaded on both ends. If the nuts donÂ’t budge and it turns it's the inner thread giving. My top guide came out, and my bottom nut gave and the guide stayed in. **If your bottom guide threads off from inboard, the hole is open to the Diff fluid and it will leak out. These are both 14 mm. The 3rd is a bolt and 12 mm marked in green. You can then pry the actuator away, there are points that are obvious that give good pry points with a flathead. If itÂ’s corroded it may take a little muscle and then gently work it loose as there is a small o-ring you are going to not want to ruin if you can help it. I then moved the actuator up and over the casing and drive shaft and out for a cleaning and inspection. I cleaned up the face of the actuator and the diff casing as best I could without putting too much debris near the port and on the pinion. I used diff oil to clean and relube the pinion and o-ring before replacing and used a little on the port seat as well.
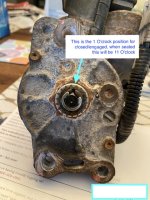
Step 5: I manually moved the fork to fully engage, as my first attempt to replace the actuator in the fully open position did not align with the pinion and it wouldnÂ’t unlock it after it locked and the sensor couldnÂ’t read it so the light blinked even though it was locked again. I repeated the disassembly and cycled the actuator to lock (11 OÂ’Clock position when placed in the port) by hooking up the 5 pin while it was in 4L and the actuator was hanging outside of the port. I then moved the fork to full lock, see pic (only took one in open and even then you canÂ’t see the fork) and manual. I then gently replaced the actuator to align the teeth. Make sure you tighten the bolts/nuts in a triangle pattern. It takes some wiggling and patience, but it should press in using the bolts. Remember you have an o-ring on there. There also looked to be a dab of threadlock on the bolt mount face and I also added a dab just to be safe. Torque is 20 ft lbs. on the bolts. Reattach the 2 plugs and the breather tube (just push it back in). Reattach the plug zip to itÂ’s bracket or zip tie if you cut the factory zip.
Step 6: cycle through lock and unlock with wheels off the ground by hand, then test under full power, you have to move the wheels for it to engage after you press the button. Mine went back to normal and immediate working condition. Hope it stays that way. Keep an eye for any leaks. Should be good to go and if you ever have it lock and wontÂ’ disengage on trail, you now know how to manipulate it manually and get home safe. One last note, there is a lot of info on this for 3rd gens, their actuator looks to be on the back of the diff compared to the 5th gen being on the front driverÂ’s side. Also, the link for DDMckinnon shows him purchasing a new actuator, Thankfully I didnÂ’t have to do that, but I noticed there are a number of models out there that are very similar. DD mentions that he had to mod his to fit, make sure you get the correct part as I think itÂ’s a difficult part to source and get the correct part #. It doesnÂ’t look to show up on the parts diagrams online. Not a dig on DD at all, just something to be aware of and his observation and experience may be accurate regarding the part.
https://www.toyota-4runner.org/attachment.php?attachmentid=382721&stc=1&d=1622571365
https://www.toyota-4runner.org/attachment.php?attachmentid=382722&stc=1&d=1622571365
https://www.toyota-4runner.org/attachment.php
attachmentid=382723&stc=1&d=1622571365
https://www.toyota-4runner.org/attachment.php?attachmentid=382724&stc=1&d=1622571365
https://www.toyota-4runner.org/attachment.php?attachmentid=382725&stc=1&d=1622571365
https://www.toyota-4runner.org/attachment.php?attachmentid=382726&stc=1&d=1622571365
https://www.toyota-4runner.org/attachment.php?attachmentid=382727&stc=1&d=1622571365
https://www.toyota-4runner.org/attachment.php?attachmentid=382728&stc=1&d=1622571365