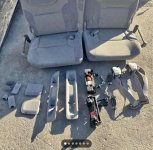
Aftermarket Third Row install (3rd Row)

Asmara

New member
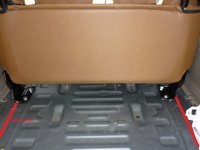
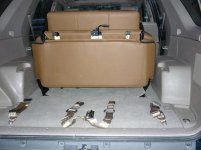
Here’s version 1.0 of a rear seat install. I’m sure somebody can take what I learned and make it even better. We now know that the seat fits. I didn't post pictures but I had the cargo deck that had to be removed. There's an ugly gap behind the middle seats that will have to be addressed.

I got tired of not having a third row seat. We wouldn't use it that much but it would be nice to have when needed. I put a 3rd row into my 3rd gen 4runner without any problems. It was actually a much more basic install than I thought it would be. I looked for seats from the same vendor but they don’t sell them for the 4th gen. Little Passenger sells them but they are pricey.

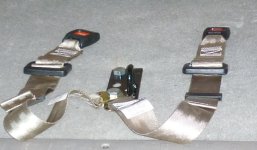
I started measuring, I started looking. In the end I figured out that fold and tumble seats from a Jeep Wrangler 1997 - 2002 (TJ) would fit. I bought seat belts from Seat Belts Plus because I wanted an U.S. manufacturer.

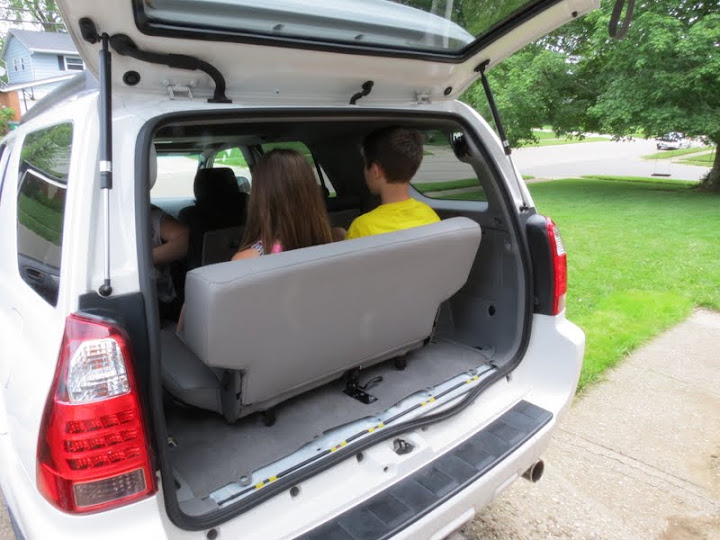
I originally tried to mount it facing out. Headroom was better but there was no leg room. I also thought it would be safer and the kids really wanted it facing out like on the 3rd gen. It just didn't fit right. Given that our vehicles are full frame and I've seen unibody cars (Highlander) with about the same spacing in the third row, I decided to mount it forward facing.


Parts

1 - 97-02 Wrangler Fold and Tumble Seat
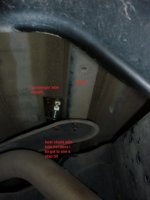
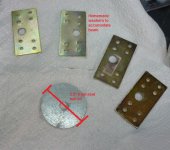
2 - Seat Belts + hardware kits (you can skip the kit if you have a good hardware store but the extra-large fender washers might be hard to find)
8 - 12mm x 35mm bolts, extra-large fender washers, lock washers

Tools
Wrenches
Phillips Screw driver
Utility Knife
Measuring Tape
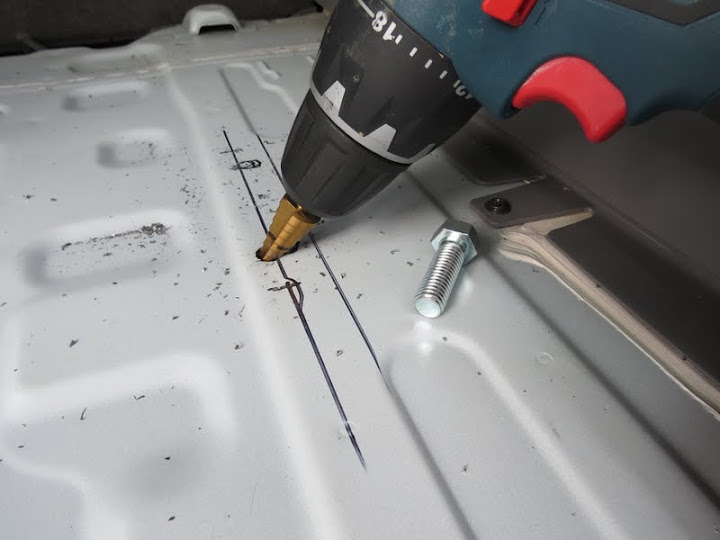
Step drill bit (very important – more control, better holes for the sheet metal)

Steps
Remove the rear tire.
Removed the rear carpet
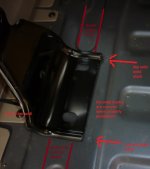
Drill holes
Replace carpet and drill holes in carpet
Mount seat and seat belts

Time
4 to 8 hours
 

Attachments

  • web - washers.jpg
    web - washers.jpg
    101 KB · Views: 50,551
  • web- mounting location.jpg
    web- mounting location.jpg
    67 KB · Views: 50,271
  • web - fit check.jpg
    web - fit check.jpg
    77.6 KB · Views: 51,449
  • Web - mounting right side.jpg
    Web - mounting right side.jpg
    79 KB · Views: 50,017
  • web mounted.jpg
    web mounted.jpg
    127 KB · Views: 56,839
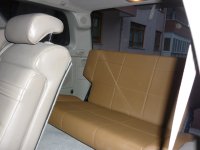
  • Web - up position.jpg
    Web - up position.jpg
    34.3 KB · Views: 55,758
Register to hide this ad
Wow, that fits in there really well. I wouldn't be interested in doing this in the part of the country I live in, because of the salt. But this looks very well done.
 
The fit is really good. Somebody could probably design different brackets that make the bolt in process easier.

Future plans are to see if I can cut down the seat pivot bar where it is inserted into the brackets and use something like a reusable cotter key to make the seat easily removable.

Cosmetically, I would love to match the rest of the seats better but that involves a trip to the upholsterer. Also, I have the ugly spot on the floor that needs the non-cargo deck cover (58401-35010) but it it really expensive. I'll mess with the old parts first to see if I can somehow make it work or try to find salvage next time I'm in the US.

Works now. I'll post any other updates as I learn more from daily use.
 
This stuff is amazingly helpful. Thank you. I am about to buy a JC Whitney seat just like your 3rd gen 3rd row install. Are you absolutely sure that seat wouldn't have worked in the 4th gen? Because the Whitney seat looks like it would width-wise and I can get it used for $200.

The kids that would ride back there occasionally would be 10 and 12.
 
This stuff is amazingly helpful. Thank you. I am about to buy a JC Whitney seat just like your 3rd gen 3rd row install. Are you absolutely sure that seat wouldn't have worked in the 4th gen? Because the Whitney seat looks like it would width-wise and I can get it used for $200.

The kids that would ride back there occasionally would be 10 and 12.

The Whitney seat wasn't an option for me because they won't ship freight using USPS. I'm overseas and that is the only way i can get mail.

The only problem I see with the Whitney seat is trying to mount it rear facing. The kids wanted this seat to be just like the 3rd gen but when fit it rear facing there was no leg room for them because of the angle of the rear, now middle, seat. That may be why the Whitney seat indicates it doesn't fit. With the 3rd row install forward facing, the angle of the middle seat gives you leg room.

The fold and tumble works well and leaves you room for groceries when up. My kids are 11 and 13 now and fit into the seat without a problem.
 
Last edited:
Awesome! I have tossed around the idea of doing something like this for a while. When my friends and I go camping it seems to be my truck everyone piles into. My friends may be a bit more cramped being that we are old farts but better than nothing.
 
I see what you are saying about the 4th gen 2nd row seat angle affecting the JC Whitney seat. The links to the Jeep seat and seat belts are helpful. They make that seat in a black and grey as well as tan. Hopefully they have grey in stock.

I took out the carpeting and have it down to bare floor. Note, for those of us with cargo shelves there are 2 indented plastic pieces made into the floor carpeting (visible in bottom right photo). You take them out using a small allen wrench or something angled and rigid to fit in the holes and delicately swing out the tabs. You do not use a screwdriver and pry them out or they will break in half (I found this out the hard way).

Lastly, looks like your homemade plates are made from door hinges - is that correct?
 
Last edited:
Awesome! I have tossed around the idea of doing something like this for a while. When my friends and I go camping it seems to be my truck everyone piles into. My friends may be a bit more cramped being that we are old farts but better than nothing.

They would probably fit back there but for old folks (like me) the biggest problem is getting there. You have to fold down the middle seat and then crawl over it. Kids no problems, adults might have an issue.

Lastly, looks like your homemade plates are made from door hinges - is that correct?

No. They are just flat pieces of some kind of treated construction metal I picked up at the hardware store.
 
They would probably fit back there but for old folks (like me) the biggest problem is getting there. You have to fold down the middle seat and then crawl over it. Kids no problems, adults might have an issue.


Yea, I am the runt of the littler for sure. I was looking into a way to turn them the other way and have them facing out. May still be a bit cramped but easier to get in and out of.
 
Yea, I am the runt of the littler for sure. I was looking into a way to turn them the other way and have them facing out. May still be a bit cramped but easier to get in and out of.

You'll see when you test fit the seat but, as I recall, the angle of the middle seat pushes the 3rd row seat towards the back so far that I think there was only slightly more than a foot of floor space where you could put your feet.
 
That is pretty cool. My wife was just saying that she wished we had a third row. I will have to look into this a little more
 
I ordered the seats mentioned in the top post in grey. They are made by Smittybuilt. You can go to the smittybuilt site and then choose your vendor from there. Free shipping but had to pay tax. $256 OTD

Also, learned that there is another alternative seat made by Bestop. Part No. 39439. Around $320 list

The Bestop seat (see below) has headrests and features better colors from the photos.

The installation instructions appear to be for the same seat.

95554-md.jpg
 
I ordered the seats mentioned in the top post in grey. They are made by Smittybuilt. You can go to the smittybuilt site and then choose your vendor from there. Free shipping but had to pay tax. $256 OTD

Also, learned that there is another alternative seat made by Bestop. Part No. 39439. Around $320 list

The Bestop seat (see below) has headrests and features better colors from the photos.

The installation instructions appear to be for the same seat.

95554-md.jpg
Rear seat 1.5. Can't wait to see what you come up with. Let me know if you need any info from my install to help. Don't try and cut the carpet like I did. It wasn't worth it. Pull out the carpet, drill your holes and mount the brackets right on top.
 
Excellent point about the carpet!

So I received the seat today and it is really nicely made although I wish it had the headrests. The headrests would obscure the visibility out the rear for the driver but could help in a whiplash situation. How did you get your arms around that part?

Now converting your hardware to imperial - that is .5 in. x 1.5 in. bolts. and related hardware. Wait - I might stick with metric seeing as one of the holes in the mounting bracket is a bit larger diameter than .5 in. But nothing a drill bit can't handle.

The step bit was $45 at Sears so that's a big no. I just checked harbor freight and can get a set of 3 step bits for $13.

The metal I will use for under body support are zinc mending straps (sears). They seem to need the least amount of machining to get to work right. One could mod some door hinges for plates but you'd have a lot to cut.

To protect the installation under the car I will hit it with some primer and rubberized under carriage spray. For the side supports I am considering having someone tack weld the bolts to the plates. Then using construction adhesive or something you could glue the plates to the underside so the bolts stick up through the floor and carpet. Might make it easier to install the seat from topside or remove it in a pinch.

One question - I can't tell from the photo where the seat is stowed - on the center tie down did you share a bolt with the two seat belt anchors?

And one more - did you go with the 60 inch belts or did you go longer?
 
Last edited:
Excellent point about the carpet!

So I received the seat today and it is really nicely made although I wish it had the headrests. The headrests would obscure the visibility out the rear for the driver but could help in a whiplash situation. How did you get your arms around that part?
My seat doesn't have head rests so it wasn't really an issue. With the kids, the seat covers much more of their back/neck than on an adult.

Now converting your hardware to imperial - that is .5 in. x 1.5 in. bolts. and related hardware. Wait - I might stick with metric seeing as one of the holes in the mounting bracket is a bit larger diameter than .5 in. But nothing a drill bit can't handle.
I would just standardize on one size bolt. If you get the seat belt mounting kit with the seatbelts, you can just match up the size and strength. I think that the bolts were grade 8 but they may have been grade 5. I used metric because I am overseas (well also everything in the car is also metric).


The step bit was $45 at Sears so that's a big no. I just checked harbor freight and can get a set of 3 step bits for $13.
I used the harbor freight bits. They work great. If you have never used one they are a dream in sheet metal. I learned about them when I put in the spoiler.


The metal I will use for under body support are zinc mending straps (sears). They seem to need the least amount of machining to get to work right. One could mod some door hinges for plates but you'd have a lot to cut.

To protect the installation under the car I will hit it with some primer and rubberized under carriage spray. For the side supports I am considering having someone tack weld the bolts to the plates. Then using construction adhesive or something you could glue the plates to the underside so the bolts stick up through the floor and carpet. Might make it easier to install the seat from topside or remove it in a pinch.

One question - I can't tell from the photo where the seat is stowed - on the center tie down did you share a bolt with the two seat belt anchors?
Yes. I put two bolts into the anchor and used one for the seat belts. See photo below.

And one more - did you go with the 60 inch belts or did you go longer?
I think I went with the 60" belts. I looked at my purchase history and didn't see the actual length.
 

Attachments

  • Rear Mount Bolts.jpg
    Rear Mount Bolts.jpg
    135.3 KB · Views: 3,545
Got the seat installed this weekend and wanted to share some photos.

Some notes on the install...
The step bit was on sale at HF for $5. The bit was awesome and made the job go smoothly. I went with .5 in x 1.5 in long bolts.

Put some extra carpeting I had lying around in the gap where I had removed the cargo tray.

Spent a lot of time cutting holes in the carpet for the bolts. You have to peel back the carpet from the padding in the corners and pick away at it to clear the hole for the bolt.

Still waiting on the seat belts. All in all everything went smoothly thanks to all the hard work done before by Asmara. Can't thank you enough!

The kids love the seat and can't wait to go on a road trip.

IMG_2131.JPG


IMG_2132.JPG


IMG_2145.JPG


IMG_2143.JPG


4runner%25203rd%2520row.jpg


Dry fit test

4runner%25203rd%2520row%25202.JPG


Kids are sitting upright.

IMG_2150.JPG
 
Wow great job! I know this is an old post but I just purchased a new to me 07 4Runner. I’m looking at doing this real soon to it since there’s six of us and I really need the room. Is there any more tips or is there any other options out there now before I take this on? Thanks in advance!
 
I am looking to buy 3rd row seats including with the hardness, is it possible for the seats along with the hardness to fit on a non 3rd row.
 

Attachments

  • Screenshot_20230425-185215.jpg
    Screenshot_20230425-185215.jpg
    135.4 KB · Views: 580

Members online

Forum statistics

Threads
278,307
Messages
3,554,056
Members
248,016
Latest member
Advally Service

Trending content

Back
Top