Anyone have a camping/sleeping setup inside of the 4Runner?

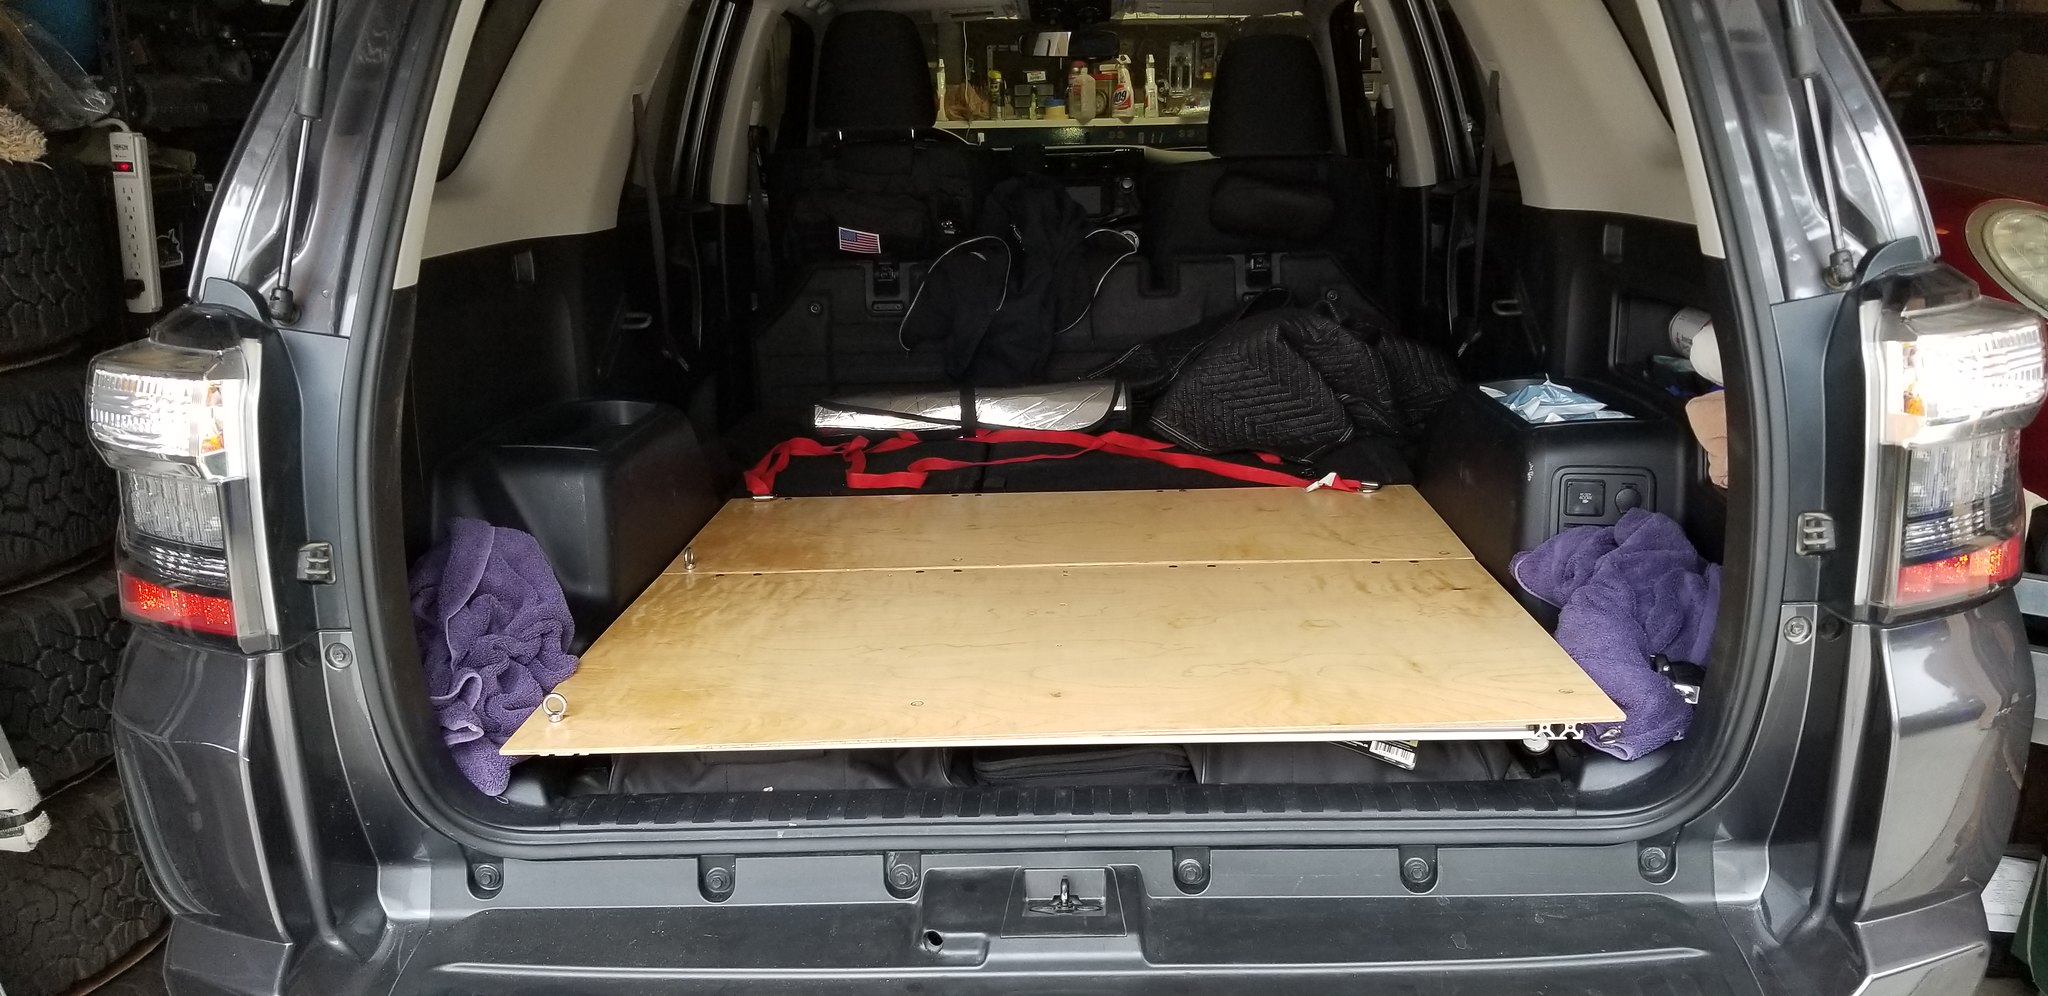
Like many of you, I have sought out to level out the back of the 4Runner using a simple sheet of plywood on some runners. I also wanted to add some storage to it while maintaining room to sleep in and didn't want to lose too much space, so behold the pictures below! Full disclosure: I do not have the time, skill, or resources to build this myself so I paid a pretty penny to have it done. It is based on and built by the same guy who did this: Building a 5th Gen (2010+) 4Runner Storage Platform – ADVENTURE TACO with a custom twist.

The drawer uses these: Firgelli Automations Full Extension Ball Bearing Drawer Slides 400 lb Capacity (36 Inch) - - Amazon.com

I absolutely love this! I have a similar set up but without the drawer on the one side, the head room is fantastic. When i redo mine i'll definitely reference what you did and the original.

esn3Jfyl.jpg


esERmBXl.jpg
 
Last edited:
Got some requests for more details on the Aluminum Extrusion Frame platform:

51252184500_595c4c0781_o.jpg


The Frame (all parts from Tnutz.com):

Side Rails -

2 Series 10 EX-1020 1" x 2" Smooth T-Slotted Aluminum Extrusion, Length 38", no machining

Front Cross Rail -

1 Series 10 EX-1010-D 1" x 1" Smooth Tri-Slot T-Slotted Aluminum Extrusion, Length 37 11/16", Machining M6 X 1.0 X 25mm Deep Tap BOTH ENDS (this could be 1" x 2" if more strength is needed)
2 1-Hole Side Connectors EF-010 10 Series Blank End Fastener Clip (you will need to drill holes though the side of the Side Rails to tighten these)
2 Metric Button Head Socket Cap Screw M6 x 20mm

Middle Cross Rail -

1 Series 10 EX-1020 1" x 2" Smooth T-Slotted Aluminum Extrusion, Length 37 11/16", no machining
2 Series 10 6-Hole Plate Connectors - JP-010-F 10 Series 6 Hole Joining Plate (this allows you to move the middle Cross Rail forward and back a bit if needed to compensate for top panel clearances; in the original design/picture, this was a 4-Hole Plate)
12 Combo-010-E M6 Standard T-Nut & 12mm Button Head Cap Screw

Rear Cross Rail -

1 Series 10 EX-1020 1" x 2" Smooth T-Slotted Aluminum Extrusion, Length 37 11/16", Machining M6 X 1.0 X 25mm Deep Tap BOTH ENDS
2 2-Hole Side Connectors EFD-010 Double End Fastener Clip Only (you will need to drill holes though the side of the Side Rails to tighten these)
4 Metric Button Head Socket Cap Screw M6 x 20mm


The Feet:

Front Feet -

Toyota 4Runner Front Cargo Panel feet FROM SLIDING CARGO TRAY VERSION
58456-35010 Slide Assembly Mount Bracket
58457-35010 Slide Assembly Mount Bracket
These will replace the shorter feet from the sloped Front Cargo Panel of the non-sliding cargo tray version floor.
2 M6 Button Head Cap Screw 20mm min

51251120386_97b339d002_o.jpg
[/url]

Rear Feet -

Connection to Side Rails -
2 CB-010-H 10 Series 8 Hole Inside Corner Bracket
8 Combo-010-E M6 Standard T-Nut & 12mm Button Head Cap Screw

Connection to Floor -
2 Steel L Framing Brackets (min 2" wide, min 3" high) from Home Depot/Lowes/HW Store (e.g. Simpson Strong-Tie 2 in. x 3-7/8 in. x 2-1/2 in. Galvanized Angle)
2 M8 Button Head Cap Screw 25mm min

4 M6 Bolts & Nuts to tie the two brackets together.

51251991094_590a91040b_o.jpg


You will need to find the threaded nut locations for the Sliding Cargo Tray rear mounting points and drill down to them from the top of the floor, being careful not to strip out the threads. I found them by laying on the ground and looking up at the bottom of the floor; you will see welded-in nuts with RTV filling the insides. Scrape out the RTV and hit the middle with a punch so that you make a dimple in the floor sheetmetal, then drill down from the top using a small drill first, working up to the correct hole size.

Bolt the 8 Hole Inside Corner Bracket to the bottom of the side rails (flat extensions inward) and place the Steel Framing Brackets inside of them (feet facing inward). After aligning the Frame, some drilling will be required to mount the Steel Framing Brackets to the floor and to the 8 Hole Inside Corner Brackets.


The Top Panels:

The combined Top Panel length is 41". I cut them 43 1/4" wide to leave clearance on the sides in case I decided to cover them with carpet (a la Volvo). I made the rearmost panel 24" long and the forward panel 17" long, but you could allocate the length of the two panels any way you want. Each panel is held to the frame with 4 hinges from your local hardware store, e.g.
Everbilt 20257 2-1/2 in. Stainless Steel Narrow Utility Hinge Non-Removable Pin (Home Depot)
or
Everbilt 15397 2 in. Zinc Plated Narrow Utility Hinges (Home Depot)

You may have to "ovalize" the holes that mount to the Frame with a rattail file to get the correct hinge height and keep the Top Panels flush with the floor.

I used 1/4" Birch Plywood (which now seems to be metric, so it is actually thinner), so I ended-up reinforcing the larger panel with some leftover scrap plywood and some aluminum channel I had lying around.

16 Combo-010-E M6 Standard T-Nut & 12mm Button Head Cap Screw (to mount the hinges to the rails)

16 M6 x 14mm Flat-Head Screws and Nyloc Nuts (to mount hinges to the Top Panels - SCREW LENGTH WILL BE DEPENDENT UPON PANEL THICKNESS)

50890953398_e93ce30efc_o.jpg


Notes:

Remove rear threshold trim, cargo area carpet, front cargo tie-downs, front cargo panel, and styrofoam under pad. Information on how to do this is in the first part of this post:

5th Gen Sliding cargo tray Install - Pics/Steps

Unbolt the front cargo panel brackets from the floor and replace them with the factory Slide Assembly Mount Brackets with the "wings" pointing outward.

After you have assembled the frame and established it's location in the cargo area, you will need to locate and drill 6mm access holes down through the top of the inner channel of each side rail so that you can slide 6mm button head cap screws into the channels (which will mate to the captive nuts of the Slide Assembly Mount Brackets) and tighten them through the access holes. Wads of paper or dollops of RTV can be used to keep these screws in place.

I reused the front cargo tie-downs on the very front of the forward floor, passing the bolt through the outer hinge plate for strength.

51251887304_1692d6e585_o.jpg


The rest of the cargo tie-downs/floor retainers are M6 x 11.2 mm SS Eye Bolts (available from Amazon). If you make the floor panels out of a thicker material, you will need to find longer Eye Bolts.

Amazon.com: Glarks 36Pcs 304 Stainless Steel M6 Male Thread Machinery Shoulder Lifting Ring Eye Bolt with Lock Nuts/Lock Washers/Flat Washers Set: Home Improvement

The stronger 6m channel nuts (DB-010 Drop-In T-Nut w/ Spring Ball, M6 x 1.0) should be used to anchor these. On my floor, they are retained to the panels using 1/4" Pushnut Bolt Retainers.

51251318133_662127dfd5_o.jpg
 
Last edited:
Got some requests for more details on the Aluminum Extrusion Frame platform:

Hmmm this has my gears turning.
I'm thinking of maybe a 2" with the top inset flush so rails could be used for tie down points. My simple one has one advantage of being able to get my folding table out even when there is stuff in the back...well as long as its not too heavy.
Time to do some measuring...
 
After looking at all the platforms and drawer setups other guys did for their 4Runners, our needs dictated a low flat platform to sleep on without having to remove the rear seats (but level with the rear seats when they're down). Since this particular 4Runner has the lowest cargo floor (2-row seats/no sliding cargo tray), that requires a raised floor. In an homage to our family's dearly departed '99 Volvo station wagon, we wanted to be able to use the area underneath the floor for storage, and as this 4Runner is also used as a tow vehicle, whatever we built needed to be light-weight.

Using information from other posts on this forum, I ended-up pulling out all the cargo floor carpet, foam padding, and trim, and building a slightly raised floor out of a combination of 2"x1" and 1"x1" aluminum T-nut extrusions and birch plywood (some of us have been making roof rack crossbars out of these extrusions for the stock roof rack). The frame is made of parts purchased from Tnutz.com, who will cut all the rails to whatever length you specify (so measure 3 times). It uses 4 of the the sliding cargo tray mounting points to secure it to the floor. The front of the frame sits on the front mounting brackets from the sliding cargo tray version of the 4Runner floor (available from Toyota parts).

50891678716_6842c46a7d_k.jpg


To keep things light, 1/4" birch plywood was used for the floor panels, but 1/4" plywood really isn't 1/4" thick anymore, so the larger panel needed to be reinforced with a doubling panel and some small aluminum U-channel that was laying around. The whole assembly came in around 25 lbs. before finishing.

50890953398_48c4b43835_k.jpg


Because the birch plywood actually had figuring in the grain, it was sprayed with urethane varnish (mostly for water protection) and the floor was secured down with hinges from the local hardware store and stainless cargo eyelets (threaded into channel nuts). The original chrome floor cargo rings are used for the very front of the floor.

50890942858_ffd23da793_k.jpg


We also purchased a Napier Sport Cove tailgate tent/awning (the large size) which actually fits the 4Runner pretty well. It adds both space and ventilation and can give you at least 6 more inches of leg room if you need it. When at a track event, I use a foldable futon from home on the wide (passenger) side and don't even have to remove my Pelican 50qt cooler. If you pull the cooler and put more sleep pads, there's enough space for two "very friendly" people.

50890924203_f72da01c6b_k.jpg


50891716811_2a3453c0bc_k.jpg


There is room to stow a considerable amount of gear under the floor, so long as nothing is more than 4" tall.

50890989743_38df7bf4b6_k.jpg


50890983673_7ff415020e_k.jpg


The floor panels are a bit willowy but the frame is really strong. The whole assembly is plenty strong enough to support human weight, but you wouldn't want anyone to drop an anvil on it. Maybe there will be 3/8" birch plywood in the next iteration.

If people want details, let me know and I can post more info.


This is next level! Inspiring me to get something built!
 
We go camping with the whole family. My wife and I sleep in the tent and the kids in the car. Usually, my kids don't like to sleep in the tent. They are afraid of all tiny creatures. So, I decided to look for a multifunctional air mattress. I bought two enerplex mattresses, one that I set in the car and another in the tent. I prefer them instead of sleeping pads. Much comfortable.
 
Last edited:
so much easier to just pack a decent tent and a air mattress. are you scared of bigfoot? i throw all our sh1t on the roof rack, ice chests stay in the back with the dog and the rest of the inside is empty for our 2-3 hour drive to the mountains. take 30 min to set up camp/fill my belly with all the non craft, non hipster bullsh1t beer or some dope whiskey. meanwhile wife cooks up some bomb dinner on the coleman grill. sleep like a baby, wake up to a bomb breakfast while i make the fire again and drink more Coors. It' not oVeRLaNdINg, it's camping, and it's awesome; but I think I digress.

Some of us have bad knees and backs! we have a large Cabela's hunting tent that will take 2 cots, chairs, and a small table. However, still requires kneeling!

We opted for an Air-Bedz mattress and put a hitch step on the back. Should be here today!

As a retired Wildlife Biologist for the Feds, we have camped in grizzly & wolf country many times. I am more afraid of moose than bears! We had one "redesign" an elk camp in '89!
 
Last edited:
Some of us have bad knees and backs! we have a large Cabela's hunting tent that will take 2 cots, chairs, and a small table. However, still requires kneeling!

We opted for an Air-Bedz mattress and put a hitch step on the back. Should be here today!

As a retired Wildlife Biologist for the Feds, we have camped in grizzly & wolf country many times. I am more afraid of moose than bears! We had one "redesign" an elk camp in '89!

haha actually since i posted that i have done a week long trip and camped outta the back of the car. it worked great!
 
Some of us have bad knees and backs! we have a large Cabela's hunting tent that will take 2 cots, chairs, and a small table. However, still requires kneeling!

We opted for an Air-Bedz mattress and put a hitch step on the back. Should be here today!

As a retired Wildlife Biologist for the Feds, we have camped in grizzly & wolf country many times. I am more afraid of moose than bears! We had one "redesign" an elk camp in '89!
Bought an AirBedz last year and took it on our 3 day 2 night Mojave Preserve trip. First night was very good as part of the mattress goes over the fender wells and gives you a full size mattress. I’m 6’3” and my wife and young son were comfortable. Next night it leaked and trying to get a refund through the manufacture that sells on Amazon is a pain. Great idea, size and easy inflate/deflate. Too bad most air mattresses eventually leak. Bring the repair kit with you and maybe some Gorilla plumbers tape. Good luck.
 
sleeping in 4 runner

bought a inflatable queen mattress at walmart. inflated it in the car and it snugged up nice and was perfect. Deflated it in the AM to put the gear back in.

too hot in the summer months to sleep inside in the summer months without some sort of swamp cooler, portable AC.
 
We sleep in the back. You can look at various trips via the link in my signature. Longest one was 21 days of which 18 nights we spent in the back of the truck.

There are no issues with odor or moisture - crack the rear window and the spoiler keeps rain and such out while still giving good ventilation. You can get cheap screens for the rear door windows if you are in a warm, buggy area.

The only "issue" is storage of stuff while you are sleeping in the back. We basically move everything in the front seats, have other stuff in 8 gal Action Packers in the footwells (see below), and leave our cooler (Grizzly bear resistant cooler) outside. If we have a ton of stuff, anything left over goes under the truck (if it's raining or in an area that gets dew in the mornings) or gets tossed in the roof basket overnight. During the day everything goes back in the cargo area.

I have a non 3rd row SR5. I assume the TRD Pro is also non 3rd row with no sliding cargo tray? If so, the trick is to remove the 2nd row seat bottoms (4 14 mm bolts, easy), fold the 2nd row seat backs all the way forward, remove that fascia panel that covers the "hump" (2 10 mm bolts), and then install some sort of riser in the cargo area to elevate it up 2.5" to make it in line with the folded 2nd row seat backs. This gives you the entire area for sleeping and makes it totally flat. Removing the seats and fascia and sliding in the riser panel takes 10 minutes and they reinstall just as fast.

My solution to the cargo area riser was to build a "pallet" out of 2 sheets of 1/2" plywood set on top of strips of 2X2" wood (which is actually 1 1/2", so this gives you a 2.5" height). Other people try and pad the area with stuff, which I think isn't as useful.

If you need more length you can move the front seats forward and place 8 gallon Rubbermaid Action Packers in the footwells, this gives you about 12 more inches for about 6.5' of length.

We then have a "full" size air mattress and bedding that we use to sleep on. The thoughtfully placed AC invertor makes inflating the air mattress every night easy. In really cold weather we use the air mattress, bedding, and sleeping bags. In really really really cold weather we use all that and run the truck as needed overnight to use the heater.

After doing it this way for a while there is no other way we'd want to do it. Setup and break down is super easy, takes like 5 minutes; we are totally self contained so we can camp anywhere including renegade camping at businesses and so forth; we are well protected in the truck with ready access to heat; and most importantly we are really comfortable.

On solo trips I use the pallet and 1 Rubbermaid Action packer and I use 2 Thermarest pads stacked on top of each other. I leave everything in the back, on one side of the cargo area, and I sleep on the other.

Since this photo was taken I have added 6 Harbor Freight D rings to the corners and center of the pallet to secure cargo. I also figured out that flat stuff can be stored under it so in those slots I have an axe, machete, and folded up tow strap. Lastly, I painted a mock up of the US ion the pallet and I note on there every trip we take so it's kind of a cool memento.

DSC_0559-XL.jpg


I was searching for how to fill the gap between the rear seat backs (seat bottoms removed easily with 4 bolts) and found this post. Low and behold - the 8Gal Rubbermaid Action Packers are still available and are a perfect fit. Such a great solution - fit the space AND provides useful accessible storage.

Here they shown in my T4R with a sliding rear cargo tray.

51551471952_3c2e1e7f63_b.jpg


The usable dimensions are 83" long x 54" wide (at the forward part by the doors) // 44" wide (at the wheel wells). By reference - a standard FULL mattress is 75" long x 52" wide. I've ordered a tri-fold foam Full mattress and plan to make a small adjustment to make it fit into the narrowing part of the "bed".

While I have use an Autohome RTT for warmer weather, I'm going to opt to sleep inside the T4R during colder fall/winter camping.
 
Tri-Fold 4" FULL mattress sourced from Amazon arrived. Took out the turkey carving knife and trimmed 2 sections to fit.

Overall length is 82" with a filler foam at the head side.

Looking forward to some chilly fall camping inside the T4R next week.

51565025222_297efd5084_h.jpg
 
Last edited:
Low and behold - the 8Gal Rubbermaid Action Packers are still available and are a perfect fit.

Front Runner wolf packs fit perfectly as well, but the front seats have to be all the way forward. The high lid makes it close to even with the seats laying down. Then I place a portable power station between the boxes to power my phone and fan at night.
 
Tri-Fold 4" FULL mattress sourced from Amazon arrived. Took out the turkey carving knife and trimmed 2 sections to fit.

Overall length is 82" with a filler foam at the head side.

Looking forward to some chilly fall camping inside the T4R next week.

51565025222_297efd5084_h.jpg

I like those light on the molle panel!
Can you share the brand/model? Thanks
 
I found a cot that fits perfect over folded 2nd row and wheel well. My daily drive and grandson mover with child seat in 2nd row and camper when on a outdoor trip.
 

Attachments

  • IMG_6052.jpg
    IMG_6052.jpg
    120.7 KB · Views: 166
At 6'3" I just can't fit comfortably, maybe with the hatch open and my feet hanging out but I worry they may look appetizing to any bears in the area.
 

Members online

Forum statistics

Threads
278,316
Messages
3,554,120
Members
248,016
Latest member
Advally Service

Trending content

Back
Top