Zacher
New member
I purchased a new ARB Bull Bar on December 7th, 2017 from Amazon and recieved it on December 15th. Quick and easy delivery. All said and done for under $1000.
I used [MENTION=49642]jsmithjr732[/MENTION]'s google doc write up for most of the install. His directions are pretty straighforward but it is a 7 year old write up so I figured I would add some more pics of the install to help others who are still having some trouble. Using his write up along with some more info from me should be sufficient for anyone who makes the decision to purchase and install one of these bumpers. Here is [MENTION=49642]jsmithjr732[/MENTION]'s write up http://www.toyota-4runner.org/3rd-gen-t4rs/78268-arb-bumper-installation-3rd-gen-t4rs-step-step.html
Tools used:
Metric ratchet set
Drill with set of drillbits
Makita angle grinder
Another human
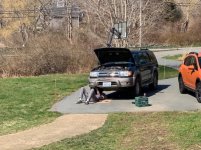
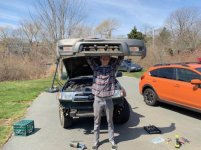
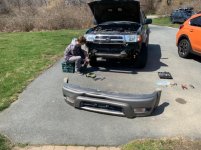
As stated in the other write up we began by removing the stock bumper from the truck. We sprayed penetrating oil on the nuts beforehand to make it easier. Once you remove the stock bumper you should be left with something that looks like this.
 IMG_1401 by Tyler Zacher, on Flickr
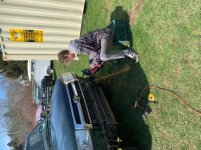
At this point it was time to cut the ends of the frame rails off. I do not recommend using a sawzall for this unless you really want to. We had great success with the angle grinder. Cut as close to the plate as you can and then grind the welds down so the surface is smooth. Do not try to cut the whole frame rail off in one swipe. Do it one side at a time. Make sure to wear safety glasses for this step! Once you are finished with the grinding hit the bare metal with some black Rustoleum to prevent future rust formation.
 IMG_0473 by Tyler Zacher, on Flickr
 IMG_2919 by Tyler Zacher, on Flickr
 IMG_2921 by Tyler Zacher, on Flickr
 IMG_2922 by Tyler Zacher, on Flickr
After cutting the frame rails we fitted the crush cans to the chassis. They slid onto the frame with no problems whatsoever. You can use grease to make them slide on more easily and prevent scratching.
 IMG_2932 by Tyler Zacher, on Flickr
 IMG_7643 by Tyler Zacher, on Flickr
 IMG_7617 by Tyler Zacher, on Flickr
Follow the other write up's intructions and reinstall the tow hook on the passenger side with the factory hardware. Reinstall the tie down using hardware provided by ARB. Keep these finger tight to allow for play when mounting bullbar. (For the tie down and tow hook)
 IMG_2353 by Tyler Zacher, on Flickr
Next you need to tap into the frame rails from underneath. Following [MENTION=87972]JSmith[/MENTION]jr373 instructions we used increasing drill bit sizes to create a 1/2" hole that allows for the crush cans to be bolted onto the frame securley. Do not tighten too much because you will need to have some play in order to mount the bumper with ease. This pic shows a small dot where you need to begin drilling.
 IMG_2931 by Tyler Zacher, on Flickr
Once completed, it was time to install the bull bar onto the mounting brackets/crush cans. This is pretty simple and can be done by two people with little problem. Use caution and pay attention becuase someone will be underneath the unsecured bumper. Have one person hold and adjust while the other is underneath installing the nuts and bolts. there should be 6 flat washers, 6 spring washers, 6 nuts, and 6 bolts (3 areas on each side) that secure the bumper to the mounting brackets. When you have all the hardware installed you can go ahead and tighten everything down. Take your time with this step and make sure you dont miss anything. Tighten the tow hook bolts, tie down bolts, crush can/mounting bracket to frame bolts, and bull bar to crush can/mounting bracket bolts.
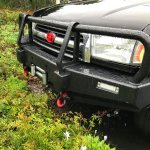
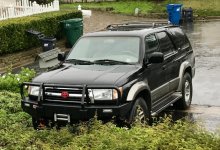
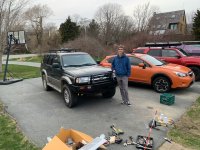
At this point the install is complete. Note: The blinker bulbs that ARB provides are very low quality and I recommend going ahead and replacing them immediately.
 IMG_2943 2 by Tyler Zacher, on Flickr
 IMG_3072 by Tyler Zacher, on Flickr
 IMG_1474 by Tyler Zacher, on Flickr
If there are any questions please feel free to ask.
Big thanks to [MENTION=49642]jsmithjr732[/MENTION] for the write up!
I used [MENTION=49642]jsmithjr732[/MENTION]'s google doc write up for most of the install. His directions are pretty straighforward but it is a 7 year old write up so I figured I would add some more pics of the install to help others who are still having some trouble. Using his write up along with some more info from me should be sufficient for anyone who makes the decision to purchase and install one of these bumpers. Here is [MENTION=49642]jsmithjr732[/MENTION]'s write up http://www.toyota-4runner.org/3rd-gen-t4rs/78268-arb-bumper-installation-3rd-gen-t4rs-step-step.html
Tools used:
Metric ratchet set
Drill with set of drillbits
Makita angle grinder
Another human
As stated in the other write up we began by removing the stock bumper from the truck. We sprayed penetrating oil on the nuts beforehand to make it easier. Once you remove the stock bumper you should be left with something that looks like this.
IMG_1401 by Tyler Zacher, on FlickrAt this point it was time to cut the ends of the frame rails off. I do not recommend using a sawzall for this unless you really want to. We had great success with the angle grinder. Cut as close to the plate as you can and then grind the welds down so the surface is smooth. Do not try to cut the whole frame rail off in one swipe. Do it one side at a time. Make sure to wear safety glasses for this step! Once you are finished with the grinding hit the bare metal with some black Rustoleum to prevent future rust formation.
IMG_0473 by Tyler Zacher, on FlickrIMG_2919 by Tyler Zacher, on FlickrIMG_2921 by Tyler Zacher, on FlickrIMG_2922 by Tyler Zacher, on FlickrAfter cutting the frame rails we fitted the crush cans to the chassis. They slid onto the frame with no problems whatsoever. You can use grease to make them slide on more easily and prevent scratching.
IMG_2932 by Tyler Zacher, on FlickrIMG_7643 by Tyler Zacher, on FlickrIMG_7617 by Tyler Zacher, on FlickrFollow the other write up's intructions and reinstall the tow hook on the passenger side with the factory hardware. Reinstall the tie down using hardware provided by ARB. Keep these finger tight to allow for play when mounting bullbar. (For the tie down and tow hook)
IMG_2353 by Tyler Zacher, on FlickrNext you need to tap into the frame rails from underneath. Following [MENTION=87972]JSmith[/MENTION]jr373 instructions we used increasing drill bit sizes to create a 1/2" hole that allows for the crush cans to be bolted onto the frame securley. Do not tighten too much because you will need to have some play in order to mount the bumper with ease. This pic shows a small dot where you need to begin drilling.
IMG_2931 by Tyler Zacher, on FlickrOnce completed, it was time to install the bull bar onto the mounting brackets/crush cans. This is pretty simple and can be done by two people with little problem. Use caution and pay attention becuase someone will be underneath the unsecured bumper. Have one person hold and adjust while the other is underneath installing the nuts and bolts. there should be 6 flat washers, 6 spring washers, 6 nuts, and 6 bolts (3 areas on each side) that secure the bumper to the mounting brackets. When you have all the hardware installed you can go ahead and tighten everything down. Take your time with this step and make sure you dont miss anything. Tighten the tow hook bolts, tie down bolts, crush can/mounting bracket to frame bolts, and bull bar to crush can/mounting bracket bolts.
At this point the install is complete. Note: The blinker bulbs that ARB provides are very low quality and I recommend going ahead and replacing them immediately.
IMG_2943 2 by Tyler Zacher, on FlickrIMG_3072 by Tyler Zacher, on FlickrIMG_1474 by Tyler Zacher, on FlickrIf there are any questions please feel free to ask.
Big thanks to [MENTION=49642]jsmithjr732[/MENTION] for the write up!
Last edited: