
Balistikboy '14 T4R Trail Premium Build Thread

balistikboy

New member
I never got around to creating a build thread for my '06 Tacoma. I had planned to but it just didn't happen. The mods ended up coming more slowly than I had planned and life happened. You can see my former pride and joy below.
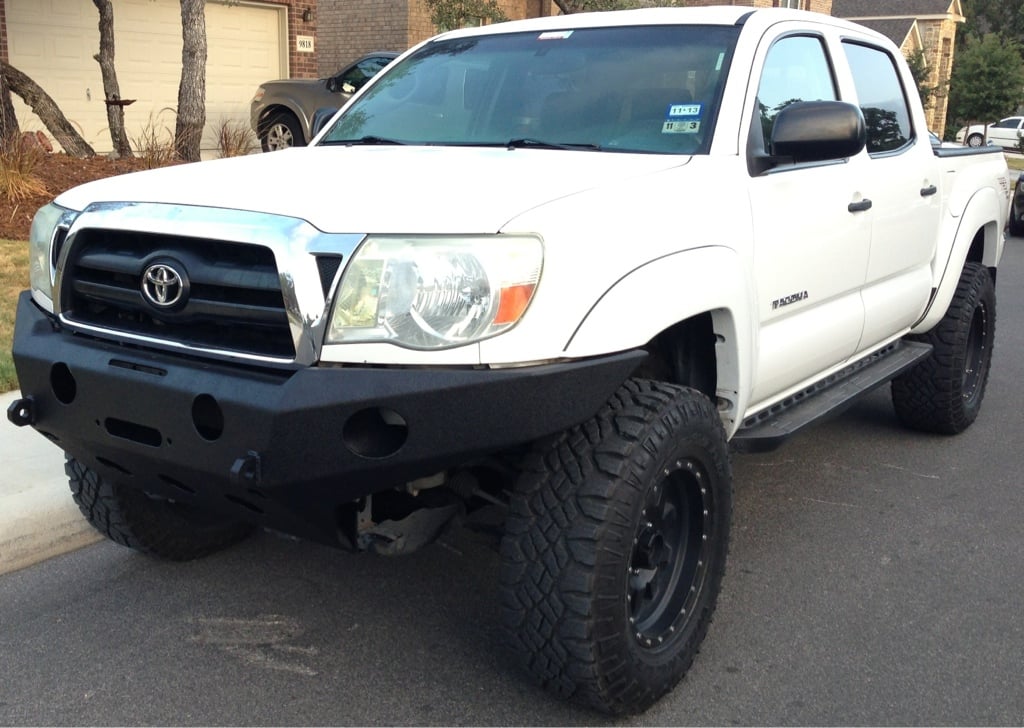
zenanuta.jpg


The day came that I was due for an upgrade and made the tough decision to trade in my Tacoma. I still wanted a capable off-road vehicle and decided to get a 4Runner Trail. This build will take some time as my family has grown and there are new time commitments for me, but I will be documenting all the mods I make in here.

940d16686e3fcb51a253d16d41d4d143.jpg


I have outlined most of the mods I will eventually be making below and will be linking them to the actual posts once they have been completed. Thanks for looking and hopefully I'll be able to contribute to this great community that I have already learned so much from!

I will be updating this as I go so check back occasionally! I have big plans!

Black - Planned
Red - In Progress
Blue - Completed

Mods:
  1. Suspension and Treads
  2. Armor and Load
    • SouthernSS Slimline Hybrid Bumper (or possibly a full custom steel bumper)
    • Rear Bumper with Tire Carrier
    • Rock Sliders (MetalTech Trail Edition, Bay Area Metal Fab, or BudBuilt)
    • BudBuilt Full Skidplates
    • PrInSu Full Length Roof Rack
  3. Lighting
    • 40" Light Bar on Rack
    • TRS Morimoto HID Low Beam Replacement
    • VLEDs High Beam Replacement
    • Rigid LED Foglight Replacement Brackets
    • Rigid Dually D2 Lights
    • Rigid Crawling Lights
    • AirOnBoard 4Runner Light Switches
  4. Misc

And I want to send out a thanks to jangoforhire since I copied his build thread style, Antman for his numerous mods which I will probably be copying and adding to my build, and Desert Dawg for his great exterior design which is my motivation. Thanks is also due to others not mentioned who have contributed to the mods above and this community.

548775e1a9aab89930760766bf32e4ff.jpg
 
Last edited:
Register to hide this ad
So I just did my first mod to my T4R TEP. I installed a Ram X-Grip mount with a B-size diamond base and a medium double socket arm on the dash. I was debating on where I wanted to install the mount and chose the lower right dash pillar below the temperature knob. I chose this spot because 1) I didn't want to block any vents and 2) I didn't want to obstruct the windshield. Additionally, if I get a longer arm, I can also get a holder for my iPad where I located it; there is plenty of room. I held the mount and phone in numerous locations to decide before installing because I knew this would be a non-reversible install as I had to drill 2 holes somewhere.

595f67f4894077ccdabe6a41d344b5bc.jpg


Once decided I first removed the dash piece by pulling firmly and straight away from the dash. The dash piece is just held on by plastic clips. It was not the easiest to grip so to help I used a screwdriver with electrical tape wrapped around the end to help pry from the bottom left corner of the piece. I gripped the piece at the bottom, pulled out, and slid in the screwdriver. With the screwdriver holding the bottom out I was able to pull the piece off.

442e141c2fae4a71ce8dc2cfbfa86e54.jpg


Next I masked off the front of the piece so I didn't get any scratches anywhere and so the holes drilled would be nice and clean. Then I wanted to reinforce the back of the piece to help support the weight of the mount if I end up putting a tablet holder on it. To do this I found a piece of scrap metal I had laying around, bent it to fit in the back of the dash piece, and drilled 2 holes to mate up with the mount base. There wasn't a lot of room on the dash piece to fit this metal backer.

50719d3eac31b382839937c23dde68ed.jpg

ab98c35cf52d4992a120c6e16d29c2cc.jpg


From here I was ready to drill the holes through the dash piece. I duct taped the metal backing plate into place and drilled 2 small pilot holes from the back. Then I flipped over the dash piece and drilled 2 larger holes from the front to allow the chosen bolts to fit through. I did the drilling this way to keep the front of the dash piece nice and clean with respect to the holes.

99e21958eb3475eef73d7b48860b38c3.jpg

d3b5fb2259578d6880e3a101b2b788f4.jpg

b3a85b099679fdbe7a1895136b246d55.jpg


Then I took off the masking tape and proceeded to attach the mount base with the hardware. I picked up the bolts and nuts at Lowes. Once the base was attached, I installed the dash piece back into the T4R.

fbb9a5724cd5d7a5dd5833db6f3aaef7.jpg

921b49cf6447231562f45bc2f11ee50a.jpg

d0f4d0fa8f256cbf7916dad86c76c36a.jpg


Here's the final product. Hope these instructions were clear and will help others in deciding where to install a mount and what possible mounts to purchase. Cheers!

fec7046dee4e269ae309472aff5633de.jpg

95e9f4c09a5cd2349c0542ffbd4355e5.jpg

f44be08a98bf64f22af48a2fd8f748c3.jpg
 
Last edited:
Is the phone stable when driving? I have a bar mounted to the passenger seat bolt that shakes too much for my liking and may try this.
 
It's very stable. Doesn't move one bit.

I like this option though I'm still deciding whether I want to drill into the dash like that (guess I'm not getting rid of the truck anytime soon might as well). Do you think that area and the double articulating mount could create enough room for an iPad mini? I just picked one up with data and gps so it would be my primary navigation screen.
 
I like this option though I'm still deciding whether I want to drill into the dash like that (guess I'm not getting rid of the truck anytime soon might as well). Do you think that area and the double articulating mount could create enough room for an iPad mini? I just picked one up with data and gps so it would be my primary navigation screen.


I was hesitant also but had the same thoughts. Plus that trim piece is simple to replace if necessary and most likely not too expensive.

I do think there would be enough room for an iPad mini. I am thinking about getting a longer single arm and the iPad mount for a regular iPad.

But the more articulation you do (or distance from the mount), you might get a little vibration/movement when driving. I don't get any with the 4" arm I have right now but the extra weight and length might cause there to be some.
 
I haven't made any updates to my build page for a while...but that's also not saying I have done much since my last update either. Having a baby and trying to finish a master's degree by the end of March have really taken all of my time.

What I have done recently is purchase WeatherTech Floor Liners for the front and rear seats. I didn't get one for the cargo area because I plan on building a drawer system this spring. I will post a pic when I get a chance but most everyone I'm sure knows what they look like.

I also had a 3M ClearBra installed on the front of the vehicle. It didn't look easy for the guys to do with all the angles on the front bumper. I decided to do this even though I want to eventually get a steel bumper up front because it will probably be the last mod I do to the vehicle. I want to keep the paint nice until then. I will post a pic when the weather is nice again and the T4R is clean.

And lastly for this update, I received my SCS SR8 wheels I ordered! They are great quality and a very reasonable price. I ordered them in dark bronze. Their size is 17x8.5 with -10 offset. I plan on wrapping them in Cooper ST Maxx 255/80-17 tires. But first I have to get my lift ordered.

Here's a pic of one of the wheels. The picture doesn't do it justice. And I will of course post pics when they're installed.
e6d892d4039df281e87e929efc61e5a6.jpg
 
Last edited:
You preferred the right side for a couple of reasons including possibly adding the iPad later. If you stuck with just the iphone/android smartphone, did you think the left dash pillar would work suffice or would it create any obstructions? Any other reasons?....thx
 
I did dry fit the phone there but I didn't choose it for a couple other reasons in addition to what you mentioned above.

First and actually the biggest was it felt like I was looking down more on the left vs right side. It was quicker and felt more natural to look to the right.

And second, I use the cup holder pretty regularly and the phone would be blocking it, whereas I can still easily get to the 4wd shifter with it on the right.

Hope this helps your decision. Ultimately it'll be what feels easiest and safest for you.
 
Just ordered my ToyTec BOSS suspension system! Now I just have to order the LR UCAs and Cooper S/T Maxx tires and I'll be ready to put on the SCS wheels!

Normally I wouldn't wish this (because I love winter and snow), but I hope spring arrives quickly. I don't really want to put on the new gear when the city is still salting the roads here. My need for instant gratification may win out on this one though. I'll post pics when I have all the gear and then when it's all installed.
 
We finally had some good weather and I was able to install my lift with the help of a buddy. The lift install wasn't too bad except for the damn sway bars with the KDSS system. Otherwise it was pretty painless. Just don't think you can simply follow the ToyTec instructions; they're not nearly detailed enough and don't mention any particular methods of doing anything or torque specs. Look those up before hand.

Regardless, the BOSS suspension is installed, as well as the SCS SR8 wheels and Cooper ST Maxx tires, and the 4R looks amazing now!

In the friend's garage ready for surgery
7b88dad737e12ed6db2f84e51d2007f3.jpg


Surgery in progress
cfc66897bd196743b23abb0e1264d323.jpg


Post surgery, recovering at home
4ffb16edaefcea58a22db8c49427181b.jpg

c145ecfeaf430555d92bf4fad60ac74e.jpg

8037b197598dcc4f5cc7c698c010b91e.jpg

03c966d52a9c9dad1013544f7b1a3078.jpg


And sorry about not including any picks of the install process. There was so much trial and error in the installation process due to poor instructions, there was no way I would have been able to take photos during. The install of the lift took about 7.5 hours with my buddy, all said and done. The difficulty was quite honestly the KDSS. It would have been much easier without that system. But after understanding how it works now, it's pretty damn cool!

Now I'm just waiting on my UCAs to arrive to finish the install and get an alignment!
 
I can't tell, but did you end up running the 255 or did you decide on the 285s?

I see your build thread mentions the 285s, but you also mention the 255.
 
I can't tell, but did you end up running the 255 or did you decide on the 285s?

I see your build thread mentions the 285s, but you also mention the 255.

I ended up going with the 285s. I just couldn't go that skinny with the 255s when it came down to it.
 
Thanks! Yeah there is rubbing. I ended up moving the liners forward and trimming the bumper cover in the front of the wheel wells. And in the back of the wheel wells I had to trim the mud flaps a bit. I was too reluctant to just take them off to try to still protect the sides of the body from rock chips. I moved the caster as far negative as I could with the LR UCAs.
 

Members online

Forum statistics

Threads
278,316
Messages
3,554,111
Members
248,016
Latest member
Advally Service

Trending content

Back
Top