
First off, I couldn't find much information on these shocks to begin with. Looks like most guys are going to a lifted setup, so threads about stock replacement are few and far between. After researching quite a bit, I came to the conclusion that the Bilstein 4600 shocks were the best option for my purposes (light offroad, stock height replacement). I ordered the following part numbers from shock warehouse:
Rear Shock : Bilstein 4600 24-024518
Front Shock: Bilstein 4600 24-187244
Rear Shock Installation:
This was a pain in the ass. The nice part is, the shocks come with everything you need. 4 bushings and 3 washers, the shock, and the nut for the top. The only parts you have to re-use are the washers on the bottom shock mount. To remove the original shock, I ended up having a buddy hold the dust shield with pliers while I turned the seized nut at the top. Eventually the shaft sheared off and the shock came right out. The other option was a sawzall, which I couldn't really even fit up between all the linkages.
Installation is the reverse of removal. Bushing order is the same as stock. I found the only way to get the shock compressed and in place was to jack up the vehicle so that I didn't have to push it up as far. Place the top in the mount hole and use all your might to compress the shock and push it onto the lower stud.

The shock has an allen key socket in the top of the shaft. Anyone that has installed rear shocks knows that there is not a whole lot of room. I ended up putting the allen key in the socket, pushing it against the frame, and turning the nut with an open ended wrench, a quarter turn at a time. Painful. Allen key is shown below.

Fully installed:

Front Shock Install:
This is the part that sucks, mainly because I wasn't prepared. The front shock does not come with all of the bushings and washers for the top. All it comes with is the bottom spring retainer and the nut for the top. When I ordered it I thought "bushings will be on the shelf at the parts store, no problem!". Well, that's not the case. Everyone has the strut mount with the studs, but the bushings normally come with the shock. After a lot of driving around, I ended up with the following:
2x Toyota P/N 90948-01056 (Top bushing for the shock, 1 per side)
2x Monroe 904900 (Strut mount with integrated lower bushing)
The washers for the top and bottom have to be re-used. I think on the stock mount, the lower bushing is actually separate, at least that's what I see on the OEM diagram. They only had 2 at the dealer, so the Monroe mounts seem like they will work out great.
Shocks are at the shop right now transferring the springs because I don't trust the DIY compressors. Front shock removal and installation is fairly well documented and straight forward. But, you basically unbolt the 3 outer nuts on the top, take the bolt out of the bottom, and pull the thing out. After jacking up your vehicle and securing it on jack stands, of course.
Hope this helps someone out, cheers!
UPDATE:
Added pictures of the rear shocks installed. I ended up not using the Monroe strut mates as the guy at the shop said the lower bushings were in good shape. Pics of all of them assembled:
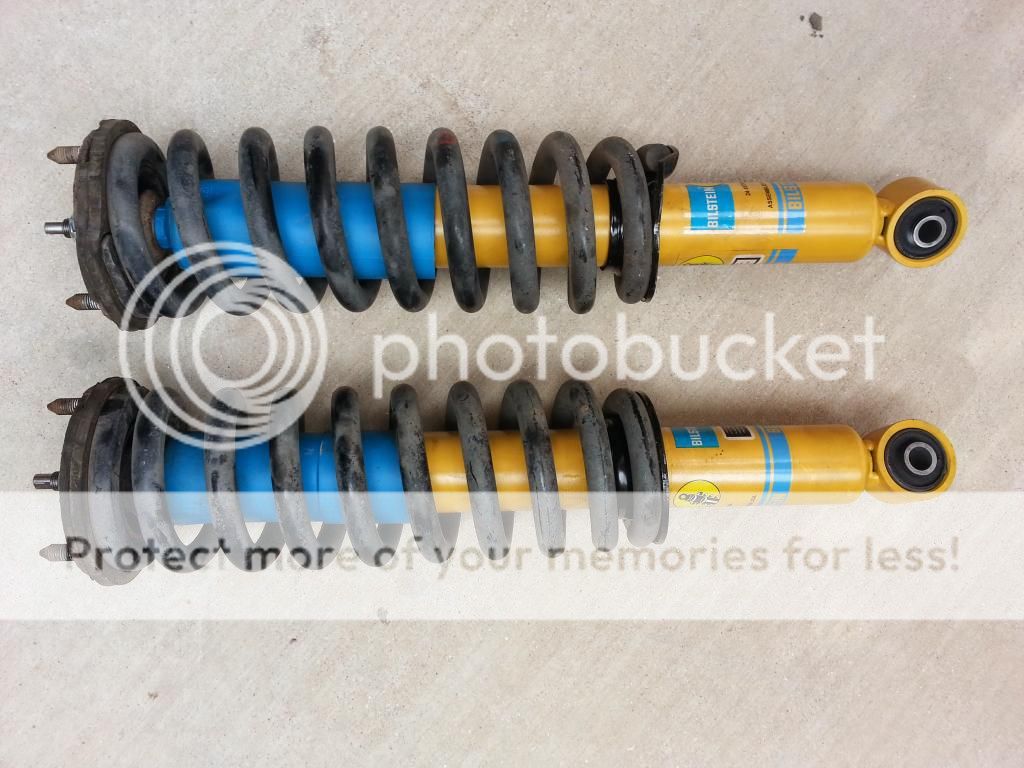
Picture of the top bushing (the one I got from the Toyota dealer):

Picture of the lower bushing:

If you are going to go the OEM route, my research indicated the top and bottom bushings and the top and bottom washers are identical. When installing the front struts, I had to unbolt the LBJ in order to get the LCA to drop down low enough. Even then, it was tough to get the bolt hole to line up at the bottom.
My sway bar end links were in REALLY bad shape, so I ended up replacing those while I was in there as well.
The torque values I used are as follows:
- 3 Upper nuts on the front strut: 47 ft. lbs.
- Lower bolt on front strut: 101 ft. lbs.
- LBJ Bolts 59 ft. lbs.
- Sway bar end link upper nut 18 ft. lbs.
- Sway bar end link lower nut 55 ft. lbs.
Let me know if there are any questions. Not the best step by step guide, but all of the info that I didn't have is in there!
Rear Shock : Bilstein 4600 24-024518
Front Shock: Bilstein 4600 24-187244
Rear Shock Installation:
This was a pain in the ass. The nice part is, the shocks come with everything you need. 4 bushings and 3 washers, the shock, and the nut for the top. The only parts you have to re-use are the washers on the bottom shock mount. To remove the original shock, I ended up having a buddy hold the dust shield with pliers while I turned the seized nut at the top. Eventually the shaft sheared off and the shock came right out. The other option was a sawzall, which I couldn't really even fit up between all the linkages.
Installation is the reverse of removal. Bushing order is the same as stock. I found the only way to get the shock compressed and in place was to jack up the vehicle so that I didn't have to push it up as far. Place the top in the mount hole and use all your might to compress the shock and push it onto the lower stud.

The shock has an allen key socket in the top of the shaft. Anyone that has installed rear shocks knows that there is not a whole lot of room. I ended up putting the allen key in the socket, pushing it against the frame, and turning the nut with an open ended wrench, a quarter turn at a time. Painful. Allen key is shown below.

Fully installed:

Front Shock Install:
This is the part that sucks, mainly because I wasn't prepared. The front shock does not come with all of the bushings and washers for the top. All it comes with is the bottom spring retainer and the nut for the top. When I ordered it I thought "bushings will be on the shelf at the parts store, no problem!". Well, that's not the case. Everyone has the strut mount with the studs, but the bushings normally come with the shock. After a lot of driving around, I ended up with the following:
2x Toyota P/N 90948-01056 (Top bushing for the shock, 1 per side)
2x Monroe 904900 (Strut mount with integrated lower bushing)
The washers for the top and bottom have to be re-used. I think on the stock mount, the lower bushing is actually separate, at least that's what I see on the OEM diagram. They only had 2 at the dealer, so the Monroe mounts seem like they will work out great.
Shocks are at the shop right now transferring the springs because I don't trust the DIY compressors. Front shock removal and installation is fairly well documented and straight forward. But, you basically unbolt the 3 outer nuts on the top, take the bolt out of the bottom, and pull the thing out. After jacking up your vehicle and securing it on jack stands, of course.
Hope this helps someone out, cheers!
UPDATE:
Added pictures of the rear shocks installed. I ended up not using the Monroe strut mates as the guy at the shop said the lower bushings were in good shape. Pics of all of them assembled:

Picture of the top bushing (the one I got from the Toyota dealer):

Picture of the lower bushing:

If you are going to go the OEM route, my research indicated the top and bottom bushings and the top and bottom washers are identical. When installing the front struts, I had to unbolt the LBJ in order to get the LCA to drop down low enough. Even then, it was tough to get the bolt hole to line up at the bottom.
My sway bar end links were in REALLY bad shape, so I ended up replacing those while I was in there as well.
The torque values I used are as follows:
- 3 Upper nuts on the front strut: 47 ft. lbs.
- Lower bolt on front strut: 101 ft. lbs.
- LBJ Bolts 59 ft. lbs.
- Sway bar end link upper nut 18 ft. lbs.
- Sway bar end link lower nut 55 ft. lbs.
Let me know if there are any questions. Not the best step by step guide, but all of the info that I didn't have is in there!
Last edited:


