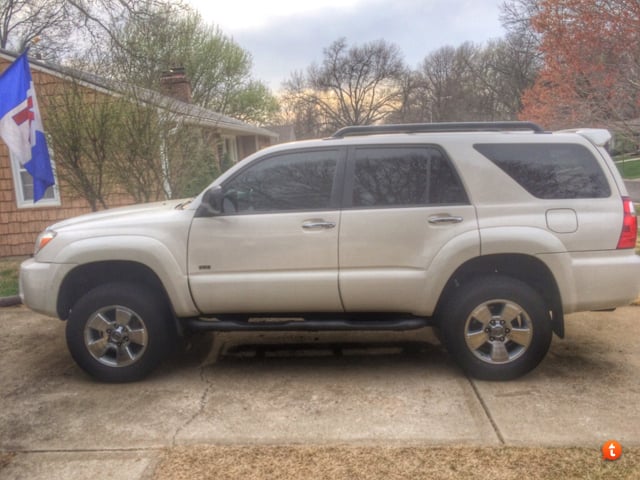
NOVA46
New member
Disclaimer: I am not a certified mechanic. The procedure listed below is for informative purposes only and none of the information contained in this post should be relied upon; always consult a certified mechanic before performing work on any vehicle. Always make sure your vehicle is properly supported before attempting to get underneath it. Use EXTREME caution when operation a spring compressor. Use personal protective equipment such as safety glasses and gloves.
Objective: Replace both the front and rear shock absorbers and springs with Bilstein 5100's and Moog FJ Springs:
These steps generally apply to a 4th Generation, V6 4WD model.
Notes:
- This method DOES NOT utilize the "no spring compressor method". I had my struts assembled by a local mechanic for $50 total. This eliminated the risk of damaging or improperly installing any parts, and reduced the risk of injury. Personally, I was not comfortable assembling the front springs myself, or using the "no spring compressor method".
- I also opted to purchase new Raybestos Strut Mounts (spring isolators) and Lower Control Arm (LCA)-to-Shock Absorber Nuts and Bolts. By doing so, I did not have to disassemble the old front struts to re-use the original strut mounts. As part of my due diligence, i also replaced the Lower Control Arm (LCA)-to-Shock Absorber Nuts and Bolts.
- To remove and install the rear springs, I used a spring compressor I rented from an auto parts store. However, I only compressed the springs slightly, to help ease removal and to ensure proper fitment when installing. Once again, USE EXTREME CAUTION when operating a spring compressor.
- If you really want to make it easy with no prying or pulling, or bottle jacks in the tire well (all suggestions I've seen in various install write ups), back off on the retaining nuts that hold your alignment cams in position on the LCAs. The 2 19mm nuts on the outside of the LCA mounts (4 total per LCA). Make a sharpie mark on the algnment cam with a point of reference on the alignment bracket. Then just loosen (don't remove) the outer nuts and that will free up your LCA to swing all the way down if you desire. I used a length of 2x4 propped between the wheel studs and the ground to hold the hub assembly in place while the LCA was dropped. When you get everything reassembled, adjust your cams to your reference mark and tighten the retaining nuts back down. These will get readjusted when you get your alignment done anyway.
Energy Suspension Sway Bar Bushing install in Post #2
Parts Needed:
These can be obtained from a number of sites; I used rockauto, amazon, and down south motorsports for my parts.
Tools Required:
Results:
I measured the ride height before and after installing the suspension with a consistent tire pressure of 38 psi (BFG All Terrain 265/70/R17). After allowing a one week break-in period (~500 miles) to allow my springs to fully seat, I measured the final ride height difference. Please note that I did not measure my ride height before my Daystar 2.5/1.5 spacers were installed; the original height is calculated.
Before: Height with Daystar Spacers - (Calculated Original Height)
Front Driver: 36" (33.50")
Front Passenger: 36.25" (33.75")
Rear Driver: 37.94" (36.44")
Rear Passenger: 38.25" (36.75")
After: Final with FJ/Bilstein Shocks @ 1.75 - (Difference from Daystar 2.5/1.5 Spacers) - (DIfference from Original Height)
Front Driver: 37.125" (1.125") (3.625")
Front Passenger: 37.125" (0.875") (3.375")
Rear Driver: 38.375" (0.435") (1.935")
Rear Passenger: 38.875" (0.625") (2.125")
After looking at the above data, the FJ/Bilstein swap netted about 3.5" of lift in the front and 2" in the rear, while leveling all four corners of the truck (much better than the Daystar lift).
Procedure:
Starting about a week ahead of time, spray pb blaster or some other penetrating fluid on all of the nuts/bolts you will be removing during this process.
1) Put vehicle in park on a level surface, engage the parking brake, and chock the front wheels. Remove skid plates and spare tire for easier access.
Rear:
I replaced my rear suspension first, measuring my wheel well height before and after. This way, I was able to gauge what height I would have the front shocks set at to achieve the rake I wanted.
2) Pick a side of the vehicle and place the bottle jack under the frame just in front of that rear wheel well and raise that corner of the vehicle until the tire clears the ground by several inches.
3)Place jack stand under the frame and, using the bottle jack, lower the frame onto the jack stand. Remove the bottle jack.
4) Repeat steps 2 & 3 on the opposite side of the vehicle.
5) Remove both wheel lug nuts using a breaker bar and remove rear wheels.

6) Place the bottle jack or floor jack under the rear differential housing for support. Note: I used two extra jack stands for support when I lowered the rear axle (In the picture they are not being used - see Step 10).

7) Remove the Sway Bar Link-to-Frame nuts using a wrench. (This will allow the rear suspension to drop almost completely when the Shock Absorber Upper Mounting Nut is removed - Warning: See step 8)

Removed:

8) Remove the Shock Absorber Upper Mounting Nut using a wrench. Remember to support the axle using a floor jack. If not, the rear axle will drop and pull on the rear brake lines, possibly damaging them.
9) Remove the Shock Absorber-to-Axle Bolt using a wrench. You may need to use a block of wood and a balpeen hammer to remove the shock absorber from the axle mount.
Removed shock absorber:

10) Using the floor jack or bottle jack slowly lower the rear axle, until the rear brake lines are almost fully extended. Be sure not to put tension on the lines. (seen in next picture)

11) Spacer Lift - Spring Removal: Because I had a 1.5" Daystar spacer lift installed, I found that using a spring compressor made removing the spring and spacer much easier.
Option 1: Mount spring compressors on opposite sides of a rear spring and using a wrench, tighten the bolts on the compressor equally between both sides. (5 half-turns, then switch to the opposite compressor for 5 half-turns) I used a 10" extension on my socket wrench to reach the bolts.
Only compress the spring enough to wiggle the spring and bump stop down and away from the spring seat. You do not have to compress the springs more than about 0.5". Keep safety in mind at all times
Removing the driver-rear spring using compressors:

Option 2: Forgoing the use of the spring compressor, wiggle the spring and bump stop down and away from the spring seat on top of the axle.
Tip: If you unbolt the sway bar link from both sides and then use a jack or jack stand on one side of the axle to keep it elevated, lowering the other side should give you enough flex to remove the spring without compression. As long as you only lower one side at a time, the brake lines shouldn't be strained. Then raise one side and repeat on the other.
Compressing the passenger spring with a bottle jack to fit the driver spring:

Installation of the new springs and shock absorbers is the reverse of the removal procedure.
12) Place the bump stop onto the top of the spring. Insert the new spring and bump stop into the spring seat on top of the axle, aligning the top of the spring and bump stop into its housing.
If you are installing a spacer as well, place the spacer on top of the spring, then place the bump stop on top of the spacer. Spring compressors may be needed to install the new spring. Only lightly compress the spring and insert it into the spring seat on top of the axle, aligning the top of the spring and bump stop into its housing. Decompress the spring while making sure to seat it properly, and remove the spring compressors. Otherwise, wiggle the new spring and bump stop into place.
If the spring does not seat fully, it is useful to use a 3-4" 2x4" block and a balpeen hammer to force the spring into the spring seat on the axle.
13) Rub some grease on the shock absorber lower bushing and insert the new shock absorber onto the axle mount. You may need to use a block of wood and a balpeen hammer to fit the shock absorber onto the axle mount. Replace the Shock Absorber-to-Axle Bolt and using a torque wrench, tighten to 72 Ft-lbs. Repeat step on the other side.
14) Assemble washers and bushings on top of the shock absorber. The floor jack should still be in place and supporting the rear axle under the differential housing. Jack up the rear axle while guiding the shock absorbers into their mounts on the frame. Install top bushing, washer, and nut. Using a wrench, tighten the Shock Absorber Upper Mounting Nut until the bushings begin to compress slightly (or about 18 Ft-lbs of torque).

15) Guide the Sway Bar Links into their mounts on the frame. Replace washers, bushings, and nut. Using a wrench, tighten the Sway Bar Link-to-Frame Nut until the bushings begin to compress slightly (or about 11 Ft-lbs of torque).

See Post #2 for Sway Bar bushing replacement.
16) Replace rear wheels, and tighten Wheel Lug Nuts to 83 Ft-lbs using a 6-lug pattern.
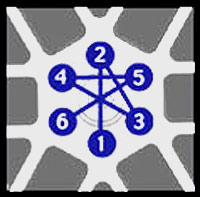
Using the bottle jack, raise the vehicle (one side at a time) to remove the jack stands. Lower the vehicle to the ground.
Front:
For the sake of safety and to avoid broken parts, I had my front struts assembled by a professional mechanic for a total cost of $50.
17) Pick a side of the vehicle and place the bottle jack under the frame just behind a front wheel well and raise that corner of the vehicle until the tire clears the ground by several inches.
18)Place jack stand under the frame and, using the bottle jack, lower the frame onto the jack stand. Remove the bottle jack.
19) Repeat steps 17 & 18 on the opposite side of the vehicle.
20) Remove wheel lug nuts using a breaker bar and remove front wheels.

21) Remove the front Sway Bar Link Nuts with a wrench (using an allen wrench to help). You may need to use pliers to hold the other end of the end link ball joint to keep it from rotating.
22 - Optional Step) Remove the front Sway Bar Bracket-to-Frame Bolts. The Sway Bar can now be removed and placed aside. TIP: You don't need to remove the sway bar brackets. Disconnecting the sway bar from both sides will give you enough room to work without putting tension on the control arm assemblies. I only did this to free up some extra room in the wheel well. You must still perform Step # 21
Sway Bar Bracket attached to Frame:

23) Remove the Shock Absorber-to-LCA Nut. Remove the Shock Absorber-to-LCA Bolt using a balpeen hammer and a dowel. When the bolt is removed, the shock will slip downward in its mounting bracket in the LCA.
- Tip: It is helpful to remove the Lower Balljoint Bracket-to-LCA Bolts. This will allow more downward movement in the LCA, but you must be careful not to let the front hub droop too far and stretch the brake line.

Removed:

24) Remove the three (3) Shock Absorber Upper Mounting Nuts from the top of the strut. Do not remove the nut in the center which holds the spring isolator, spring and shock absorber together.
25) As you press the LCA downward (with a pry bar), the strut will start to slip toward the outside of the LCA mount. Wiggle/pry/hammer the bottom of the strut out of its mounting bracket in the LCA.

26) Move the bottom of the strut toward the front of the vehicle while rotating the strut (this will help the spring clear the LCA and steering arm.
Installation of the new, pre-assembled struts is the reverse of the removal procedure.
27) Rub some grease on the shock absorber lower bushing and position the Shock Absorber Upper Mounting Bolt into the top bracket. Place one nut on a Shock Absorber Upper Mounting Bolt to hold the strut in place. Move the lower shock bushing onto the mounting on the LCA while prying the LCA down with a pry bar.
28) While prying, insert a new Shock Absorber-to-LCA Bolt. It may be helpful to insert the old (possibly stripped) bolt first to align and stabilize the bushing with the mount on the LCA, then push the new Shock Absorber-to-LCA Bolt through. Tighten the new Shock Absorber-to-LCA Nut to 100 Ft-lbs of torque.
Tip: If you have room to fit the front strut easily, you can install the strut to the LCA bracket first, then you can use a small jack to raise the LCA with the strut into position. This eliminates having to try to hold the strut assembly in place with one hand and work a nut onto the upper mount with the other.
29) Install the new Shock Absorber Upper Mounting Nuts and tighten to 47 Ft-lbs of torque (or reasonably tight).
30) Reinstall the Lower Balljoint Bracket-to-LCA Bolts by pressing down on the LCA. Tighten to 166 Ft-lbs of torque.
31) Repeat steps 23-30 for the strut on the opposite side of the vehicle.
Struts Installed:

See Post #2 for Sway Bar bushing replacement.
32) Replace the Sway Bar and tighten the Sway Bar Bracket-to-Frame Bolts to 30 Ft-lbs of torque.
33) Using a metric allen wrench and an open wrench, replace the Sway Bar Link Nuts; tighten them to 52 Ft-Lbs of torque.
Sway Bar installed:

34) Re-check the torque of all nuts and bolts, then replace with front wheels.
35) Replace front wheels, and tighten Wheel Lug Nuts to 83 Ft-lbs using a 6-lug pattern. Using the bottle jack, raise the vehicle (one side at a time) to remove the jack stands. Lower the vehicle to the ground.
36) Go get an alignment, you're done!
On your way to the alignment rack, make sure you do some laps around the mall so the soccer moms and teenage girls can see how sweet your 4Runner looks.
Before:

After:

***Please let me know if I forgot anything or if you have any tips that I should add! This is the method that worked for me; I'm sure others have found success using different methods. However, I like this method as it was safe, cost effective, and I was able to complete the install in about 8 hours total (I'm a newb, don't hate).
Objective: Replace both the front and rear shock absorbers and springs with Bilstein 5100's and Moog FJ Springs:
1) Without disconnecting brake lines;
2) Without assembling new front struts;
3) Replacing any and all necessary parts.
2) Without assembling new front struts;
3) Replacing any and all necessary parts.
These steps generally apply to a 4th Generation, V6 4WD model.
Notes:
- This method DOES NOT utilize the "no spring compressor method". I had my struts assembled by a local mechanic for $50 total. This eliminated the risk of damaging or improperly installing any parts, and reduced the risk of injury. Personally, I was not comfortable assembling the front springs myself, or using the "no spring compressor method".
- I also opted to purchase new Raybestos Strut Mounts (spring isolators) and Lower Control Arm (LCA)-to-Shock Absorber Nuts and Bolts. By doing so, I did not have to disassemble the old front struts to re-use the original strut mounts. As part of my due diligence, i also replaced the Lower Control Arm (LCA)-to-Shock Absorber Nuts and Bolts.
- To remove and install the rear springs, I used a spring compressor I rented from an auto parts store. However, I only compressed the springs slightly, to help ease removal and to ensure proper fitment when installing. Once again, USE EXTREME CAUTION when operating a spring compressor.
- If you really want to make it easy with no prying or pulling, or bottle jacks in the tire well (all suggestions I've seen in various install write ups), back off on the retaining nuts that hold your alignment cams in position on the LCAs. The 2 19mm nuts on the outside of the LCA mounts (4 total per LCA). Make a sharpie mark on the algnment cam with a point of reference on the alignment bracket. Then just loosen (don't remove) the outer nuts and that will free up your LCA to swing all the way down if you desire. I used a length of 2x4 propped between the wheel studs and the ground to hold the hub assembly in place while the LCA was dropped. When you get everything reassembled, adjust your cams to your reference mark and tighten the retaining nuts back down. These will get readjusted when you get your alignment done anyway.
Energy Suspension Sway Bar Bushing install in Post #2
Parts Needed:
These can be obtained from a number of sites; I used rockauto, amazon, and down south motorsports for my parts.
- Bilstein 5100 Shock Absorbers Down South Motorsports - $330
- Moog FJ Springs (Front 4WD: Part #81108; Rear 4WD: Part #81081) - Part Lookup for V8 or 2WD - ~$100
- RAYBESTOS Strut Mount (Part # 5201667) - RockAuto - $32 x 2
- Toyota Lower Control Arm (LCA)-to-Shock Absorber Nut and Bolt - obtained from toyota dealer - $20
Tools Required:
- 10-21mm wrenches
- 10-21mm Sockets
- Socket Wrench
- Torque Wrench up to 170 Ft-lbs
- Breaker Bar
- Metric Allen Wrenches
- PBlaster or other thread penetrating lubricant
- Grease
- Bottle Jack
- Jack Stands (2)
- Floor Jack (optional)
- Spring Compressor
- Balpeen Hammer
Results:
I measured the ride height before and after installing the suspension with a consistent tire pressure of 38 psi (BFG All Terrain 265/70/R17). After allowing a one week break-in period (~500 miles) to allow my springs to fully seat, I measured the final ride height difference. Please note that I did not measure my ride height before my Daystar 2.5/1.5 spacers were installed; the original height is calculated.
Before: Height with Daystar Spacers - (Calculated Original Height)
Front Driver: 36" (33.50")
Front Passenger: 36.25" (33.75")
Rear Driver: 37.94" (36.44")
Rear Passenger: 38.25" (36.75")
After: Final with FJ/Bilstein Shocks @ 1.75 - (Difference from Daystar 2.5/1.5 Spacers) - (DIfference from Original Height)
Front Driver: 37.125" (1.125") (3.625")
Front Passenger: 37.125" (0.875") (3.375")
Rear Driver: 38.375" (0.435") (1.935")
Rear Passenger: 38.875" (0.625") (2.125")
After looking at the above data, the FJ/Bilstein swap netted about 3.5" of lift in the front and 2" in the rear, while leveling all four corners of the truck (much better than the Daystar lift).
Procedure:
Starting about a week ahead of time, spray pb blaster or some other penetrating fluid on all of the nuts/bolts you will be removing during this process.
1) Put vehicle in park on a level surface, engage the parking brake, and chock the front wheels. Remove skid plates and spare tire for easier access.
Rear:
I replaced my rear suspension first, measuring my wheel well height before and after. This way, I was able to gauge what height I would have the front shocks set at to achieve the rake I wanted.
2) Pick a side of the vehicle and place the bottle jack under the frame just in front of that rear wheel well and raise that corner of the vehicle until the tire clears the ground by several inches.
3)Place jack stand under the frame and, using the bottle jack, lower the frame onto the jack stand. Remove the bottle jack.
4) Repeat steps 2 & 3 on the opposite side of the vehicle.
5) Remove both wheel lug nuts using a breaker bar and remove rear wheels.
6) Place the bottle jack or floor jack under the rear differential housing for support. Note: I used two extra jack stands for support when I lowered the rear axle (In the picture they are not being used - see Step 10).
7) Remove the Sway Bar Link-to-Frame nuts using a wrench. (This will allow the rear suspension to drop almost completely when the Shock Absorber Upper Mounting Nut is removed - Warning: See step 8)
Removed:
8) Remove the Shock Absorber Upper Mounting Nut using a wrench. Remember to support the axle using a floor jack. If not, the rear axle will drop and pull on the rear brake lines, possibly damaging them.
9) Remove the Shock Absorber-to-Axle Bolt using a wrench. You may need to use a block of wood and a balpeen hammer to remove the shock absorber from the axle mount.
Removed shock absorber:
10) Using the floor jack or bottle jack slowly lower the rear axle, until the rear brake lines are almost fully extended. Be sure not to put tension on the lines. (seen in next picture)
11) Spacer Lift - Spring Removal: Because I had a 1.5" Daystar spacer lift installed, I found that using a spring compressor made removing the spring and spacer much easier.
Option 1: Mount spring compressors on opposite sides of a rear spring and using a wrench, tighten the bolts on the compressor equally between both sides. (5 half-turns, then switch to the opposite compressor for 5 half-turns) I used a 10" extension on my socket wrench to reach the bolts.
Only compress the spring enough to wiggle the spring and bump stop down and away from the spring seat. You do not have to compress the springs more than about 0.5". Keep safety in mind at all times
Removing the driver-rear spring using compressors:
Option 2: Forgoing the use of the spring compressor, wiggle the spring and bump stop down and away from the spring seat on top of the axle.
Tip: If you unbolt the sway bar link from both sides and then use a jack or jack stand on one side of the axle to keep it elevated, lowering the other side should give you enough flex to remove the spring without compression. As long as you only lower one side at a time, the brake lines shouldn't be strained. Then raise one side and repeat on the other.
Compressing the passenger spring with a bottle jack to fit the driver spring:
Installation of the new springs and shock absorbers is the reverse of the removal procedure.
12) Place the bump stop onto the top of the spring. Insert the new spring and bump stop into the spring seat on top of the axle, aligning the top of the spring and bump stop into its housing.
If you are installing a spacer as well, place the spacer on top of the spring, then place the bump stop on top of the spacer. Spring compressors may be needed to install the new spring. Only lightly compress the spring and insert it into the spring seat on top of the axle, aligning the top of the spring and bump stop into its housing. Decompress the spring while making sure to seat it properly, and remove the spring compressors. Otherwise, wiggle the new spring and bump stop into place.
If the spring does not seat fully, it is useful to use a 3-4" 2x4" block and a balpeen hammer to force the spring into the spring seat on the axle.
13) Rub some grease on the shock absorber lower bushing and insert the new shock absorber onto the axle mount. You may need to use a block of wood and a balpeen hammer to fit the shock absorber onto the axle mount. Replace the Shock Absorber-to-Axle Bolt and using a torque wrench, tighten to 72 Ft-lbs. Repeat step on the other side.
14) Assemble washers and bushings on top of the shock absorber. The floor jack should still be in place and supporting the rear axle under the differential housing. Jack up the rear axle while guiding the shock absorbers into their mounts on the frame. Install top bushing, washer, and nut. Using a wrench, tighten the Shock Absorber Upper Mounting Nut until the bushings begin to compress slightly (or about 18 Ft-lbs of torque).
15) Guide the Sway Bar Links into their mounts on the frame. Replace washers, bushings, and nut. Using a wrench, tighten the Sway Bar Link-to-Frame Nut until the bushings begin to compress slightly (or about 11 Ft-lbs of torque).
See Post #2 for Sway Bar bushing replacement.
16) Replace rear wheels, and tighten Wheel Lug Nuts to 83 Ft-lbs using a 6-lug pattern.
Using the bottle jack, raise the vehicle (one side at a time) to remove the jack stands. Lower the vehicle to the ground.
Front:
For the sake of safety and to avoid broken parts, I had my front struts assembled by a professional mechanic for a total cost of $50.
17) Pick a side of the vehicle and place the bottle jack under the frame just behind a front wheel well and raise that corner of the vehicle until the tire clears the ground by several inches.
18)Place jack stand under the frame and, using the bottle jack, lower the frame onto the jack stand. Remove the bottle jack.
19) Repeat steps 17 & 18 on the opposite side of the vehicle.
20) Remove wheel lug nuts using a breaker bar and remove front wheels.
21) Remove the front Sway Bar Link Nuts with a wrench (using an allen wrench to help). You may need to use pliers to hold the other end of the end link ball joint to keep it from rotating.
22 - Optional Step) Remove the front Sway Bar Bracket-to-Frame Bolts. The Sway Bar can now be removed and placed aside. TIP: You don't need to remove the sway bar brackets. Disconnecting the sway bar from both sides will give you enough room to work without putting tension on the control arm assemblies. I only did this to free up some extra room in the wheel well. You must still perform Step # 21
Sway Bar Bracket attached to Frame:
23) Remove the Shock Absorber-to-LCA Nut. Remove the Shock Absorber-to-LCA Bolt using a balpeen hammer and a dowel. When the bolt is removed, the shock will slip downward in its mounting bracket in the LCA.
- Tip: It is helpful to remove the Lower Balljoint Bracket-to-LCA Bolts. This will allow more downward movement in the LCA, but you must be careful not to let the front hub droop too far and stretch the brake line.
Removed:
24) Remove the three (3) Shock Absorber Upper Mounting Nuts from the top of the strut. Do not remove the nut in the center which holds the spring isolator, spring and shock absorber together.
25) As you press the LCA downward (with a pry bar), the strut will start to slip toward the outside of the LCA mount. Wiggle/pry/hammer the bottom of the strut out of its mounting bracket in the LCA.
26) Move the bottom of the strut toward the front of the vehicle while rotating the strut (this will help the spring clear the LCA and steering arm.
Installation of the new, pre-assembled struts is the reverse of the removal procedure.
27) Rub some grease on the shock absorber lower bushing and position the Shock Absorber Upper Mounting Bolt into the top bracket. Place one nut on a Shock Absorber Upper Mounting Bolt to hold the strut in place. Move the lower shock bushing onto the mounting on the LCA while prying the LCA down with a pry bar.
28) While prying, insert a new Shock Absorber-to-LCA Bolt. It may be helpful to insert the old (possibly stripped) bolt first to align and stabilize the bushing with the mount on the LCA, then push the new Shock Absorber-to-LCA Bolt through. Tighten the new Shock Absorber-to-LCA Nut to 100 Ft-lbs of torque.
Tip: If you have room to fit the front strut easily, you can install the strut to the LCA bracket first, then you can use a small jack to raise the LCA with the strut into position. This eliminates having to try to hold the strut assembly in place with one hand and work a nut onto the upper mount with the other.
29) Install the new Shock Absorber Upper Mounting Nuts and tighten to 47 Ft-lbs of torque (or reasonably tight).
30) Reinstall the Lower Balljoint Bracket-to-LCA Bolts by pressing down on the LCA. Tighten to 166 Ft-lbs of torque.
31) Repeat steps 23-30 for the strut on the opposite side of the vehicle.
Struts Installed:
See Post #2 for Sway Bar bushing replacement.
32) Replace the Sway Bar and tighten the Sway Bar Bracket-to-Frame Bolts to 30 Ft-lbs of torque.
33) Using a metric allen wrench and an open wrench, replace the Sway Bar Link Nuts; tighten them to 52 Ft-Lbs of torque.
Sway Bar installed:
34) Re-check the torque of all nuts and bolts, then replace with front wheels.
35) Replace front wheels, and tighten Wheel Lug Nuts to 83 Ft-lbs using a 6-lug pattern. Using the bottle jack, raise the vehicle (one side at a time) to remove the jack stands. Lower the vehicle to the ground.
36) Go get an alignment, you're done!
On your way to the alignment rack, make sure you do some laps around the mall so the soccer moms and teenage girls can see how sweet your 4Runner looks.
Before:
After:
***Please let me know if I forgot anything or if you have any tips that I should add! This is the method that worked for me; I'm sure others have found success using different methods. However, I like this method as it was safe, cost effective, and I was able to complete the install in about 8 hours total (I'm a newb, don't hate).
Last edited: