Building, Driving and Adventuring the MTN4RNR

The "who needs a hand hold"... mod

Seems many people have rear facing lights on their roof racks, which are great for lighting pretty much everything behind you... Unless you have the hatch open. To solve this, I installed a [MENTION=87816]Baja Designs[/MENTION] S2 Pro LED light in the driver side hand hold of the hatch. I will post a full install write up as soon as I can, but for now, here are some photos. The flood pattern works great, and the light output is ridiculously awesome. Just in time for camping this weekend
:dancin:

DSC09385_zpsbczn5ytn.jpg~original

DSC09378_zpsq7daef4o.jpg~original

DSC09386_zpsktlq3jwc.jpg~original


More to come...
 
Last edited:
Seems many people have rear facing lights on their roof racks, which are great for lighting pretty much everything behind you... Unless you have the hatch open. To solve this, I installed a [MENTION=87816]Baja Designs[/MENTION] S2 Pro LED light in the driver side hand hold of the hatch. I will post a full install write up as soon as I can, but for now, here are some photos. The flood pattern works great, and the light output is ridiculously awesome. Just in time for camping this weekend
:dancin:

DSC09385_zpsbczn5ytn.jpg~original

DSC09378_zpsq7daef4o.jpg~original

DSC09386_zpsktlq3jwc.jpg~original


More to come...

Oh this is on my to do list now. Great mod.
 
Seems many people have rear facing lights on their roof racks, which are great for lighting pretty much everything behind you... Unless you have the hatch open. To solve this, I installed a [MENTION=87816]Baja Designs[/MENTION] S2 Pro LED light in the driver side hand hold of the hatch. I will post a full install write up as soon as I can, but for now, here are some photos. The flood pattern works great, and the light output is ridiculously awesome. Just in time for camping this weekend
:dancin:

http://i1380.photobucket.com/albums/ah175/mtn4rnr/S2 installation/DSC09385_zpsbczn5ytn.jpg
http://i1380.photobucket.com/albums/ah175/mtn4rnr/S2 installation/DSC09378_zpsq7daef4o.jpg
http://i1380.photobucket.com/albums/ah175/mtn4rnr/S2 installation/DSC09386_zpsktlq3jwc.jpg


More to come...

Nice, great idea!
 
The "who needs a hand hold"... mod (Complete install) 1 of 3

Seems many people have rear facing lights on their roof racks, which are great for lighting pretty much everything behind you... Unless you have the hatch open. To solve this, I installed a [MENTION=87816]Baja Designs[/MENTION] S2 Pro LED light in the driver side hand hold of the hatch. I first took a look at the specs, and made a paper model of the light to test the theory, and knowing that it was very close, I ordered the light to find out first hand. Considering that the light would be used to illuminate a large area I ordered the flood pattern lens and it works great. The light output is ridiculously awesome. Thankfully, this was a short install and I get it finished just in time for camping this weekend! The S2 does not require a relay, so all I had to do was run a hot wire from the battery to the hatch, and then modify both plastic hand hold pieces to make the light and the switch fit.

Parts used:
DSC09305_zpsil9hmwgf.jpg~original

- Baja Designs S2 Pro Flood/work LED light
- Wiring harness from Baja Designs [/URL]
- Drill of choice
- Milwaukee #9 step drill bit
- Stainless Steel mounting hardware
- Flexo PET wire sheathing
- Shrink wrap
- Heat gun
- Weather resistant butt connectors
- Dielectric grease
- 16 ga. wire
- Electrical tape
- Wire coat hanger
- Standard paint can opener
- 16” thin copper wire
- Zip ties
-Uinta Brewing Detour DIPA

Install:
Start by removing the interior hatch cover. Start with removing the lights, then the center knock out, then the pull strap. Then remove the plastic hand holds on the outside of the hatch. I found the perfect tool to remove these is a standard paint can opener. Insert at the top, then lever up to pop the plastic hand hold out of the hatch.
DSC09309_zpslc6ior6p.jpg~original

DSC09310_zpsiuqsj0ph.jpg~original

DSC09311_zpsdgfkwbsl.jpg~original

DSC09312_zpsfeknkums.jpg~original


Here is the piece (1 of 2) that will house the light and the switch on opposite sides of the hatch.
DSC09314_zpsb93a37kf.jpg~original


Remove the interior hatch panel by using the center “punch out” hole to pull down on the panel, releasing it from it’s plastic clips. The interior window seal at the top requires you to rotate the hatch panel down, and then push towards the interior of the car to release it from the hatch.
DSC09315_zpss87i9gm0.jpg~original


I started running the hot wire from the back because I had more clearance to go through the rubber “grommet” that connects the hatch to the main body of the car unless I wanted to drop the whole head liner out, which I didn’t want to do. I started by pulling the grommet out of the hatch so that the hole was open. I then fed the wire from the hand hold hole up to the top of the hatch using a straightened wire coat hanger to allow me to push it through. Once the wire/hanger was visible, I pulled it through the top of the hatch.
DSC09319_zpsslimobm2.jpg~original

DSC09318_zpssofiibha.jpg~original

DSC09316_zpsoqqwinhw.jpg~original


I then poked a small hole in the rubber grommet, just big enough to fit a small copper wire through as a pull wire. The copper wire was thin enough to get through, but sturdy enough to allow it to be pushed through the grommet. I looped the end to keep it from hanging up on any wiring or the grommet itself.
DSC09321_zpszrq9rw4w.jpg~original

DSC09322_zpsh8pj53yv.jpg~original

[note the tight clearance for the headliner below]
DSC09324_zpscjewvgp4.jpg~original


Once through, I wrapped the hot wire around the copper wire and pulled it through.
DSC09326_zpsmqx2u0yk.jpg~original

DSC09328_zpsszl37kpf.jpg~original


I then pulled enough wiring through the hatch/grommet to get me to the front of the vehicle, and started my way forwards. First, I pulled the weather stripping for the rear door off, and routed the wire down the driver’s side of the rear hatch area to the floor.
DSC09333_zpscnyl6c9m.jpg~original

DSC09331_zpsaxsbywrr.jpg~original

DSC09329_zpszd3s4w6u.jpg~original


Then, up under the floor mat in the cargo area to the back seat.
DSC09341_zpsm365tkte.jpg~original


See 2 of 3 below
 
Last edited:
The "who needs a hand hold"... mod (Complete install) 2 of 3

Under the driver’s side door trim.
DSC09335_zpsd9ewbinw.jpg~original

DSC09337_zpsxufksu7r.jpg~original


And through the firewall grommet I used for the grille light bar install using the same copper pull wire technique.
DSC09339_zpsg8pervzu.jpg~original


Once in the engine bay, I pulled enough wiring through plus 12” to reach the battery. I then cut and installed the same Flexo wrap used in the other light bar install over the wire to protect it in the engine bay. Shrink wrap on both sides, and a water tight battery connector on the end.
DSC09342_zpsnqsxcs2m.jpg~original


I then pulled the slack 12” back through the firewall so the Flexo extended from the driver footwell into the engine bay. I tucked all wires away, reinstalled all paneling and wrapped up that portion of the install. I left the wire disconnected from the battery for obvious reasons.

At the back of the hatch, I started by installing the switch on the passenger side hand hold using a step drill to create the hole for the round weather resistant switch.
DSC09344_zpssmufnfjt.jpg~original

DSC09345_zpsk1jg4reu.jpg~original


I then took the wiring harness through both holes, attached the hot wire from the battery to the positive wire on the harness, and routed the negative wire from the harness through a factory grommet and onto a factory hatch bolt.
DSC09348_zpssekbx98y.jpg~original

DSC09350_zps93rpz4l3.jpg~original


Hooked up the switch wires as it came, and reinstalled the hand hold on the passenger side, with the switch.
DSC09351_zpsk9y035pw.jpg~original


Pulled the slack out of the wiring harness and used zip ties to clean everything up.
DSC09352_zpscoaiqkuy.jpg~original


[Daytime!]

I then used the step drill to hone out the mounting hole for the light, and the hole for the light wire to come inside the hatch.
DSC09360_zpsgnhoo1rh.jpg~original


Because I wasn’t going to be able to secure the bolt inside the hand hold due to the light blocking it once in place, I used a rubber washer to allow the bolt to have enough traction to allow me to tighten without causing the bolt to simply spin. For this reason, I also opt’d away from the supplied nylon lock nut and favored a jam nut set up because it would put less rotational force on the bolt (eliminating spin and allowing it to tighten). To get the light wire through the hole I dirlled, I removed the provided deutsch connector, fed through and reinstalled it.
DSC09362_zpsfgkb8e0p.jpg~original

DSC09363_zpsohkiifap.jpg~original


I zip tied all bound wires to a support inside the hatch to eliminate any rattling or clatter from the hatch.
DSC09365_zpsbwauv1l3.jpg~original

DSC09366_zpsudwp3ctx.jpg~original


Plugged it in, and reinstalled the hand hold with the light into the hatch!
DSC09367_zpsjijtiwx7.jpg~original


It does stick out of the hand hold because of the mounting bracket, but it clears the bumper when the hatch is shut, and that was all I needed!

DSC09369_zps0srutuia.jpg~original


See 3 of 3 below
 
Last edited:
The "who needs a hand hold"... mod (Complete install) 3 of 3

Now for some installed photos.

DSC09377_zpsu0pyepcx.jpg~original

DSC09379_zpsw0b1axio.jpg~original


Switch lights when on.
DSC09383_zpse50mdjfl.jpg~original


DSC09387_zpsy8thcalp.jpg~original


S8 in the grille, S2 in the hatch.
DSC09402_zpsynppy9e3.jpg~original


DSC09412_zps6scwvqxi.jpg~original

DSC09415_zpsbvfjhwcn.jpg~original


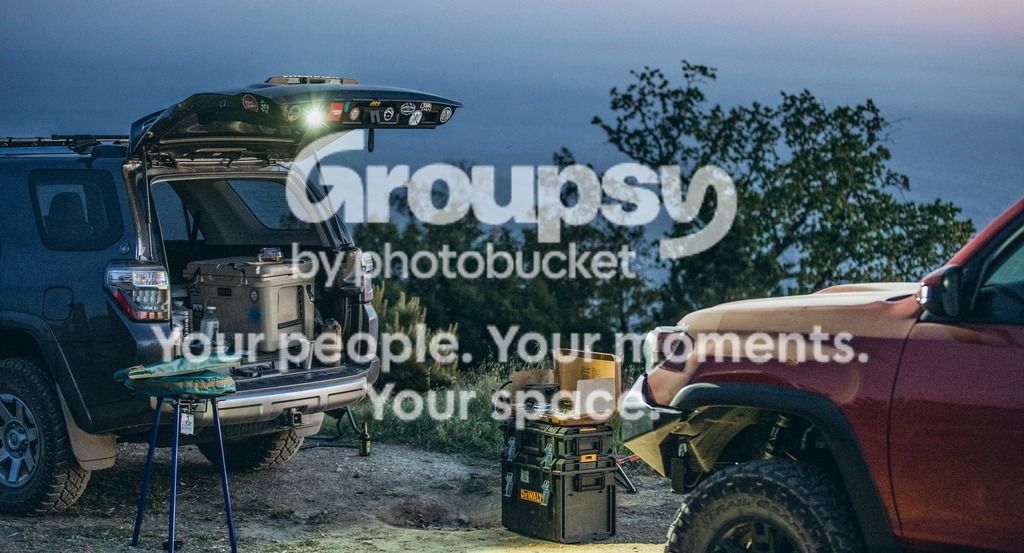
From the following weekend camping trip. This light definitely did it's job lighting up camp, and [MENTION=124732]LawnDart[/MENTION]'s rig for a sunset photo shoot
image_zpsmpvibafh.jpeg~original

DSC09461_zpsj7rd3wqe.jpg~original


Impressions
I am very pleased with the outcome of the light installation. It covers all of the requirements for my install, and the light output is awesome. This is the perfect addition to the 4Runner for anyone who spends time behind the truck at night, working, camping, or whatever. The quality of the [MENTION=87816]Baja Designs[/MENTION] light is top notch and it puts out a lot of light for it’s compact size, and in the right place with the work/flood lens. I finished this just in time for a dispersed camping trip, and will post updated photos when I come back!

More to come…​
 
Last edited:
Super Creative and Useful! Fantastic Mod!

Thanks! Last time I was camping I remember packing up the site for the night, putting the campfire out, etc and I thought "Man it would be nice to have some light back here" and this is what I came up with! I am trying to add things to the truck on an as needed basis to help with the budget and to keep the rig as functional as possible :thumb3:
 

Members online

Forum statistics

Threads
278,316
Messages
3,554,111
Members
248,016
Latest member
Advally Service

Trending content

Back
Top