
How to install a set of 4 note Cadillac horns on a 2010 4Runner Limited.
Horns came from a 96' fleetwood and were labeled A, C, D and F.
This installation uses the existing Toyota horn wiring so you can use the steering wheel to trigger the new horns.
Overall the install was not difficult but more than plug-n-play. Simple hand tools are needed for the job.
Total cost for the instal was just under $100, including the horns.
Here is the parts list:
4- Cadillac horns with mounting brackets and screws
1- 12v 30amp relay
1- 12v ATC fuse block
20' - 12ga wire
20' - 14ga wire
1- 20 amp ATC fuse
3 – 10mm bolts
1 - 8mm bolt
assorted wire end terminals
1 – corner bracket
Remove the plastic cowling (Toyota calls it the upper radiator support seal) to gain access to the front of the radiator and the horns by lightly pushing down on the center of the push pins then lift up the edge to remove the pins.
Next remove the plastic support in front of the hood release lever which partly covers the center most horn. After removing the three bolts, lift up on the center catch with a small blade screwdriver and pull the support away from the radiator cross member.
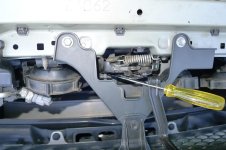
Both horns are exposed and ready for removal. Just unbolt and unplug.
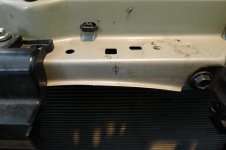
Three of the Caddy horns will bolt to existing Toyota threaded locations on the frame. However you will have to drill a new 21/32” hole on the front of the radiator frame as shown in the photo below to accept the fourth horn.
The Cadillac horns are labeled A,C, D and F. Each horn has a mounting bracket permanently attached to the horn, so a little modifying is necessary to fit to the Toyota frame.
Horns A and C will replace the Toyota horns with the following modifications.
To allow flush mounting to the frame, drill out the threads on the mounting bracket and grind the flashing down, then flatten the tab at the top of the bracket.
Horn D will bolt to the frame using the new hole drilled. DO NOT DRILL OUT THE THREADS on the horn bracket. Flatten the tab on the bracket to allow flush mounting to the frame as shown.
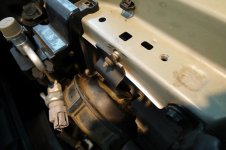
Horn F : mounts to the frame using an existing threaded location with an accessory bracket to allow the horn to clear the A/C line in front of the radiator. I used an old corner bracket I had in my spare parts box. Probably bought it at the local hardware store.
Horns F and D mounted to the frame. Location is to the left of the hood release.
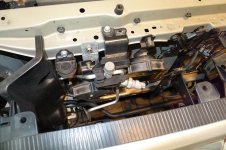
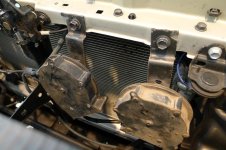
Next photo show Horns A and C mounted to the frame. Location is to the right of the hood release.
Wiring Hook up
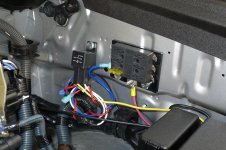
Mount the relay and fuse block to the fender side wall and connect wires as shown.
Run 12ga wire to connect the battery to the fuse block. Run 14ga wire for the other connections.
View attachment Horn Wiring 4runner.pdf
Like I said this hook up uses the existing horn wiring to trigger the relay which blows the horns....sweet!
Not as loud as air horns but a lot cheaper and I get their attention!
Horns came from a 96' fleetwood and were labeled A, C, D and F.
This installation uses the existing Toyota horn wiring so you can use the steering wheel to trigger the new horns.
Overall the install was not difficult but more than plug-n-play. Simple hand tools are needed for the job.
Total cost for the instal was just under $100, including the horns.
Here is the parts list:
4- Cadillac horns with mounting brackets and screws
1- 12v 30amp relay
1- 12v ATC fuse block
20' - 12ga wire
20' - 14ga wire
1- 20 amp ATC fuse
3 – 10mm bolts
1 - 8mm bolt
assorted wire end terminals
1 – corner bracket
Remove the plastic cowling (Toyota calls it the upper radiator support seal) to gain access to the front of the radiator and the horns by lightly pushing down on the center of the push pins then lift up the edge to remove the pins.
Next remove the plastic support in front of the hood release lever which partly covers the center most horn. After removing the three bolts, lift up on the center catch with a small blade screwdriver and pull the support away from the radiator cross member.
Both horns are exposed and ready for removal. Just unbolt and unplug.
Three of the Caddy horns will bolt to existing Toyota threaded locations on the frame. However you will have to drill a new 21/32” hole on the front of the radiator frame as shown in the photo below to accept the fourth horn.
The Cadillac horns are labeled A,C, D and F. Each horn has a mounting bracket permanently attached to the horn, so a little modifying is necessary to fit to the Toyota frame.
Horns A and C will replace the Toyota horns with the following modifications.
To allow flush mounting to the frame, drill out the threads on the mounting bracket and grind the flashing down, then flatten the tab at the top of the bracket.
Horn D will bolt to the frame using the new hole drilled. DO NOT DRILL OUT THE THREADS on the horn bracket. Flatten the tab on the bracket to allow flush mounting to the frame as shown.
Horn F : mounts to the frame using an existing threaded location with an accessory bracket to allow the horn to clear the A/C line in front of the radiator. I used an old corner bracket I had in my spare parts box. Probably bought it at the local hardware store.
Horns F and D mounted to the frame. Location is to the left of the hood release.
Next photo show Horns A and C mounted to the frame. Location is to the right of the hood release.
Wiring Hook up
Mount the relay and fuse block to the fender side wall and connect wires as shown.
Run 12ga wire to connect the battery to the fuse block. Run 14ga wire for the other connections.
View attachment Horn Wiring 4runner.pdf
Like I said this hook up uses the existing horn wiring to trigger the relay which blows the horns....sweet!
Not as loud as air horns but a lot cheaper and I get their attention!








