
You are using an out of date browser. It may not display this or other websites correctly.
You should upgrade or use an alternative browser.
You should upgrade or use an alternative browser.
***Cracked Dashboard Action Request***
- Thread starter momo.75
- Start date

momo.75
Registered User
Well, it looks really good to me. I mean really, my wife doesn't ride in my truck that often so the odds of the begs deploying with her in the truck are pretty slim...lol.
If i don't get anywhere by crawling the owner of the dealership i might check into an interior place here in town. I would try to do it myself, but don't really want to mess with the airbags.
If i don't get anywhere by crawling the owner of the dealership i might check into an interior place here in town. I would try to do it myself, but don't really want to mess with the airbags.
Yeah that does look very nice actually...
If I wasn't worried about the airbags I would definitely go that route.
On another note, I haven't gotten any PMs from people who are actively following this post. Momo was the only one that replied.. lol
I'll post back what I hear from Toyota.
Jman
--------------------
04' 4Runner Limited
If I wasn't worried about the airbags I would definitely go that route.
On another note, I haven't gotten any PMs from people who are actively following this post. Momo was the only one that replied.. lol
I'll post back what I hear from Toyota.
Jman
--------------------
04' 4Runner Limited

Agriess
New member
unused dash mat
I would love to get a dash mat for mine, I have a 05 limited, do you still have the mat available? I also have a 6" + crack and dont know what to do to stop it...
I also have one, it isn't terribly noticeable and I thought it was a seam when it first noticed it, due to the location, but it is large. It runs all the way across the dash above the cluster along the furthest protruding edge, as I said, almost where a seam could be (if there were a seam).
Not sure when it happened or if it was all at once or slow, due to where it is. It may have even been there when I bought it.
I bought a dash mat that fits relatively well but ends right where the crack is, so I don't use it. btw if anyone wants a charcoal gray dash mat PM me :wink2:
I would love to get a dash mat for mine, I have a 05 limited, do you still have the mat available? I also have a 6" + crack and dont know what to do to stop it...
cracked dash update....
So I finally tackled the dash project this past weekend. Full post coming with pictures. My local Toyota dealer basically said "good luck" on my dash. The service manager was rude enough to say "I used to work at a Chevy dealer for 10+ years and this wouldn't happen to a Chevy". I told him I didn't understand. He replied "the Chevy wouldn't be around long enough to have this problem". Anyway, he did allow me to buy the dash for ~$900 including tax so I was only partially satisfied. I contacted the Toyota "regional exec" and he was no help either.
I’m really struggling to accept the other post that indicated it takes ~1hr to get the dash off - suspect that involves a torch and a crowbar. In my opinion, if you want to do even a minimally quality job, it is at least 2 hrs (took me 2:45). Success is driven by the same stuff with other jobs I’ve done - follow the factory service manual instructions, be methodical, track the parts you are taking off (particularly fasteners) with post-its on a bench (or equivalent) that match the manual procedure numbers (trust me - you have this done at the dealer and they would have half a dozen bolts leftover that you'll never know about until your dash starts rattling), don't manhandle things that feel like they may break, and all will be well. Total time was 6.5 hrs but it should have taken 4-4.5 if I wasn't so meticulous with cleaning, checking/rechecking, watching 5 mins of college football here and there, etc. Everything works. The Toyota dealer guys insisted I'd have to come there after the job was done to reset the airbag DTCs but none came up. I own a Honda and the Japanese folks there write better service manuals. Love the errors and misspellings in the Toyota manual. Trust me folks, ANYONE could do this job. No special tools are needed. You don't even need a steering wheel puller (just back off the nut half-way and pull like he**). A basic set of metric sockets with various extensions, good phillips screwdrivers (#1-3), and a low/mid-torque wrench (for passenger airbag and steering wheel re-install) is all that is really needed. Also, the yellow trim tool set from Harbor Freight (HUGE fan - use them for everything) to get the various trim pieces off.
Again, full post coming w/pix. The picture of the half-way point is awesome…..
i always buy the factory service manual for every vehicle i own. Honda manuals are better than those from Toyota but the instructions are pretty clear for this one. I'm going to call and log a case tomorrow. Will see if they'll at least give me the part for cost if i'm going to burn a weekend. Then I'll go to the dealership that i purchased it from to see if they'll fight for me. if everything fails, i'll eat the ~$900.
So I finally tackled the dash project this past weekend. Full post coming with pictures. My local Toyota dealer basically said "good luck" on my dash. The service manager was rude enough to say "I used to work at a Chevy dealer for 10+ years and this wouldn't happen to a Chevy". I told him I didn't understand. He replied "the Chevy wouldn't be around long enough to have this problem". Anyway, he did allow me to buy the dash for ~$900 including tax so I was only partially satisfied. I contacted the Toyota "regional exec" and he was no help either.
I’m really struggling to accept the other post that indicated it takes ~1hr to get the dash off - suspect that involves a torch and a crowbar. In my opinion, if you want to do even a minimally quality job, it is at least 2 hrs (took me 2:45). Success is driven by the same stuff with other jobs I’ve done - follow the factory service manual instructions, be methodical, track the parts you are taking off (particularly fasteners) with post-its on a bench (or equivalent) that match the manual procedure numbers (trust me - you have this done at the dealer and they would have half a dozen bolts leftover that you'll never know about until your dash starts rattling), don't manhandle things that feel like they may break, and all will be well. Total time was 6.5 hrs but it should have taken 4-4.5 if I wasn't so meticulous with cleaning, checking/rechecking, watching 5 mins of college football here and there, etc. Everything works. The Toyota dealer guys insisted I'd have to come there after the job was done to reset the airbag DTCs but none came up. I own a Honda and the Japanese folks there write better service manuals. Love the errors and misspellings in the Toyota manual. Trust me folks, ANYONE could do this job. No special tools are needed. You don't even need a steering wheel puller (just back off the nut half-way and pull like he**). A basic set of metric sockets with various extensions, good phillips screwdrivers (#1-3), and a low/mid-torque wrench (for passenger airbag and steering wheel re-install) is all that is really needed. Also, the yellow trim tool set from Harbor Freight (HUGE fan - use them for everything) to get the various trim pieces off.
Again, full post coming w/pix. The picture of the half-way point is awesome…..
to be honest...it did take me about an hour....and i required no crowbars or torches...i've taken several toyotas apart and put them all back together....it took me an hour to gut my entire 02 tacoma from stock to the entire interior gutted down to the sheetmetal. but i wont be putting mine back in anytime soon either and i as i previously posted i repaired my dash so i dont need to swap anything over. My question for you is about the area surrounding the gauges clesuer. Is there a plastic piece just above the cluster surround? I looked at my moms 07 and the vinyl stops just after it wraps over the gauges and a plastic trim piece is installed just over the cluster surround. To me toyota knows there is a problem but i refusing to acknowledge it
to be honest...it did take me about an hour....and i required no crowbars or torches...i've taken several toyotas apart and put them all back together....it took me an hour to gut my entire 02 tacoma from stock to the entire interior gutted down to the sheetmetal. but i wont be putting mine back in anytime soon either and i as i previously posted i repaired my dash so i dont need to swap anything over. My question for you is about the area surrounding the gauges clesuer. Is there a plastic piece just above the cluster surround? I looked at my moms 07 and the vinyl stops just after it wraps over the gauges and a plastic trim piece is installed just over the cluster surround. To me toyota knows there is a problem but i refusing to acknowledge it
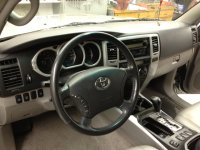
i stand in awe of your mechanic skills. 1 hr is no joke. that said, maybe i could do it if i tried the disassembly several more times. full post coming probably tonight. as a starter, pic of cluster area at start of job attached. can't see crack from this view.
Attachments
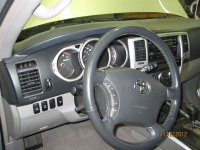
That does look really good! My only concern would be how it would react if/when the passenger side airbag deployed......but that is my only concern. Other than that it looks fantastic! Great job!
if you could see the plastic "cradle" the passenger airbag sits in behind the dash pad, you'd likely agree with me when i say that the airbag would laugh at whatever material he added to the surface of his dash. it would blow right through unless it was made of kevlar - just my opinion. the airbag has to pierce a somewhat substantial "creased" soft plastic housing. that, in my view, is the bigger force, not a thin piece of added vinyl....
i stand in awe of your mechanic skills. 1 hr is no joke. that said, maybe i could do it if i tried the disassembly several more times. full post coming probably tonight. as a starter, pic of cluster area at start of job attached. can't see crack from this view.
Full pix below - round 1. You also need a Torx 30 bit to get the airbag out/in (and this needs to be re-torqued). Forgot about that yesterday. Folks, seriously, this may look heinous but you must believe me when I say that ANYONE can do this job. If you can swallow the 900 bucks, have some basic tools (Auto Zone, Advance Auto, etc will loan the tools you need), and can acquire the instructions from the factory service manual (possibly elsewhere?), you should be able to successfully navigate this project with no worries. One day burned. Plus, you get a stamp on your man card that no one can take away, even if you order a chardonnay on guys night out.
Attachments
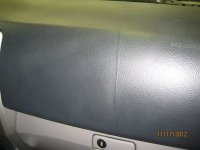
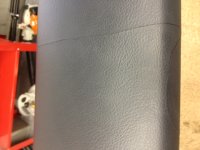
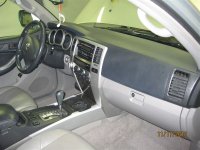
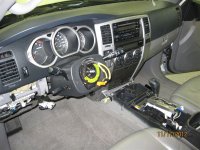
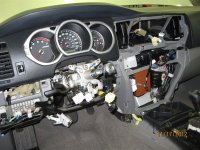
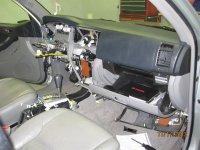
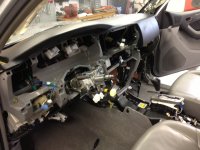
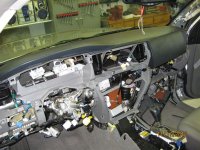
Full pix below - round 1. You also need a Torx 30 bit to get the airbag out/in (and this needs to be re-torqued). Forgot about that yesterday. Folks, seriously, this may look heinous but you must believe me when I say that ANYONE can do this job. If you can swallow the 900 bucks, have some basic tools (Auto Zone, Advance Auto, etc will loan the tools you need), and can acquire the instructions from the factory service manual (possibly elsewhere?), you should be able to successfully navigate this project with no worries. One day burned. Plus, you get a stamp on your man card that no one can take away, even if you order a chardonnay on guys night out.
here are the rest. pic #2 is half-way point - my favorite. looks so scary and yet isn't. good luck folks.
Attachments
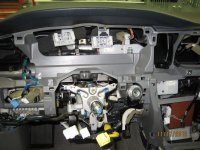
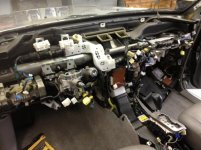
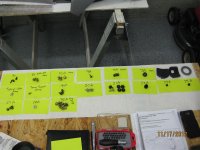
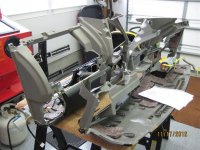
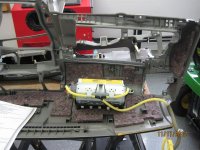
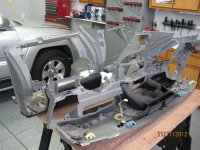
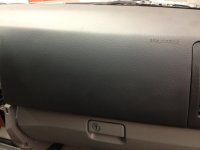

That is very impressive! If you ever happen to be in Birmingham with nothing to do just let me know......lol
haha - you don't want me, you want e10pvmt - he can do it in an hour!!

my god, you have your own bead blaster too! I wish you were my neighbor.
yeah, that one didn't go over too well with the wife. i just sort of had to have it once i saw it. it's awesome.

GregGimbert
New member
After pitching a ***** I got a new dash from the dealer in Daytona Beach for $600 +/- with free install since they had to pull the dash apart to get to an ac repair back there anyway. Total bull, I mean total bill, $1200.

Agriess
New member
Right side crack, "custom vinyl"
I would love one, but I don't know how to install it... Got a picture of it? Also in case anyone is wondering I was told there is this guy who runs a "custom vinyl" shop or something who said he could fix my crack right above the passenger airbag side and it runs up to the top just in the front and slightly starting to move to the left. No details on how much it will cost yet, I'm probably going to call him in the next two days an see what my possibilities are...
I have a dashboard which has been custom covered with black vinyl to cover the cracks for sale right now in the classified section if anyone wants a cheap fix. Make me an offer, I guarantee it is much cheaper than a new one!
I would love one, but I don't know how to install it... Got a picture of it? Also in case anyone is wondering I was told there is this guy who runs a "custom vinyl" shop or something who said he could fix my crack right above the passenger airbag side and it runs up to the top just in the front and slightly starting to move to the left. No details on how much it will cost yet, I'm probably going to call him in the next two days an see what my possibilities are...
Similar threads

- Replies
- 53
- Views
- 55K


