Deflecta Shield Magnum hood protector

ToolmanJohn

New member
I bought this hood protector last October, a couple of months after purchasing my 2003 4runner in August. The deflector has been OK since then, but yesterday I noticed it was vibrating on the hood a bit more than usual. I did a wash/wax today, and took it off the truck so I could do a good job on the front of the hood.

Well, the 2 little rubber expanding grommets that are used to hold it onto the hood corners were broken. Both sides have sheared off and the bolts remain attatched to the protector, but the brackets were not connected to the hood. The only thing that was preventing it from coming off were the two center brackets that are better attatched to the grill bolts.

I emailed Deflecta- Shield, and will wait to see what kind of service they offer. If anyone has the type of hood protector that uses a no-drill system and the expansion grommets, check them once in a while.
 

Attachments
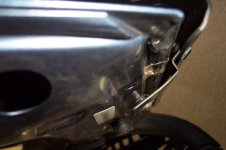
  • broken grommet.jpg
    broken grommet.jpg
    42.5 KB · Views: 1,827
Last edited:
Register to hide this ad
do you know what? i discovered the exact same thing on my truck last night .... i went to tighten the bolts on my lund interceptor bug shield, and discovered the same two rubber pieces were shredded, and the only thing holding the shield on were the two center things. i took the shield off and emailed Lund ... but haven't heard back from them.

will you keep us posted on what you discover? i'll let you know if i hear anything.
 
Good Warranty Service!

I got an email reply from LUND today. That was quick! They are sending out the entire hardware kit to me.

I was in Home Depot this morning. They had an assortment of expanding grommets similar to the ones on the shield. But the smallest bolt capacity was for 8-32 thread. The ones on my sheild were 6-32 thread. I was tempted to buy bolts and washers to make the switch and use 8-32, but didn't know how it would fit, if at all. Luckily when I got home the email response was there.

Thumbs up to LUND. Now if there is a way to prevent it from happening again. Hmmmm.... I'll have to think about reinforcing the connection somehow.

EDIT: Now I just thought of something. Did I put the darn things in backwards to begin with?? .....Fudge...Now I am not sure...
 
Last edited:
Nope.. I simply told them the problem

I was very straight forward. I asked if there was a way I could get a replacement set of the brommets. Here is my original email:

"Question:
How can I get a couple of the expanding grommets that are used to hold the hood shield metal support clips to the hood? Both of the grommets at the front corners of my hood have broken, and I had to remove the shield because
of flapping. "

I used their [email protected] on their website email for contact.

Their reply:

"John, I'll drop you out a new hardware kit for the shield. This will include the fasteners you are looking for.
Please contact me with any questions you may have."

Pretty cool huh?
 
it will just happen again and again. I gave up with the my rubber gromets on mine. In my sig u can see what i did, i bolted it on, not hard to do at all.


Chris
 
Got my parts

In fact, they sent TWO sets of mounting hardware to me, about 4 days apart. Must be a mixup there. But anyway, I reinstalled the hood deflector using the new hardware, and I will keep a close eye on it. I think I'll check it every week to make sure the expanding nut isn't ripping again.
 
hey, i just got mine too! only one set, though. :) i'm going to take the fasteners to home depot and see if i can find anything similar, then i'll buy a handful!
 
4route said:
hey, i just got mine too! only one set, though. :) i'm going to take the fasteners to home depot and see if i can find anything similar, then i'll buy a handful!

I've found that Lowe's has a much better stock of oddball hardware pieces than Home Depot. I really miss the independent hardware stores that had experienced salespeople.

Thanks for the advice, I'll check mine this weekend.
 
yeah, definitely head to lowes ...

and by the way, in case you are ever looking for some replacements/extras (for example if Lund stops sending them out free) ... i found out that those little pieces are called "well nuts" and the size is 6/32" for the internal thread.

i went to lowes today and will be going back soon ... they didn't have any of that size in stock, but you can buy them online as well.

just thought i'd let you guys know. :)

(and the way i found out was by taking one of 'em into home depot and lowes ... and trying them out with some screws and with the other well nuts)
 
Yes, you're right

I did the same thing originally. I tried both Lowes and Home Depot. They don't carry 6-32 well nuts. I figured it would be easier (and cheaper) to just go through the warranty process than trying to hunt them down.
I am very "do-it-yourself", but I always look for the path of least resistance too. I would rather spend $200 on special tools and materials to do a repair around the house than pay some one $75 to do it, just because I know I may have to do it again sometime in the future. If I have room for storage of the tools, I get the tools. This method of reasoning is why I don't have a backhoe. I could really use a backhoe. :)
 
It's broken again

Well, the well nuts have sheared again. This bites. I am using the "extra" set they accidentally sent me. But I plan on making a flat aluminum strip with serated flange nut attatched to it.

There is a hole adjacent to the hole which the well nut goes into. I will puch the nut up intot he hole and use a nice big pan head bolt (10-32) to lock it in. My only worry is losing the nut and srit inside the hood as it could conceivably slide in if I let go.

So I think putting a wire on it and letting it hang out of the hood just a bit is my plan. I will take some pictures of my inventiveness when I get it together this week.;):
 
please do take pictures - i would love to see what you come up with, as i'm sure we will all be having that problem over and over again until someone comes up with a fix.

(you maybe!)

oh, and one part of one of the well nuts on mine broke off in the hood ... so, t'is lost forever!

good luck and don't forget to post pictures!
 
Bummer on losing that nut

It is rubber coated so hopefully it won't rattle, and the nut insert itself looked like brass, so it won't rust either. But that means you can't fish it out with a magnet unfortunately.

I am on vacation this week, so I think I will go to Home Depot today and get what I need to do this project. If they don't have any thin aluminum strip, I will use brass instead, as long as it won't rust.

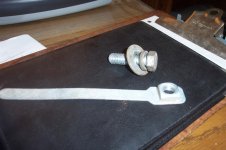
If you have ever installed a tow hitch onto a car with a unit body frame, you might have encountered the type of nut I am talking about fabricating. Here is a picture of one of these devices from the hitch that was on my sedan. I took it off before trading in the car.

I will make a small enough version to work in the space the hood allows.
 

Attachments

  • well nut.jpg
    well nut.jpg
    78.8 KB · Views: 823
All done..Should be Permanent

This repair should be permanent. It would only come off now if I take it off. I don't know how to post multiple pictures in one response so I will have to do a sequence.

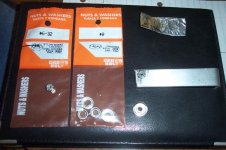
I used some 1/8" thick by 3/4" wide aluminum bar (Sears Hardware) that I had kicking around the garage. Also I used some foilmastic tape. It's unbelieveable stuff. Sticks like crazy, and I used it in two places.

FIRST, I measured the diameter of the actual nylon insert locknut. I bought a small bag of 6-32 nylon insert locknuts, they are the same thread as the Philips head screw that holds the bracket to the hood already, so I didn't want to make many changes to existing hardware.

The nut was .310" across the flats, and .350 across the corners. I needed to know this because of what I did next.
 

Attachments

  • captured nut.jpg
    captured nut.jpg
    94.8 KB · Views: 766
Last edited:
Second Step

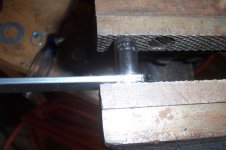
After I knew those dimensions, I drilled a hole 21/64" in diameter somewhere near the corner of the aluminum bar. That's .328" decimal. Then I pressed the nut into the aluminum bar using the bench vise. This is so the corners of the nut would be pressed right into the aluminum. Then I used a socket to support the bar, and finished pressing the nut flush to the bar, so the bottom of the nut would be flush and the top would sick out slightly.
 

Attachments

  • press nut flush.jpg
    press nut flush.jpg
    73.7 KB · Views: 784
Third Step

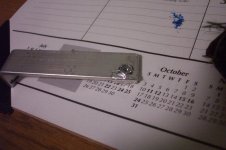
Then I squashed an 8-32 finish washer. They are contoured for a nice look, but I needed a flat washer inside the hood to keep the nut from coming through the hole in the hood. If I had used a 6-32 and squashed it, the hole would be too small for the 6-32 bolt. The hole of the 8-32 washer turned out perfect, almost to small after squashing, just right.

Now I used the foilmastic tape. I taped the washer over the bottom of the nut. I made sure to center it pretty good, and I cleared the hole with a razor afterward so threading the bolt would be easy. If I could have welded both the washer and nut to the aluminum bar I would have, but I don't have that kind of equipment or the knowledge to do it at home. Also welding anything with nylon in it (the nut) is a bad idea to begin with. That's why I pressed it into a pressfit hole.
 

Attachments

  • nut flush washer taped.jpg
    nut flush washer taped.jpg
    68.2 KB · Views: 763

Members online

Forum statistics

Threads
278,310
Messages
3,554,078
Members
248,016
Latest member
Advally Service

Trending content

Back
Top