Ditch Light/DRL/Turning Signal Mod

T101

New member
First and foremost this mod is made possible 99% by [MENTION=93434]gshadow325[/MENTION] for having the patience to answer my wiring questions, and 1% by me for physically putting everything in.

My plan was to install amber ditch lights which could also be used as turn signals, and wanted two things...
1: Manual on/off switch to control lights always on or always off
2: Lights flash with blinkers, regardless of switch being on or off


First thing was to purchase lights. Purchased these Cree 18w led's on amazon for $30 http://www.amazon.com/gp/product/B00G620ZVU/ref=oh_aui_detailpage_o00_s01?ie=UTF8&psc=1.

and a sheet of orange plexiglass for $10. http://www.amazon.com/gp/product/B006FLYLKS/ref=oh_aui_detailpage_o05_s00?ie=UTF8&psc=1


Started by removing the cap on one side of the lights by unscrewing the bolts
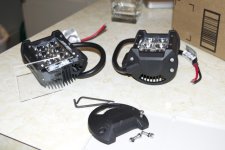
_DSC0238.jpg

then removed the clear lens that came with the lights, and cut the orange plexiglass to the same size.
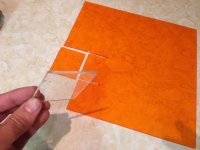
IMG_2259.jpg

Put the new orange lens in, and tightened everything back up.
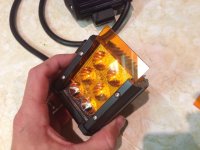
IMG_2261.jpg

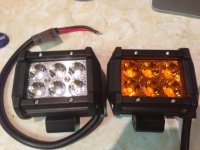
A side by side:
IMG_2264.jpg

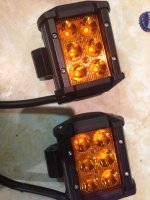
And both after the swap:
IMG_2265.jpg
 

Attachments

  • _DSC0238.jpg
    _DSC0238.jpg
    66 KB · Views: 1,668
  • IMG_2259.jpg
    IMG_2259.jpg
    71.2 KB · Views: 1,613
  • IMG_2261.jpg
    IMG_2261.jpg
    84.1 KB · Views: 1,605
  • IMG_2264.jpg
    IMG_2264.jpg
    84.7 KB · Views: 1,659
  • IMG_2265.jpg
    IMG_2265.jpg
    95.7 KB · Views: 1,538
Last edited:
Register to hide this ad
Ditch light brackets were DIY'd by making a few bends in a 1" strip of steel from Home Depot, self etching primer, and black automotive paint.

_DSC0010.jpg

_DSC0013.jpg

I'll add a picture of how they're mounted to the hood soon...
 

Attachments

  • _DSC0010.jpg
    _DSC0010.jpg
    50.5 KB · Views: 1,488
  • _DSC0013.jpg
    _DSC0013.jpg
    61.7 KB · Views: 1,581
Last edited:
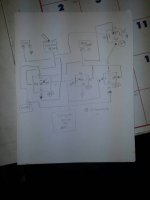
Wiring was pretty involved, and entirely thanks to [MENTION=93434]gshadow325[/MENTION]

This:
010f512e902f9d53fe8fb9f4ca679ed9.jpg

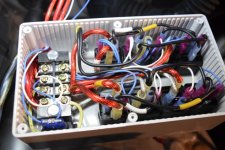
Became this:
_DSC0005.jpg

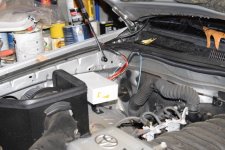
And all mounted in this project box http://www.amazon.com/gp/product/B00D5T4E2S/ref=oh_aui_detailpage_o00_s00?ie=UTF8&psc=1
here:

_DSC0009.jpg
^^^ The exposed wires have since been taped and loomed.^^^


As you can see the entire set up took 8 relays, or 4 per side.
To be clear "switched 12v" I mean the + signal from an on/off switch I installed in cab, which gets power from an ignition powered (only when powered when key turned) fuse tap

and "ignition 12v" I mean the + signal straight from that same fuse tap, bypassing the switch.

So it is 4 relays per side, the below wiring is the same for each bank of relays, besides the input from the OEM DRL's, and the output to that sides aftermarket Ditch light...

Relay 1:
87: + from battery (thick clear red wire)
87a: to/from 87a of relay 4 (Black wire w/ yellow tape)
85: to/from 87a of relay 2 (Black wire w/ white tape)
86: + from switched 12v (thin light blue wire)
30: to ditch light + of respective side (clear red wire w/ white tape driver side, w/ yellow tape passenger side)

Relay 2:
87: unused
87a: to/from 85 for relay 1 (Black wire w/ white tape)
85: from + of OEM DRL of respective side (clear blue driver side, clear silverish passenger side)
86: + from ignition 12v (thin white wire)
30: ground (black, no tape)

Relay 3:
87: to/from 30 relay 4 (black, no tape, short wire)
87a: unused
85: from + of OEM DRL of respective side (clear blue driver side, clear silverish passenger side)
86:+ from ignition 12v (thin white wire)
30: + from battery (thick clear red wire)

Relay 4:
87: unused
87a: to/from 87a of relay 1 (Black wire w/ yellow tape)
85: ground (black, no tape)
86: + from switched 12v (thin light blue wire)
30: to/from 87 relay 3 (black, no tape, short wire)


To the left inside the project box are two of these http://www.amazon.com/gp/product/B00H8T9BPG/ref=ox_ya_os_product
4 terminal wiring blocks, stacked on top of each other.

I did it this way so i could wire everything inside the box neatly, from the terminal to the relays, then connect the respective wires to the corresponding terminal after the box was mounted. Because of the limited space I was very very careful that not a single strand of any wire was poking out that could potentially touch another wire and short something out or worse.

The top row has the switched 12v, ignition 12v, and the battery 12v with an inline fuse.

Bottom row has + from each OEM DRL, and + to each ditch light.

And since our OEM DRL's turn off when the headlights turn on, I also had to do this mod to keep the DRL's always on
2004 4Runner: DRL Disable With On/Off Capability - YotaTech Forums

but instead of wiring in a switch I just grounded the wire permanently.
 

Attachments

  • 010f512e902f9d53fe8fb9f4ca679ed9.jpg
    010f512e902f9d53fe8fb9f4ca679ed9.jpg
    41.9 KB · Views: 1,496
  • _DSC0005.jpg
    _DSC0005.jpg
    98.8 KB · Views: 1,454
  • _DSC0009.jpg
    _DSC0009.jpg
    94.5 KB · Views: 1,523
Last edited:
VIDEO:
https://www.youtube.com/watch?v=mbX_ZwpFuh8&list=UUmwGPuZ47r5VHizmajSXtJA

Everything works awesome, totally met and exceeded what I wanted to accomplish with this mod. And i didn't burn down my truck and/or house, so that's a good thing too.

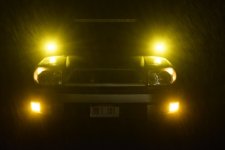
The ditch's steady ON:
_DSC0020.jpg


And before anyone criticizes me for having nothing besides extra lights on my truck, I finally picked up some
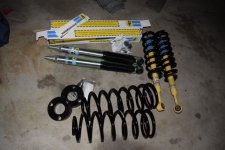
_DSC0017.jpg
Tacoma front bilsteins, FJ front Coils, 1" front Daystar spacer, NIB ToyTec 2" rear coils, and NIB rear 5100's ready to go, just waiting for 2 free days that I can dedicate to the install.


Thank you everyone for all the information on this forum.
 

Attachments

  • _DSC0020.jpg
    _DSC0020.jpg
    40.1 KB · Views: 1,554
  • _DSC0017.jpg
    _DSC0017.jpg
    82 KB · Views: 1,442
Last edited:
I like that project box! might have to borrow that idea!

what or how did you keep the relays down? glue?

Thanks for the mention. The wiring looks awesome!

Great job, you should be proud of that work!
 
VIDEO of the lights operating
https://www.youtube.com/watch?v=mbX_ZwpFuh8&list=UUmwGPuZ47r5VHizmajSXtJA


I like that project box! might have to borrow that idea!

what or how did you keep the relays down? glue?

Thanks for the mention. The wiring looks awesome!

Great job, you should be proud of that work!


THANKS...
I took the cover off of each relay and used a dab of PVC cement to glue the top part (opposite of where the wires connect) to the bottom of the project box. Once everything was secured I snapped the main body of the relay back in.

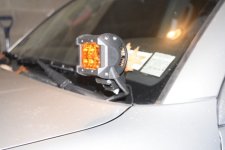
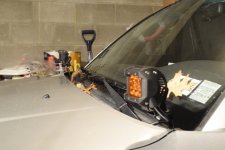
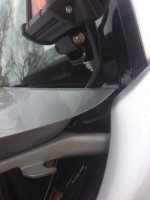
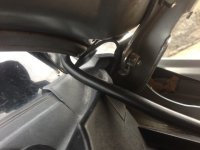
Outside and inside view of DIY brackets mounted
IMG_2311.jpg

IMG_2313.jpg

And see video link above
 

Attachments

  • IMG_2311.jpg
    IMG_2311.jpg
    57.3 KB · Views: 1,642
  • IMG_2313.jpg
    IMG_2313.jpg
    68.5 KB · Views: 1,611
Last edited:
Looks good, I like the improvised brackets.

Interested to see how it looks at night, also do you have any info on the light bar?

That relay box is nuts. Hats off to you and your advisers.
 
VIDEO of the lights operating
https://www.youtube.com/watch?v=H6AWsbwdF4k


THANKS...
I took the cover off of each relay and used a dab of PVC cement to glue the top part (opposite of where the wires connect) to the bottom of the project box. Once everything was secured I snapped the main body of the relay back in.

Outside and inside view of DIY brackets mounted
View attachment 138295

View attachment 138296

And see video link above

thats awesome! thanks for coming up with the concept and executing my crazy diagram! i love it its freaking awesome!
 
Looks good, I like the improvised brackets.

Interested to see how it looks at night, also do you have any info on the light bar?

That relay box is nuts. Hats off to you and your advisers.

Added 2nd video here:
https://www.youtube.com/watch?v=mbX_ZwpFuh8&list=UUmwGPuZ47r5VHizmajSXtJA
showing day and night view.

And a little more info on the 40" bar in my build thread here:
http://www.toyota-4runner.org/4th-gen-t4rs/177537-t101-build.html


And after 2 days of rain the new ditch lights have stayed dry behind the lens.
 
Last edited:
Added 2nd video here:
https://www.youtube.com/watch?v=mbX_ZwpFuh8
showing day and night view.

And a little more info on the 40" bar in my build thread here:
http://www.toyota-4runner.org/4th-gen-t4rs/177537-t101-build.html


And after 2 days of rain the new ditch lights have stayed dry behind the lens.

Video is marked as private. I like the lights and brackets though!! I bought the CBI brackets a couple months ago. I get a ton of looks and comments now that I have them mounted. I had a conservation officer ask me if they were movable from the cab for ("ahem" spotting deer purposes.) I showed him that they were hard mounted with bolts and that you would literally have to loosen bottom bolt to turn them sideways and 4 bolts to move them up and down. He was like, "oh". lol
 
YouTube link is fixed....

The ditch lights definitely get drowned out by the roof light bar, but it's scary at night how many sets of those glowing deer eyes show up that I'd never see with just the headlights or high beams.

Hit one at work last year. (Hopefully) Not gonna let that happen in my personal car.
 
[MENTION=109596]T101[/MENTION] Um..... I wanted to see how it looked on the road, as in... what YOU see from inside LMAO...

I'm sitting here watching the video trying to not have a seizure and then I realize its over and i'm like....
PEWOORn.gif
 

Members online

No members online now.

Forum statistics

Threads
278,312
Messages
3,554,083
Members
248,016
Latest member
Advally Service

Trending content

Back
Top