comtn4x4
Senior Member
Ok First off this is my first write up so be easy on me.
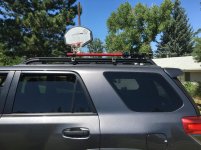
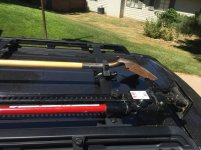
I was looking for an inexpensive removable Hi-lift and shovel mount to go on the stock crossbars. I am eventually planning on getting a rear bumper and a rack but in the meantime with the family and dogs I needed a temporary fix. Since I didn't find anything other than mounting it to the bar on my front bumper I came up with this myself and thought I would share. I have driven around for a week with them on and there have been no issues. I am going on a 3 day off road trip in a week so we will see
This should work for any vehicle that the mighty mounts can be adapted to.
Parts List:
1 each Yakima Might Mount set. I found mine on Amazon for $45
https://www.amazon.com/Yakima-8003590-Universal-MightyMount/dp/B0012SHLVK
2 each carriage bolts 2 1/2" x 5/16" Coarse. Available at all hardware store for about 30 cents
2 each clamping knobs. There are dozens of varieties available here
Clamping Knobs, Star Knobs, Metal Knobs, Wing Nuts, Wing Screws, Thumb Screw and Rim Knobs – Section 8
I used these safety knobs. They were more than some of the others but I felt it was worth it to get it clamped down right. $13.46 each. There are also locking knobs available
https://estore.jwwinco.com/default.aspx?itemcode=5TCN2K&Page=item+detail
2 each quick fist clamps. I bought a pack of two for $10.95
https://www.amazon.com/Original-Qui...g_2?ie=UTF8&psc=1&refRID=VNMV1FJ3K8HTGX6DVN2H
There is no real fabrication to the process just assembly.
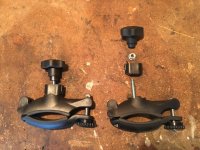
For both the mounts I assembled the mighty mounts with the shorter arms needed to fit the crossbars of the 5th gens.
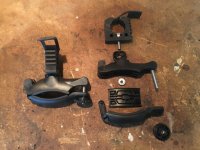
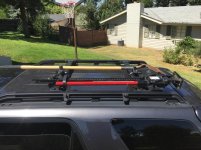
For the lift mount I used the taller of the two available spacers (For lack of a better description) to help the lift fit on the mount correctly. In the top part of the mount use the 2 1/2" carriage bolt and put it through the mount then the spacer. Then thread on one of the lock nuts that comes with the might mount assortment of hardware. I didn't tighten this all the way due to it's need to move to seat correctly and the difficulty of tightening it. At this point the hi-lift mount is ready to go. I placed the rear crossbar as far back as I could without the base of the Hi-lift hitting the hatch door in the up position. Also to center it more to standing on the rear wheel which is where I will be when removing etc.
I placed the front crossbar forward enough to spread the weight of the lift evenly and for the mount to reach an available hole in the hi lift
For the shovel mounts I first widened the hole in the base of the quick fist with a 1/4 inch drill bit and forced one of the 1 1/2" carriage bolts that comes with the mighty mount kit down through the quick fist. I then inserted the carriage bolt through the smaller spacer and into the mighty mount. Next I tightened it down with one of the included lock nuts. At this point the shovel mount just needs to be attached to the crossbar and mount your shovel.
I hope someone find use of this and I am happy to answer any questions or criticisms.
I was looking for an inexpensive removable Hi-lift and shovel mount to go on the stock crossbars. I am eventually planning on getting a rear bumper and a rack but in the meantime with the family and dogs I needed a temporary fix. Since I didn't find anything other than mounting it to the bar on my front bumper I came up with this myself and thought I would share. I have driven around for a week with them on and there have been no issues. I am going on a 3 day off road trip in a week so we will see
This should work for any vehicle that the mighty mounts can be adapted to.
Parts List:
1 each Yakima Might Mount set. I found mine on Amazon for $45
https://www.amazon.com/Yakima-8003590-Universal-MightyMount/dp/B0012SHLVK
2 each carriage bolts 2 1/2" x 5/16" Coarse. Available at all hardware store for about 30 cents
2 each clamping knobs. There are dozens of varieties available here
Clamping Knobs, Star Knobs, Metal Knobs, Wing Nuts, Wing Screws, Thumb Screw and Rim Knobs – Section 8
I used these safety knobs. They were more than some of the others but I felt it was worth it to get it clamped down right. $13.46 each. There are also locking knobs available
https://estore.jwwinco.com/default.aspx?itemcode=5TCN2K&Page=item+detail
2 each quick fist clamps. I bought a pack of two for $10.95
https://www.amazon.com/Original-Qui...g_2?ie=UTF8&psc=1&refRID=VNMV1FJ3K8HTGX6DVN2H
There is no real fabrication to the process just assembly.
For both the mounts I assembled the mighty mounts with the shorter arms needed to fit the crossbars of the 5th gens.
For the lift mount I used the taller of the two available spacers (For lack of a better description) to help the lift fit on the mount correctly. In the top part of the mount use the 2 1/2" carriage bolt and put it through the mount then the spacer. Then thread on one of the lock nuts that comes with the might mount assortment of hardware. I didn't tighten this all the way due to it's need to move to seat correctly and the difficulty of tightening it. At this point the hi-lift mount is ready to go. I placed the rear crossbar as far back as I could without the base of the Hi-lift hitting the hatch door in the up position. Also to center it more to standing on the rear wheel which is where I will be when removing etc.
I placed the front crossbar forward enough to spread the weight of the lift evenly and for the mount to reach an available hole in the hi lift
For the shovel mounts I first widened the hole in the base of the quick fist with a 1/4 inch drill bit and forced one of the 1 1/2" carriage bolts that comes with the mighty mount kit down through the quick fist. I then inserted the carriage bolt through the smaller spacer and into the mighty mount. Next I tightened it down with one of the included lock nuts. At this point the shovel mount just needs to be attached to the crossbar and mount your shovel.
I hope someone find use of this and I am happy to answer any questions or criticisms.