Unner
New member
I was under my 4Runner tightening up the sway bar links when I noticed some gear oil on the skids. It hadn’t dripped yet, but there was a drip forming. I researched it a bit and figured it was the gasket on top of the shifter for the transfer case leaking. There wasn’t really a full blown how to anywhere, so here’s a short and sweet one to help you out.
I’m not liable for you breaking something in your truck, hurting yourself, hurting others, or anything else that may occur with you performing this job on your own with the help of this write up.
Tools needed:
Rachet
10mm socket
12mm socket
14mm socket (maybe, can’t remember. I don't think so. I think they were 12mm)
Extensions
Universal joint adapter
Torque wrench
Razor blade
Phillips screwdriver
Pliers/small flat head screwdriver (whatever your preferred method is to remove stubborn clips)
Time Required: ~2 hours. I work slow. I’d rather do it right the first time, than have to do it a second time.
Part numbers:
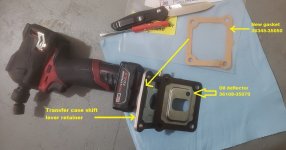
1 x Oil Deflector 36108-35070
1 x Gasket 36345-35050
A note about the parts above: Most things I read said you need 2 gaskets. This is not true if you buy the oil deflector. The oil deflector has a paper gasket just like the gasket above built into it. This part is listed as non-reusable by Toyota but some people have reused it. You just have to be careful not to bend it, and make sure you get all the old gasket off. I recommend just buying the deflector, but do whatever you feel is best for you. If you buy the deflector you only need one gasket. If you do not buy the deflector you will need two gaskets. I just want to make it clear so no one gets halfway through the job and has the wrong parts.
First step, is diagnose your problem. I had oil on both sides of the transfer case. If you only have it on one side you might have a different problem.
Second step, pull the trim piece around the e-brake up, and the piece around the shifters as well. To pull the e-brake trim piece you just lift the center console lid and then pull straight up, there are only clips holding this piece in. For the shifter trim piece, you pull up on all 4 corners as there is a clip on each. Sorry, no pics of this process.
Next step is to remove the little screw on your shift knob, assuming you have a multimode TC (transfer case) like I do. This little screw has some sort of thread locker on it so make sure you get a good bit on it and don’t round it out.
 IMG_20170825_081934115 by Unner Unner, on Flickr
Now you can pull the entire trim piece off, including the shift boot for the TC and the knob, but be careful. There is a wire attached to the knob. You don’t need to unplug this, although you can if you would like. I just laid mine in the driver floorboard still attached.
There is a little piece of insulation sitting around the transfer case shifter. Remove this and set it to the side.
 IMG_20170825_082008958 by Unner Unner, on Flickr
Now it should look like this. I ended up removing my center console too as it gave easier access to a clip you need to get to in a second. It’s only two screws that come in from the side right around where the e-brake and shifter trim piece is, and then two bolts inside the console. Take those out and it will lift right out.
 IMG_20170825_082111881 by Unner Unner, on Flickr
 IMG_20170825_083644643 by Unner Unner, on Flickr
Now, the next step is to get this little clip in the bottom driver side corner free. This clip was a pain for me. It’s impossible to reach with the center console in, which is why I removed mine.
 IMG_20170825_083135282 by Unner Unner, on Flickr
After a lot of force and messing with it I finally got it to slip through.
The next step is to remove the 8 bolts that holt the shifter plate down onto the body. These come out pretty easy, and I believe they are a 10mm. I marked the locations with the red dots below.
 IMG_20170825_083644643 by Unner Unner, on Flickr
Now that you have those out, crawl under the truck and mark the location of where the shift linkages bolt together. You will separate these so that you can pull the shift plate up off the vehicle. I marked mine with a sharpie and then removed it. It came loose easily on mine, and I believe it was a 12mm. This picture shows it already disconnected, but you can see how I marked it.
 IMG_20170825_085115882 by Unner Unner, on Flickr
Now you’re done outside the truck. Get back inside and unplug this big white connector with a D on it in front of the transmission shifter. This one came apart easily.
 IMG_20170825_085046100 by Unner Unner, on Flickr
Now you are ready to remove the shift plate from the vehicle. Go slowly and work around the different trim pieces and wires, making sure you’re not caught up on anything if you get stuck. You will also have to work the rubber boot around the TC shifter up and off the shifter as you go. Once you get the plate out to a certain point you will have to pivot the front of it towards the passenger side so that the transmission shifter linkage can come through the hole. It is not a straight linkage, there is a bend in it.
Now that you have the plate off it should look something like this.
 IMG_20170825_090110045 by Unner Unner, on Flickr
Take those 4 bolts out holding the shifter to the TC (12mm I think, but may have been 14mm). Now on the passenger side there is a nipple with a hose attached to it. You need to remove this hose. This hose links your TC to the open space between the TC and Transmission, connecting the TC to the breather that you can see on the driver side looking through the holes in the body you just exposed. The hose may be stubborn to get off the nipple. I had to grip it with a pair of pliers to get it to free itself and then I was able to work it loose with my fingers. Also be careful here not to get any dirt down into the TC as it is exposed and open.
With the entire shifter free take it out of the vehicle, being careful not to drip gear oil on the interior. You should be able to peal the old gasket off with the help of a razor blade. Mine was hard and brittle. Clean the surface up, and wipe away any remaining residue. Now go back inside the truck and take the razor blade and pry up on the metal plate that the shifter was sitting on. This is the oil deflector.
Once this is off, clean up the mating surface for the new one. It should look like this with everything removed.
 IMG_20170825_093806104 by Unner Unner, on Flickr
Once it is clean and ready go set the new oil deflector down (or gasket and then the old oil deflector if you are reusing it) in the same orientation as the old one. Paper gasket side down.
Now put the other paper gasket on top of this. Then set the shifter into its hole and see if the bolt holes line up. If they don’t you probably bumped the shift lever during cleaning and it just needs to be adjusted to the left or right. Push it left or right, whichever way you need it to go to make the bolt holes line up. Once the bolt holes are lined up start threading the bolts back in. Once they’re all in tighten them slowly in a pattern. Don’t just torque one and then move to the next one. Not sure if you have to do this, but I always do this when working with gaskets, etc. These bolts get torque to 13 ft lbs.
Don’t forget to hook up the hose! Sorry there’s not many pics of this process.
Side note to clear any confusion, the order of the parts should be like this: Transfer case, paper gasket built into oil deflector, oil deflector, paper gasket, shifter.
Now put the shifter plate back on, work the boot around the TC lever back down. Also make sure nothing is pinched under the plate between it and the body (carpet, wiring, fingers, cat, etc.) Start threading in the 8 bolts that hold it down. These go to 52 in-lbs. INCH POUNDS. NOT FOOT POUNDS!
Now once those are tight go back under the truck and hook the transmission shift linkage back up at the same spot you marked it at earlier. This gets torqued to 9 foot pounds.
Now go back into the truck and plug the big white plug in at the front, as well as the white retaining clip at the back.
Reinstall the center console.
Place the insulation back where it was around the TC shifter.
Reinstall the shifter trim plate.
Reinstall the screw holding the shifter knob on.
Reinstall the e-brake trim piece.
Put everything back in your center console.
Check the fluid level on the TC. (24mm socket, 27 ft-lbs torque) Or change the fluid if you haven’t done it in awhile. I did mine not too long ago so I just checked the fluid. It was still full because it didn’t get to leak for long.
Rinse the oil off your transfer case.
Go for a test drive! Test your 4WD and make sure you can still get it into 4Lo. If all this still works then you should be good to go! Monitor for leaks to make sure you fixed it.
Congrats, you probably just saved yourself $300 by doing this yourself and not taking it to the dealer.
Hopefully this helps someone, if you have any questions or comments go ahead and post them!
I’m not liable for you breaking something in your truck, hurting yourself, hurting others, or anything else that may occur with you performing this job on your own with the help of this write up.
Tools needed:
Rachet
10mm socket
12mm socket
14mm socket (maybe, can’t remember. I don't think so. I think they were 12mm)
Extensions
Universal joint adapter
Torque wrench
Razor blade
Phillips screwdriver
Pliers/small flat head screwdriver (whatever your preferred method is to remove stubborn clips)
Time Required: ~2 hours. I work slow. I’d rather do it right the first time, than have to do it a second time.
Part numbers:
1 x Oil Deflector 36108-35070
1 x Gasket 36345-35050
A note about the parts above: Most things I read said you need 2 gaskets. This is not true if you buy the oil deflector. The oil deflector has a paper gasket just like the gasket above built into it. This part is listed as non-reusable by Toyota but some people have reused it. You just have to be careful not to bend it, and make sure you get all the old gasket off. I recommend just buying the deflector, but do whatever you feel is best for you. If you buy the deflector you only need one gasket. If you do not buy the deflector you will need two gaskets. I just want to make it clear so no one gets halfway through the job and has the wrong parts.
First step, is diagnose your problem. I had oil on both sides of the transfer case. If you only have it on one side you might have a different problem.
Second step, pull the trim piece around the e-brake up, and the piece around the shifters as well. To pull the e-brake trim piece you just lift the center console lid and then pull straight up, there are only clips holding this piece in. For the shifter trim piece, you pull up on all 4 corners as there is a clip on each. Sorry, no pics of this process.
Next step is to remove the little screw on your shift knob, assuming you have a multimode TC (transfer case) like I do. This little screw has some sort of thread locker on it so make sure you get a good bit on it and don’t round it out.
IMG_20170825_081934115 by Unner Unner, on FlickrNow you can pull the entire trim piece off, including the shift boot for the TC and the knob, but be careful. There is a wire attached to the knob. You don’t need to unplug this, although you can if you would like. I just laid mine in the driver floorboard still attached.
There is a little piece of insulation sitting around the transfer case shifter. Remove this and set it to the side.
IMG_20170825_082008958 by Unner Unner, on FlickrNow it should look like this. I ended up removing my center console too as it gave easier access to a clip you need to get to in a second. It’s only two screws that come in from the side right around where the e-brake and shifter trim piece is, and then two bolts inside the console. Take those out and it will lift right out.
IMG_20170825_082111881 by Unner Unner, on FlickrIMG_20170825_083644643 by Unner Unner, on FlickrNow, the next step is to get this little clip in the bottom driver side corner free. This clip was a pain for me. It’s impossible to reach with the center console in, which is why I removed mine.
IMG_20170825_083135282 by Unner Unner, on FlickrAfter a lot of force and messing with it I finally got it to slip through.
The next step is to remove the 8 bolts that holt the shifter plate down onto the body. These come out pretty easy, and I believe they are a 10mm. I marked the locations with the red dots below.
IMG_20170825_083644643 by Unner Unner, on FlickrNow that you have those out, crawl under the truck and mark the location of where the shift linkages bolt together. You will separate these so that you can pull the shift plate up off the vehicle. I marked mine with a sharpie and then removed it. It came loose easily on mine, and I believe it was a 12mm. This picture shows it already disconnected, but you can see how I marked it.
IMG_20170825_085115882 by Unner Unner, on FlickrNow you’re done outside the truck. Get back inside and unplug this big white connector with a D on it in front of the transmission shifter. This one came apart easily.
IMG_20170825_085046100 by Unner Unner, on FlickrNow you are ready to remove the shift plate from the vehicle. Go slowly and work around the different trim pieces and wires, making sure you’re not caught up on anything if you get stuck. You will also have to work the rubber boot around the TC shifter up and off the shifter as you go. Once you get the plate out to a certain point you will have to pivot the front of it towards the passenger side so that the transmission shifter linkage can come through the hole. It is not a straight linkage, there is a bend in it.
Now that you have the plate off it should look something like this.
IMG_20170825_090110045 by Unner Unner, on FlickrTake those 4 bolts out holding the shifter to the TC (12mm I think, but may have been 14mm). Now on the passenger side there is a nipple with a hose attached to it. You need to remove this hose. This hose links your TC to the open space between the TC and Transmission, connecting the TC to the breather that you can see on the driver side looking through the holes in the body you just exposed. The hose may be stubborn to get off the nipple. I had to grip it with a pair of pliers to get it to free itself and then I was able to work it loose with my fingers. Also be careful here not to get any dirt down into the TC as it is exposed and open.
With the entire shifter free take it out of the vehicle, being careful not to drip gear oil on the interior. You should be able to peal the old gasket off with the help of a razor blade. Mine was hard and brittle. Clean the surface up, and wipe away any remaining residue. Now go back inside the truck and take the razor blade and pry up on the metal plate that the shifter was sitting on. This is the oil deflector.
Once this is off, clean up the mating surface for the new one. It should look like this with everything removed.
IMG_20170825_093806104 by Unner Unner, on FlickrOnce it is clean and ready go set the new oil deflector down (or gasket and then the old oil deflector if you are reusing it) in the same orientation as the old one. Paper gasket side down.
Now put the other paper gasket on top of this. Then set the shifter into its hole and see if the bolt holes line up. If they don’t you probably bumped the shift lever during cleaning and it just needs to be adjusted to the left or right. Push it left or right, whichever way you need it to go to make the bolt holes line up. Once the bolt holes are lined up start threading the bolts back in. Once they’re all in tighten them slowly in a pattern. Don’t just torque one and then move to the next one. Not sure if you have to do this, but I always do this when working with gaskets, etc. These bolts get torque to 13 ft lbs.
Don’t forget to hook up the hose! Sorry there’s not many pics of this process.
Side note to clear any confusion, the order of the parts should be like this: Transfer case, paper gasket built into oil deflector, oil deflector, paper gasket, shifter.
Now put the shifter plate back on, work the boot around the TC lever back down. Also make sure nothing is pinched under the plate between it and the body (carpet, wiring, fingers, cat, etc.) Start threading in the 8 bolts that hold it down. These go to 52 in-lbs. INCH POUNDS. NOT FOOT POUNDS!
Now once those are tight go back under the truck and hook the transmission shift linkage back up at the same spot you marked it at earlier. This gets torqued to 9 foot pounds.
Now go back into the truck and plug the big white plug in at the front, as well as the white retaining clip at the back.
Reinstall the center console.
Place the insulation back where it was around the TC shifter.
Reinstall the shifter trim plate.
Reinstall the screw holding the shifter knob on.
Reinstall the e-brake trim piece.
Put everything back in your center console.
Check the fluid level on the TC. (24mm socket, 27 ft-lbs torque) Or change the fluid if you haven’t done it in awhile. I did mine not too long ago so I just checked the fluid. It was still full because it didn’t get to leak for long.
Rinse the oil off your transfer case.
Go for a test drive! Test your 4WD and make sure you can still get it into 4Lo. If all this still works then you should be good to go! Monitor for leaks to make sure you fixed it.
Congrats, you probably just saved yourself $300 by doing this yourself and not taking it to the dealer.
Hopefully this helps someone, if you have any questions or comments go ahead and post them!