Dual Battery Installation Questions

libido

New member
For the people who have installed a dual battery system in your 5th gen T4R, I am looking for some ideas as to what works best for placement of the 2nd battery. Also, what did you use as an isolator/solenoid/controller unit? There are so many choices out there for RVs, but for an off-road vehicle, I am wondering if there are reasons to choose one over another. The company National Luna seems to be a good choice from what I have read, but they seem somewhat expensive. Any ideas and recommendations would be appreciated. Also a picture of where you put your second battery and what needed to be moved to do so would be helpful.

Thanks,
Greg
 
Register to hide this ad
I'm interested in the same thing! I have a new odyssey battery lying around that I would like to use for the project.
 
The National Luna kit is extremely easy and if you shop around you can get a decent deal when websites are having sales. You will need to modify the power steering bracket and move it over an inch or so to fit a full size battery. The battery goes behind the passenger headlight and the 4runner for the most part is ready to accept a 2nd battery in this position (it has the threaded mounting hole and slots for holding the battery brackets.

IMG_4406.jpg~original

IMG_4408.jpg~original

IMG_4405.jpg~original
 
Last edited:
For the people who have installed a dual battery system in your 5th gen T4R, I am looking for some ideas as to what works best for placement of the 2nd battery. Also, what did you use as an isolator/solenoid/controller unit? There are so many choices out there for RVs, but for an off-road vehicle, I am wondering if there are reasons to choose one over another. The company National Luna seems to be a good choice from what I have read, but they seem somewhat expensive. Any ideas and recommendations would be appreciated. Also a picture of where you put your second battery and what needed to be moved to do so would be helpful.

Thanks,
Greg

I made my own tray and incorporates the Power Steering Res relocation as ABR Sidewinder of Australia is the only one that made one at the time. They were expensive so I just modified their design to fit my needs. Budbuilt said they were going to make one but don't see it on their site.
Here's how I did mine.Dual Battery Mod

More pics and explanations....https://picasaweb.google.com/110764526188420500909/DualBatteryModOptimaBlueTopVortex

Link to ABR.....http://www.sidewinder.com.au/page190.html
 
Thanks for the responses. Just to throw out some other items to consider, there is a dual battery set up made by Kodiak that includes two small Odyssey batteries that take up a smaller footprint (both together can fit where the original battery resides). These don't have the same CCAs as the original battery, so right there you have a significant limitation. Also if you look at some of the African and Australian sites, they seem to promote items made by CTEK such as the D250S that can also be hooked into solar panels and/or windmills when the vehicle is parked for an extended period. Perhaps the ideal would be a CTEK D250S combined with the National Luna solenoid/controller. With a modest solar panel on the roof, I would suspect that you could be off the grid for quite a while and still enjoy the pleasure of cold beer.:beer:

Cheers,
Greg
 
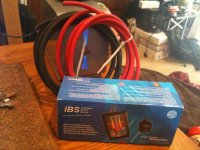
After some extensive research, I decided to go with the IBS system for my dual battery installation. I will try to take some pictures and provide my comments if I can get around to installing it this weekend.


Cheers,
Greg
 

Attachments

  • 052.jpg
    052.jpg
    135.8 KB · Views: 2,780
After some extensive research, I decided to go with the IBS system for my dual battery installation. I will try to take some pictures and provide my comments if I can get around to installing it this weekend.

Cheers,
Greg

I know this thread is a bit old but did you ever get around to installing your IBS system and do you have pics w/ a how to write-up?


Thanks,
 
[MENTION=70355]OBW2011[/MENTION] I just did the IBS Dual battery system install last weekend, here are some pics that might help you get started. Note that I am NOT like a lot of guys on here that have actual mechanical and engineering skills, so follow my lead at your own risk.

I ran the IBS monitor wires into the center console, as you can see from pic 1. You have to pop the front console, it is really easy, there are threads on here that show how to do it.

To get the wire up under the hood I used the big rubber grommet thing that brings a bunch of wires in as you can see in pic 2. I cut really small holes so that the fit around the wiring harness was tight. You can see that I ran my ARB fridge freezer wiring loom through there too, it runs under the doors and back into the cargo area.

Once you have your wiring up under the hood it is a matter of following the IBS wiring diagram. I ran the battery cables around the back, and the rest is pretty self explanatory I think, just double check before you cut the individual colored monitor wires, because you are only going to have one shot at that. Also, remember that there are two different size holes for the crimped on ends for the monitor wires, one size for wires that connect to the battery terminal and one size for the wires that connect to the IBS module. I screwed that up and had to go to West Marine for more crimp on end thingies, as you can see I don't really know what I am talking about since I don't know the word for those. It took a me a solid afternoon to get it all done, and another afternoon previously to run the wiring into the center console and do the ARB wiring loom. I am not happy with the bit of rats nest around the IBS module and may tape that up or try to use a harness of some kind to make it look cleaner.


Overall it was easier than I thought, and as some other members of the forum encouraged me to do before I became and Antman cupholder rolling mod addict, just jump in there and do it!

Good luck!

<a href="http://s1251.photobucket.com/user/sitting_still/media/83AA30B0-3473-4CDF-8353-C6139B40810B-3626-000005D55E7DF1C2.jpg.html" target="_blank"><img src="http://i1251.photobucket.com/albums/hh559/sitting_still/83AA30B0-3473-4CDF-8353-C6139B40810B-3626-000005D55E7DF1C2.jpg" border="0" alt=" photo 83AA30B0-3473-4CDF-8353-C6139B40810B-3626-000005D55E7DF1C2.jpg"/></a>

<a href="http://s1251.photobucket.com/user/sitting_still/media/8956B834-E8AA-4E74-B210-FC338B498138-3928-0000068B0F1878B7.jpg.html" target="_blank"><img src="http://i1251.photobucket.com/albums/hh559/sitting_still/8956B834-E8AA-4E74-B210-FC338B498138-3928-0000068B0F1878B7.jpg" border="0" alt=" photo 8956B834-E8AA-4E74-B210-FC338B498138-3928-0000068B0F1878B7.jpg"/></a>

<a href="http://s1251.photobucket.com/user/sitting_still/media/25191393-2E00-4DA4-B32A-B72F76A0CCB5-3626-000005D56CA23B3C.jpg.html" target="_blank"><img src="http://i1251.photobucket.com/albums/hh559/sitting_still/25191393-2E00-4DA4-B32A-B72F76A0CCB5-3626-000005D56CA23B3C.jpg" border="0" alt=" photo 25191393-2E00-4DA4-B32A-B72F76A0CCB5-3626-000005D56CA23B3C.jpg"/></a>

<a href="http://s1251.photobucket.com/user/sitting_still/media/06CFC588-CCAD-4272-9927-80DF3804AA1D-3626-000005D574F23B87.jpg.html" target="_blank"><img src="http://i1251.photobucket.com/albums/hh559/sitting_still/06CFC588-CCAD-4272-9927-80DF3804AA1D-3626-000005D574F23B87.jpg" border="0" alt=" photo 06CFC588-CCAD-4272-9927-80DF3804AA1D-3626-000005D574F23B87.jpg"/></a>

 
I used IBS. Pics available at the link in my sig.

Not too much offense....

BUT the photos in this thread of installed systems look pretty bad.

You guys should get some terminal covers and split loom for your wiring....
 
And why mount the optima with the positive side next to the fender? It could have been mounted in either orientation.

The positive contacts are very near grounding out on the fender. :fish:
 

Members online

Forum statistics

Threads
278,309
Messages
3,554,075
Members
248,016
Latest member
Advally Service

Trending content

Back
Top