Exhaust Tip Installed

TheDude

New member
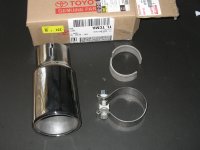
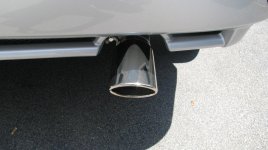
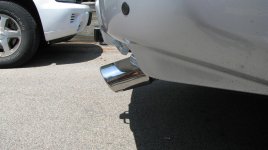
I received and installed the Toyota Exhaust tip today. Ordered it through Toyota Parts People. It came with no directions, but it did say to contact my toyota dealership to get the directions. Well, it looks pretty simple (there's only 1 bolt) so I went ahead without the directions.

I put the 2 small pieces around the thin section of the original exhaust right before it starts to flare wider. Then you slide the new exhaust tip with clamp/bolt over the 2 small pieces and ratchet away (i think it was a 5/8 ratchet).

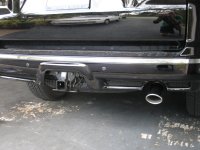
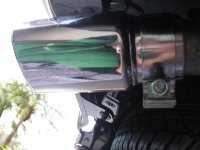
Anybody that has seen the directions let me know if anything I did wasn't right. Also, I put put the bolt/clamp assembly to the bottom of the exhaust tip, it's not noticeable this way when you step back and look at the tip. With the bolt installed on the side in a vertical position (somebody mentioned in a post from 2006 that the directions said to clamp it vertically) or on top of the exhaust tip, it was way too noticeable when you stepped back to look.

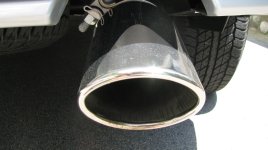
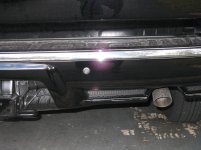
Not the best shots with my reflection in them and my 3 week old 4runner needing a good bath. so the 1st pic is a before and the last 2 are after shots.
 

Attachments

  • IMG_1409.jpg
    IMG_1409.jpg
    132.2 KB · Views: 21,719
  • IMG_1407.jpg
    IMG_1407.jpg
    134.3 KB · Views: 23,686
  • IMG_1410.jpg
    IMG_1410.jpg
    131.2 KB · Views: 26,211
  • IMG_1416.jpg
    IMG_1416.jpg
    117.3 KB · Views: 21,358
Register to hide this ad
interesting...I called a local dealer today to order my running boards $350 and I will be installing. I asked about the exhaust tip and they had two parts one for $46 and then a dual wall polished for $64. The $46 just indicated stainless steel per him. I can't imagine the tip not being polished though. Either way i ended up ordering the $64 cuz I definitely wanted the polished one and didnt want to have to make a trip back to the dealer. parts should be in on Tuesday.
 
I swear that the SR5 I test drove a week ago already had this. I stopped by the dealer and picked up the paperwork on it and it wasn't listed as any extra cost. Weird.
 
I had problems with mine. Didn't see how the spacer fit but the realized I didn't have the tip in deep enough. Not to mention Sparks Toyota sent me a pdf of the installation. The bolt is supposed to be on the left side of the exhaust, facing downward. You did just fine.
 
I noticed on one of yur pics that there's a groove on the exhaust tip. Was this on the top or bottom of the original exhaust when you installed?
 
I put the 2 small pieces around the thin section of the original exhaust right before it starts to flare wider. Then you slide the new exhaust tip with clamp/bolt over the 2 small pieces and ratchet away (i think it was a 5/8 ratchet).

Mine just arrived last night, the nut is 15mm. Hopefully put it on this evening.
 
Installing 2011 4Runner Exhaust tip

ExhaustTip4runner

ExhaustTip4runner

ExhaustTip4runner

ExhaustTip4runner

ExhaustTip4runner


Hi:

I Got the instructions.

There is an internal bump inside the tip at the bottom. You should touch with the exhaust inferior part.
The clamp nut should be at 10:00 position left driver side.

anything else is correct.

Installation.
(a) Make sure the vehicle’s tail pipe is free from
dirt and debris.
(b) Remove exhaust tip from box and set on a
soft surface to prevent scratching.
(c) Slide the Stainless Steel Clamp over the
exhaust tip inlet.
(1) Locate the bolt of the clamp at the left
side (driver side) of exhaust tip inlet with
the nut facing down.

(d) Slide the exhaust tip and clamp assembly
over the tail pipe until the edge of the exhaust
tip is on the beginning of the bend of
vehicle's tail pipe.

(1) The exhaust tip should be oriented with
the internal bump on down.
(2) Slide the exhaust tip until the internal
bump interferes with tail pipe. The end of
tail pipe and end to the exhaust tip should
be positioned.
(e) Install the Stainless Steel spacers.
(1) Make sure that the clamp assembly is
loose enough to move around the exhaust
tip.
(2) Slide the two spacers into exhaust tip
opening between the tail pipe and exhaust
tip inlet. Place one at left and the other at
right.
(3) Make sure the edges of the spacers are
flush to the tip's edges.
(f) Align the exhaust tip so that the oval is
horizontal to the rear of bumper fascia.
(g) Once the tip is positioned correctly and the
alignment seems accurate, tighten the clamp
nut making sure the clamp remains in the
proper position.
(h) Torque clamp nut to 55Nm 8Nm ( 40.57
Ft/lbs 5.9 Ft/lbs).
(i) Clean exhaust tip with glass cleaner or
approved cleaner and non-scratching cloth.
 
Last edited:
Install Exhaust Tip

I read your post regarding install of exhaust tip and I want to thank you and all that responded to your post.
I recently purchased a 2011 4Runner Trail Edition and was able to install exhaust tip quite easily, after reading your post and responses to your post.
I think it took about 10 minutes fo rme to install tip.
Many thanks.
 
Also, I put put the bolt/clamp assembly to the bottom of the exhaust tip, it's not noticeable this way when you step back and look at the tip. With the bolt installed on the side in a vertical position (somebody mentioned in a post from 2006 that the directions said to clamp it vertically) or on top of the exhaust tip, it was way too noticeable when you stepped back

I'd recommend rotating the bolt assembly so you don't drag it on stuff.
 
I bought mine at Toyota of the Desert in the Palm Springs, CA area and it came with the tip and the roof cross bars already...and I didn't get charged extra! (I meticulously reviewed the list of charges and sticker!)
 
exhaust tip

Hey all.
Quick question. I bought the exhaust tip, installed it without using the spacers. so here are my questions

1: I have a 2011 SR5, I pushed the tip in as far as I could and there isn't any room for the spacers at all between the original exhaust and the tip.
Do I need the spacers?

2: Does anyone know how far out the tip should be from the bumper? I think mine looks like it's too far out and down..

Any help or opinion on this would be greatly apprecialted..

here are the pics
 

Attachments

  • Tip 1.jpg
    Tip 1.jpg
    131.6 KB · Views: 19,274
  • Tip 2.jpg
    Tip 2.jpg
    137.7 KB · Views: 18,732
  • Tip 3.jpg
    Tip 3.jpg
    136.6 KB · Views: 18,170
I have mine pushed in quite a bit more than yours. You can't easily see the clamp looking at mine. I used the spacers and pushed the existing pipe to the bump in the exhaust tip, which leaves the tip almost flush with th bumper.
Hope this helps.
Trying to write a reponse that didn't sound like a porn movie was hard... No pun intended!
 
thanks for the reply airwolf,

did you have any difficulty getting the bump in the tip to touch the original exhaust pipe? I was thinking of putting a piece of wood against the end of the tip and using a hammer to get the exhaust to touch the bump in the tip. Did you have to do anything like that? Or were you able to just slide it on by hand?
 
I slid it down by hand.
I can e-mail over a few pics of my install if you would like. Just IM your e-mail.
 

Members online

No members online now.

Forum statistics

Threads
278,309
Messages
3,554,068
Members
248,016
Latest member
Advally Service

Trending content

Back
Top