
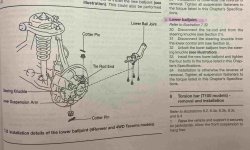
I know this topic has been covered a million times but I enjoy documenting the process in hopes of helping another owner who might need it. This post will go through the steps I took to replace the lower ball joints (or LBJ) on my 3rd gen 2002 4runner. Some of the tools I used vs what you already have may differ, so this is for references purpose only. This documentation should be the same for any 3rd gen 4runner. Also, here the Official Lower Ball Joint Write Up Thread that does a great job documenting the same process.
OEM Part Numbers List
Other Parts/Materials List
Torque Specs
EDIT: Notice the different torque specs for the four ball-joint nuts. Depending on the year of your 4runner, the specs differ. Don't over-tighten the bolts, causing them to stretch. If you do this (like me), you'll most likely need to replace the bolts with new ones.
Various Resources Used
Before Starting
0) Spray every nut and bolt needing to be removed with PB blaster a few hours (or the night before) before starting. There are a total of 12 bolts that need to be removed, so continue through the post to see which nuts and bolts need to be sprayed with PB Blaster.
Removing the Front Tire
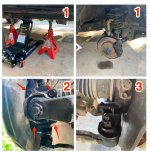
1) Jack up one side of the vehicle in a designated jack spot until the front tire is off the ground. Using the jack stands, secure the truck so you're able to remove the tire and work under the truck. Use chock blocks on the rear tires to ensure the vehicle does not roll out while you're working on it. Using a 21mm socket remove the lug nuts. Might need to use a breaker bar to loosen them. Remove the tire once all lug nuts are removed.
Removing The Old Lower Ball Joint
2) Loosen the four LBJ bolts with a 14mm socket and ratchet or breaker bar if they are stubborn. Do not take off the bolts, just loosen them.
3) Remove the cotter pin from the outer tie rod end and using a 19mm socket, remove the castle nut. Place the castle nut "up-side-down" on the outer tie rod so when you release the outer tie rod from the wheel knuckle it won't be so aggressive when using the Pitman arm.
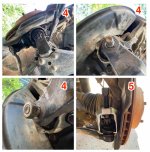
4) Remove the cotter pin from the LBJ castle nut and loosen the castle nut bolt using a 24mm socket and ratchet. Use a breaker bar if the nut is stubborn (it is very tight). Once it is removed, thread the nut "up-side-down" so the release won't be as explosive when using the Pitman arm.
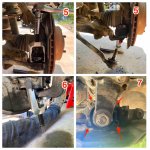
5) Use the Ball Joint remover arm on the outer tie rod to remove it from the LBJ. Use a 19mm socket on the Pitman arm to break free the joint. Remove the nut and outer tie rod from the joint. Don't lose this nut since you'll use it with the new LBJ.
6) Using the Pitman arm on the lower ball joint castle nut using the 19 mm socket to break the lower ball joint free. Once the lower ball joint castle nut is broken free. Leave the castle nut on.
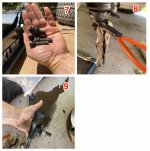
7) Remove the 4 LBJ joint screws.
8) Finally remove the lower castle nut. I did have issues where the lower castle nut was spinning with the old ball joint so I went ahead and and improvised to get the lower castle nut removed.
9) Once all the bolts and nuts are removed, remove the old lower ball joint.
EDIT: If you have a rubber dust cover over your ball joint gasket then keep it and use it when you replace the new one! Don't be like me and think this is some aftermarket part. Port over the rubber dust cover that helps protect your Lower Ball Joint gasket.
Installing New Lower Ball Joint
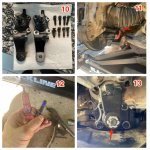
10) Spray all the areas with break cleaner so you'll have a cleaner surface area. Inspect the old and new ball joints and bolts and ensure they are the same.
11) Place new LBJ in place and start new low castle nut tightening by hand. Use the jack to raise the lower control arm and line up the steering knuckle and to rest the new LBJ in place.
12) Use Locktite blue on the four bolts on the LBJ and start to hand tighten them into place.
13) Tighten the lower castle nut by hand until tight.
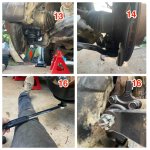
14) Put the tie rod back into the joint and snug up the castle nut that you removed initially.
15) If you're using the jack, lower the jack from lower control arm.
16) Tighten the lower castle nut to 105 ft/lbs and place the provided cotter pin. You might have to "over tighten" the castle nut to get the cotter pin to line up.
17) Torque the tie rod castle nut to 67 ft/lbs and use a new cotter pin from the assorted kit.
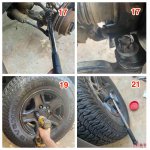
18) Torque the four LBJ bolts to spec at 59 ft/lbs (96-00) or 37 ft/lb (01-02) in a criss-cross pattern. Don’t over tighten your bolts 01-02 owners!!
19) Put the wheel and tire back on and hand tighten each lug nut.
20) Using the jack, raise the vehicle up to remove the jack stands. Once they're removed, slowly lower the vehicle until it's back on the ground.
21) Tighten the lug nuts to spec at 83 ft/lbs.
22) Repeat on the other side.
23) Once both sides are complete, it's recommended to get an alignment done.
24) Post alignment, have a beer.
EDIT: As I’m doing the other side, the “up-side-down” castle nut technique is not really necessary. Using the Pitman arm directly against the bolt works just fine. Just take it slow.
OEM Part Numbers List
- Driver Side Lower Ball Joint: 43340-39465
- Passenger Side Lower Ball Joint: 43330-39585
- LBJ Bolts (96-00) - 8 total (4 per ball joint): 90080-10066
- LBJ Bolts (01-02) - 8 total (4 per ball joint): 90119-10933
Other Parts/Materials List
- Cotter Pin Assortment Set
- CPB Blaseter Penitration Oil
- Pitman arm/Front End Service Kit (** I rented this kit from Advanced Auto as a loaner. Return it within 45 days and it's free to use.)
- 3.5 ton car jack
- 6-ton Jack Stands (a pair)
- 21 mm socket to remove lug nuts
- 14 mm socket to remove the four LBJ bolts
- 24 mm socket to remove the lower castle nut
- 19 mm socket to use on ball joint remover
- 1/2 and/or 3/4 in ratchet
Breaker bar to loosen stubborn/tight bolts - Needle nose plier to remove cotter pins
- Blue Locktite for four LBJ bolts
- Break cleaner to clean up oil and grime
- Impact drill to zip bolts on and off
Torque Specs
- Four ball joint nuts (96-00) - 59 ft/lbs
- Four ball joint nuts (01-02) - 37 ft/lbs
- Outer Tie Rod Castle Nut 67 ft/lbs
- Lower Castle Nut on ball joint - 105 ft/lbs
- Front Wheel Lug nuts - 83 ft/lbs
EDIT: Notice the different torque specs for the four ball-joint nuts. Depending on the year of your 4runner, the specs differ. Don't over-tighten the bolts, causing them to stretch. If you do this (like me), you'll most likely need to replace the bolts with new ones.
Various Resources Used
- https://www.youtube.com/watch?v=--HcOQlv03U&list=PLbigVHbnEpn4-ld_ICAk4s3HW7TBCje_A&index=8&t=1265s
- https://www.youtube.com/watch?v=EmoCAb0ygnw&list=PLbigVHbnEpn4-ld_ICAk4s3HW7TBCje_A&index=7
- Official Lower Ball Joint Write Up Thread
Before Starting
0) Spray every nut and bolt needing to be removed with PB blaster a few hours (or the night before) before starting. There are a total of 12 bolts that need to be removed, so continue through the post to see which nuts and bolts need to be sprayed with PB Blaster.
Removing the Front Tire
1) Jack up one side of the vehicle in a designated jack spot until the front tire is off the ground. Using the jack stands, secure the truck so you're able to remove the tire and work under the truck. Use chock blocks on the rear tires to ensure the vehicle does not roll out while you're working on it. Using a 21mm socket remove the lug nuts. Might need to use a breaker bar to loosen them. Remove the tire once all lug nuts are removed.
Removing The Old Lower Ball Joint
2) Loosen the four LBJ bolts with a 14mm socket and ratchet or breaker bar if they are stubborn. Do not take off the bolts, just loosen them.
3) Remove the cotter pin from the outer tie rod end and using a 19mm socket, remove the castle nut. Place the castle nut "up-side-down" on the outer tie rod so when you release the outer tie rod from the wheel knuckle it won't be so aggressive when using the Pitman arm.
4) Remove the cotter pin from the LBJ castle nut and loosen the castle nut bolt using a 24mm socket and ratchet. Use a breaker bar if the nut is stubborn (it is very tight). Once it is removed, thread the nut "up-side-down" so the release won't be as explosive when using the Pitman arm.
5) Use the Ball Joint remover arm on the outer tie rod to remove it from the LBJ. Use a 19mm socket on the Pitman arm to break free the joint. Remove the nut and outer tie rod from the joint. Don't lose this nut since you'll use it with the new LBJ.
6) Using the Pitman arm on the lower ball joint castle nut using the 19 mm socket to break the lower ball joint free. Once the lower ball joint castle nut is broken free. Leave the castle nut on.
7) Remove the 4 LBJ joint screws.
8) Finally remove the lower castle nut. I did have issues where the lower castle nut was spinning with the old ball joint so I went ahead and and improvised to get the lower castle nut removed.
9) Once all the bolts and nuts are removed, remove the old lower ball joint.
EDIT: If you have a rubber dust cover over your ball joint gasket then keep it and use it when you replace the new one! Don't be like me and think this is some aftermarket part. Port over the rubber dust cover that helps protect your Lower Ball Joint gasket.
Installing New Lower Ball Joint
10) Spray all the areas with break cleaner so you'll have a cleaner surface area. Inspect the old and new ball joints and bolts and ensure they are the same.
11) Place new LBJ in place and start new low castle nut tightening by hand. Use the jack to raise the lower control arm and line up the steering knuckle and to rest the new LBJ in place.
12) Use Locktite blue on the four bolts on the LBJ and start to hand tighten them into place.
13) Tighten the lower castle nut by hand until tight.
14) Put the tie rod back into the joint and snug up the castle nut that you removed initially.
15) If you're using the jack, lower the jack from lower control arm.
16) Tighten the lower castle nut to 105 ft/lbs and place the provided cotter pin. You might have to "over tighten" the castle nut to get the cotter pin to line up.
17) Torque the tie rod castle nut to 67 ft/lbs and use a new cotter pin from the assorted kit.
18) Torque the four LBJ bolts to spec at 59 ft/lbs (96-00) or 37 ft/lb (01-02) in a criss-cross pattern. Don’t over tighten your bolts 01-02 owners!!
19) Put the wheel and tire back on and hand tighten each lug nut.
20) Using the jack, raise the vehicle up to remove the jack stands. Once they're removed, slowly lower the vehicle until it's back on the ground.
21) Tighten the lug nuts to spec at 83 ft/lbs.
22) Repeat on the other side.
23) Once both sides are complete, it's recommended to get an alignment done.
24) Post alignment, have a beer.
EDIT: As I’m doing the other side, the “up-side-down” castle nut technique is not really necessary. Using the Pitman arm directly against the bolt works just fine. Just take it slow.
Attachments
-
 img1-2_small-min.jpg129.1 KB · Views: 1,992
 -
 img2_small-min.jpg120.4 KB · Views: 1,824
 -
 img3-1_small-min.jpg117 KB · Views: 1,763
 -
 img4_small-min.jpg116.5 KB · Views: 1,729
 -
 img5_small-min.jpg128.2 KB · Views: 1,759
 -
 img6_small-min.jpg124.3 KB · Views: 1,723
 -
 img7_small-min.jpg124.7 KB · Views: 1,750
 -
 IMG_8707-min.jpg114.7 KB · Views: 2,579
Last edited:


