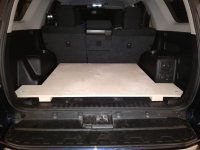
I bought my '13 TE knowing that I may not use the stock cargo slide, but had not found any viable alternatives until I came across the Goose Gear Plate System for the 5th generation 4Runner.
I had tried installing some eye-bolts into the stock slide so I could mount my fridge and such, but the design isn't right, and after a weekend in the backcountry, I got *real* tired of the "dooka dooka dooka" sound that entire assembly made every time we hit a bump or corrugations.
So, I ordered myself one. Mind you, it is a simple enough design that I could have made myself one, but my time is worth more than the system runs, so I opted to have the pros do it. The amount of time I would have spent to brain-screw the project, coupled with the fit and finish of the product, is well worth the price tag for me. On top of that, you get great customer support and you're supporting an SBO that makes stuff for our community.
Removal of the stock tray system takes longer than the install, so I'd give it a 2 banana rating, and remember, always complete step #6. You're going to need a 10mm, 12mm and 14mm socket. A few flathead screwdrivers, and a 4mm allen.
This is how the plate came...nicely boxed, well padded and plastic wrapped. No dings to the finish whatsoever.


This is more than a sheet of wood. You can tell some forethought and engineering went in to the design. The end results is a very sturdy platform.

The stock cargo slide in closed and open form....not a bad design, but not what I needed.


Start by popping off the rail covers and removing the bolts seen here; x2.

Remove the tray itself, and this is what you get.

Remove these bolts on either side at the rear of the slide rails.

Remove these bolts and nuts at the front. Also, remove the two bolts holding the forward tie-downs in, and pull the cubby up and out. Then, remove the bolts holding the brackets down.

This is what you are left with. You'll want to remove the rear most door trim piece to pull the carpet piece up. Just pop the fittings out, remove the carpet, and you're set.

I gave mine a good vacuum, and wiped the area down with some simple green. Found a dime and some broken glass....my guess is from previous owner.
I opted to install some Stinger mat that I had. Other threads have said this wasn't needed, but what the hell...I had it laying around.

Now, here is the hard part. Set the plate system in, align the holes, and bolt it down. 2 at the rear, and 4 at the front.....oh wait....that wasn't difficult at all.
It took me longer to chase the holes with a tap than it did to install the plate. The bolt holes were nuts on.


Now I need to plan out the placement of my fridge and slide, as well as some tie-down locations for my Front Runner boxes.
I had tried installing some eye-bolts into the stock slide so I could mount my fridge and such, but the design isn't right, and after a weekend in the backcountry, I got *real* tired of the "dooka dooka dooka" sound that entire assembly made every time we hit a bump or corrugations.
So, I ordered myself one. Mind you, it is a simple enough design that I could have made myself one, but my time is worth more than the system runs, so I opted to have the pros do it. The amount of time I would have spent to brain-screw the project, coupled with the fit and finish of the product, is well worth the price tag for me. On top of that, you get great customer support and you're supporting an SBO that makes stuff for our community.
Removal of the stock tray system takes longer than the install, so I'd give it a 2 banana rating, and remember, always complete step #6. You're going to need a 10mm, 12mm and 14mm socket. A few flathead screwdrivers, and a 4mm allen.
This is how the plate came...nicely boxed, well padded and plastic wrapped. No dings to the finish whatsoever.
This is more than a sheet of wood. You can tell some forethought and engineering went in to the design. The end results is a very sturdy platform.
The stock cargo slide in closed and open form....not a bad design, but not what I needed.
Start by popping off the rail covers and removing the bolts seen here; x2.
Remove the tray itself, and this is what you get.
Remove these bolts on either side at the rear of the slide rails.
Remove these bolts and nuts at the front. Also, remove the two bolts holding the forward tie-downs in, and pull the cubby up and out. Then, remove the bolts holding the brackets down.
This is what you are left with. You'll want to remove the rear most door trim piece to pull the carpet piece up. Just pop the fittings out, remove the carpet, and you're set.
I gave mine a good vacuum, and wiped the area down with some simple green. Found a dime and some broken glass....my guess is from previous owner.
I opted to install some Stinger mat that I had. Other threads have said this wasn't needed, but what the hell...I had it laying around.
Now, here is the hard part. Set the plate system in, align the holes, and bolt it down. 2 at the rear, and 4 at the front.....oh wait....that wasn't difficult at all.
It took me longer to chase the holes with a tap than it did to install the plate. The bolt holes were nuts on.
Now I need to plan out the placement of my fridge and slide, as well as some tie-down locations for my Front Runner boxes.