

hour
New member
I decided I'd make a little tutorial for replacing your front pads and rotors. Same as the radiator and tstat replacement guide, I couldn't find a tutorial that provided me step by step instructions with pictures, so I made one. I'm sure there are other guides floating around with pictures and videos, but no harm in having another.
The extent of my brake experience was disconnecting some brackets on my Tacoma and 4runner during lift installation, so consider this a guide, by a noob, for other noobs. I've read that brake installs are all fairly similar on disc brake applications - so this might help someone not only do their 4runner but other vehicles in the future. "Why no Tundra upgrade?" - Well, since I've owned this vehicle, the brakes have been squealing, producing a metal-on-metal noise, shimmying when braking at speed down hill, etc. I've learned to deal with these issues as I've continued to drive the vehicle (about 7 months, ~6k miles) so new parts will inevitably feel and perform better. That's adequate for me.
Parts:
2 x Wagner BD125503 Rotors ($32.59 on Amazon, free shipping)
1 x Wagner QC436A Thermoquiet Pads (comes as set, $23.17 on Amazon, free shipping)
Tools/Materials:
- Beer
- Gloves (optional, but it's pretty filthy and I kind of wish I had some on during)
- Needle nose pliers
- A short-ish bungee cord or a friend to hold caliper for a minute or so
- A chop stick, allen key, or something similar, rigid, and round
- Caliper grease
- One or two flat head screw drivers
- WD40 / PB Blaster
- Brake parts cleaner
- 12mm deep socket (or regular with extension)
- 17mm socket & wrench
- Possibly some clamps (I used cheap plastic clamps, broke one set - think they were $2 each)
The first step, unpictured, is to jack up the front end of the vehicle, remove wheels, and rest on jack stands. If you need a photo of this, you may wish to rethink the DIY brake job.
Next, spray this area with your WD40/PB Blaster for good measure. This is to hopefully loosen up some rust that may prevent easy removal of the rotor. Either it worked exceptionally well on mine, or mine weren't rusted in this area, because my rotor was ready to come off the second I moved the caliper.

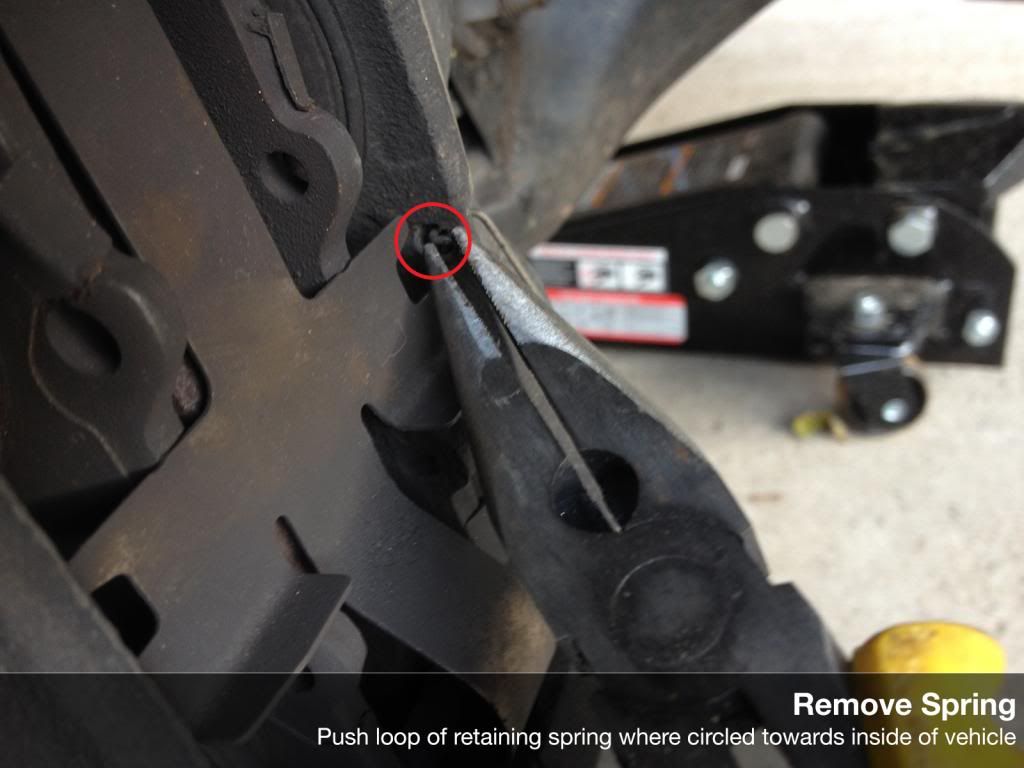
You can do the rest while the spray goes to work. Locate the spring on the caliper. The top and bottom go in to holes in the pins, the middle section has a loop. You'll want to pop the loop out and the spring will then be easy to remove.

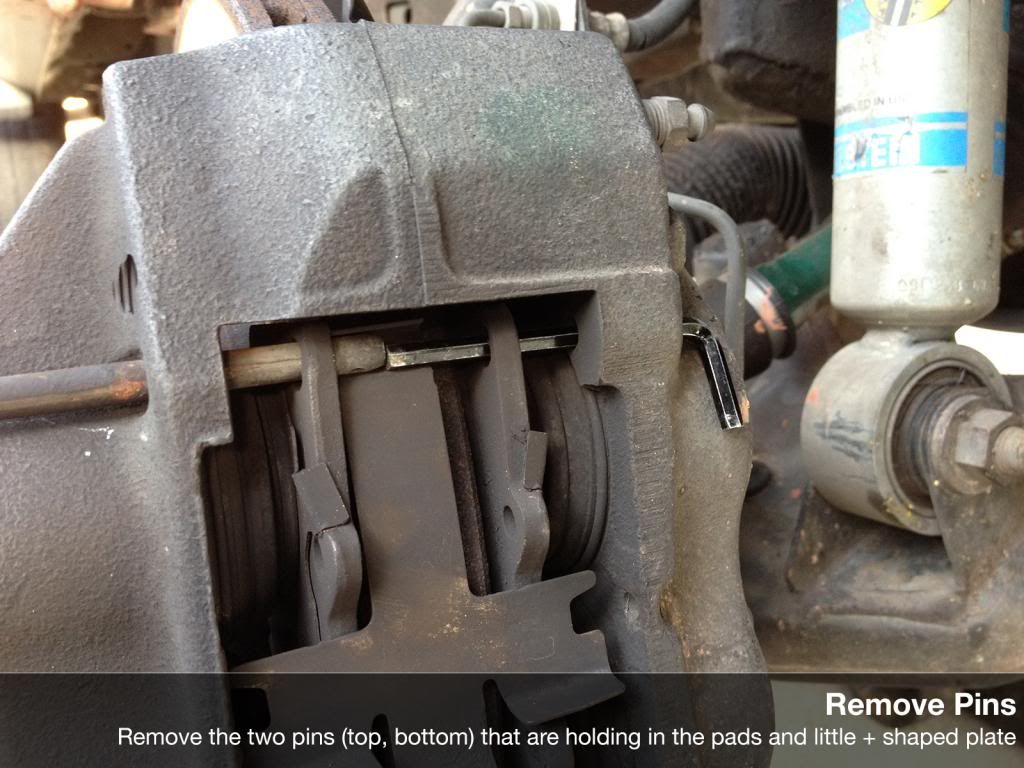
With the spring out you can then tap the two pins out that are holding the pads in. After this is done, the only thing preventing the pads from being yanked out are the caliper pistons pressing on them. I would recommend having a beer at this time, or any time. You can get them started with a hammer but you'll want to have your stick/allen key/chop stick handy so you can tap the pin back quite a ways before yanking it out with your hand or pliers. I started with the top and just tapped the end of the allen key gently until it was far enough out to grab. With both pins removed, the cross shaped tension plate deal will be free or have already fallen out. My understanding is that the plate provides tension to prevent the pads from rattling or something. In my reasearch, I found that some people doing this job didn't have the plate anymore, or didn't replace the plate (to no ill effect). Up to you, I had mine and put it back on. You should have the two pins, the spring, and plate out now. Feel free to clean them up if you want.
Now that you have both of the pins out, you'll need to loosen up the pads so they'll slide out. Before doing this, be sure to loosen your brake fluid cap under the hood. Other guides said to remove it, but I was drinking beer and have somewhat bad luck with misplacing things. I lifted mine up on an edge so that air could escape and nothing could coincidentally blow in to the reservoir. Anyway, wedge a screw driver in the area pictured and wiggle/wedge it a bit until you can tell the pistons are being compressed and the pad is getting looser. I wouldn't really suggest this if you were just doing rotors (for some reason), as the pads will probably be damaged from your brute gorilla force.


After you have a good gap between the pad and pistons, remove your screwdrivers. Then yank the pad out.

You'll want to do this for both sides. The video I watched had the guy compressing both sides of the rotor at the same time and sliding both pads out in one swoop. I guess I'm a weakling, so I did one at a time. With both of the pads out, you're ready to remove the two bolts holding the caliper and lift it off. Have your bungee cord or friend's hands ready. I was paranoid thinking that the second the bolt came out, the caliper would fall to the ground and destroy my brake line. As a precaution, I loosened the last bolt with my arm supporting the caliper underneath. I did feel it drop a hair but I'm not sure if it would have fallen off completely at this point. For me, better safe than sorry.
Oh yeah, speaking of that brake line. Go ahead and remove the one 12mm bolt holding it in position.


Now... I had two rather long bungees available, and that wasn't ideal. I just lifted it out of the way and wrapped things around a couple times until it was hanging with no tension on the brake line. You can hang it wherever as long as you accomplish the goal of a) not dropping it, and b) not stretching the brake line

Alright, so at this point nothing should be holding on the rotor except maybe rust (hence the PB Blaster in step #2). Mine came off with barely any force at all, but others will advise tapping the rotor with a hammer. Some even recommend a small sledge hammer if they're being a pain. Since you're not reusing it you may as well do whatever it takes to knock the thing off. You can clean as you see fit, I sprayed some brake cleaner on various areas throughout the process not really knowing what I was doing, but that's up to you. What you should DEFINITELY do, is spray the rotor all over pretty good. They apparently ship with some sort of grease to prevent rusting on the shelves, so spray and wipe it good.

Now you can put the new rotor in place. My research told me to avoid touching the rotor surfaces after cleaning, so I held it by the lug area and slid in place, securing with two lug nuts. I originally used one lug nut which let the rotor lean a little bit, thus preventing me from sliding caliper back in to place properly.

I then undid the bungee mess holding my caliper and put it back in place. I put the two bolts back in and tightened down. I torqued to 90 ft lbs, because that's what I found somewhere on this site.
With the caliper back on, you should probably crack another beer. The last few steps are really quite easy and you'll be done before you know it. With beer in hand, open up your new brake pads and prepare them for the great mounting. I bought some caliper grease, but have no idea how much I should have used. I employed critical thinking, recalling that when I bought my tube of grease the auto parts guy said "We also sell it in these small packs" (you know, up by the register). I guess you don't go overboard with it if they come in small packages, so I drew some childish phallic figures on the pad, smeared it around a bit, and called it good. What you should NOT do, is put the grease on the actual contact side of the pad, just the back. You could also put a layer on the piston ends as I read in another thread. I probably should have done that.
Edit - here's an additional tip on applying the grease, and it makes sense, should make them easier to remove in the future:

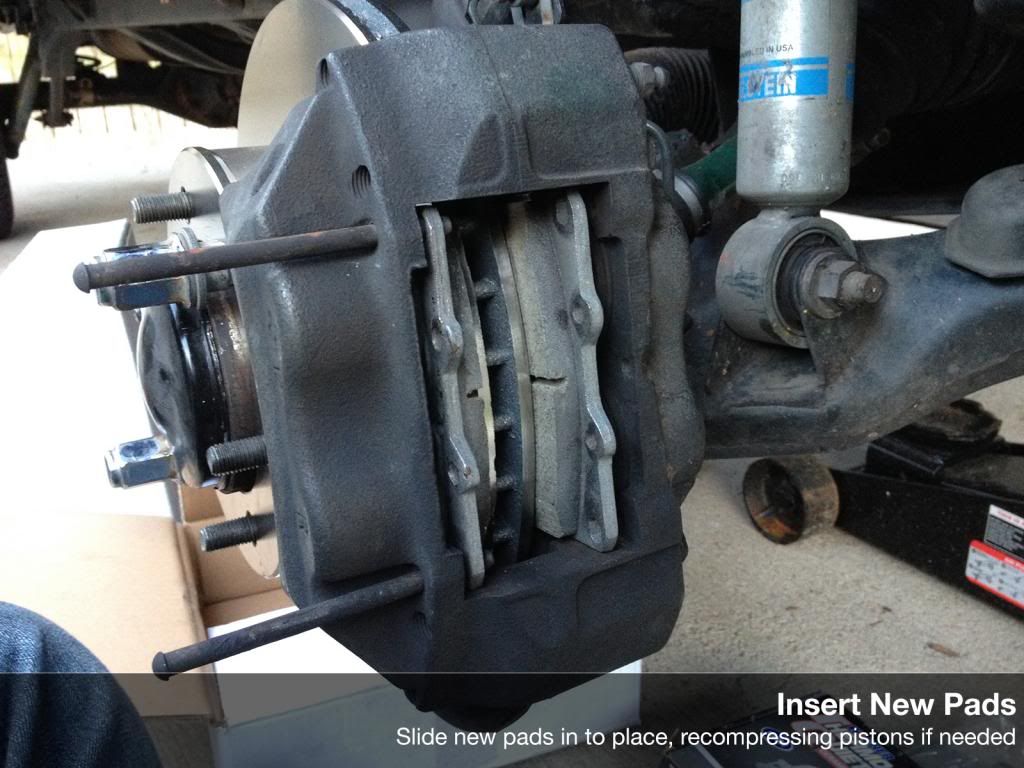
I then reinserted the pads, with the pad surface facing the rotors of course. Either my new rotor/pads were significantly thicker, or my pistons had returned to a more extended state, but I couldn't get the pads in to save my life. I used some cheap plastic clamp to give the pistons a little squeeze and the pads slipped in with minimal effort.
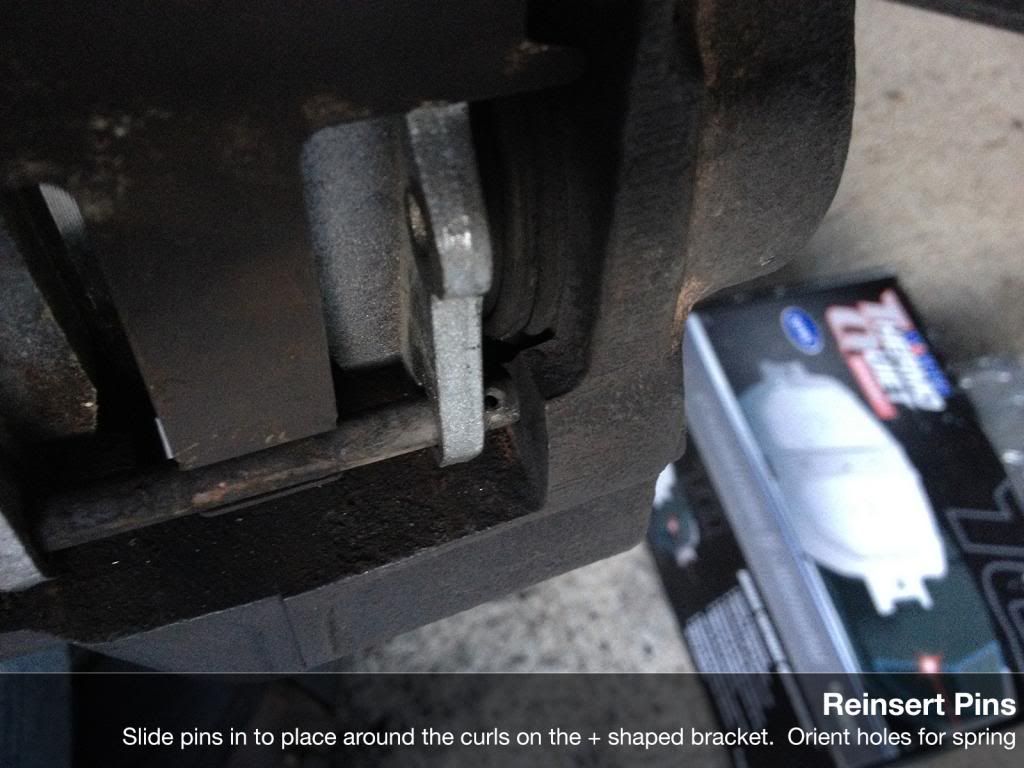
You can then start on working the two pins back in. I started these for the outward facing pad, and then dealt with that cross shaped bracket. It has curls on the top and bottom that wrap around the pins, so position that before sliding the pins all the way through. Also, if you can, try to pay attention to the orientation of the pin hole. You'll need to put that retaining spring back on at the end, so orient the holes appropriately. (Note: I probably should have greased the pins. They came out effortlessly, but I'd like them to stay that way as I've read some stories about 'em. Will likely do this when I get home today since the truck is once again on jack stands)
Lastly, you can put the little spring back in and reinstall your wheel, replace brake fluid cap, and pump brakes a couple times.

Be sure to bed in your pads properly. It seems like people like to do this in a couple different ways, so I'll let you google or search the board for the way you're most comfortable with. You should really take the time to do this, since you already did all of the above and there's no sense in ruining your new setup failing to do 30 seconds of research.
I can't really answer any questions as this is my first brake job, but this is how I did it, what I encountered, and the parts I used. Looking at the created date for my images, the job took me about an hour flat for one side, with a 20 minute break to get beer and order delivery. I could probably do each side in 20 minutes from wheel off to wheel on in the future (impact wrench helps on lugs obviously).
The extent of my brake experience was disconnecting some brackets on my Tacoma and 4runner during lift installation, so consider this a guide, by a noob, for other noobs. I've read that brake installs are all fairly similar on disc brake applications - so this might help someone not only do their 4runner but other vehicles in the future. "Why no Tundra upgrade?" - Well, since I've owned this vehicle, the brakes have been squealing, producing a metal-on-metal noise, shimmying when braking at speed down hill, etc. I've learned to deal with these issues as I've continued to drive the vehicle (about 7 months, ~6k miles) so new parts will inevitably feel and perform better. That's adequate for me.
Parts:
2 x Wagner BD125503 Rotors ($32.59 on Amazon, free shipping)
1 x Wagner QC436A Thermoquiet Pads (comes as set, $23.17 on Amazon, free shipping)
Tools/Materials:
- Beer
- Gloves (optional, but it's pretty filthy and I kind of wish I had some on during)
- Needle nose pliers
- A short-ish bungee cord or a friend to hold caliper for a minute or so
- A chop stick, allen key, or something similar, rigid, and round
- Caliper grease
- One or two flat head screw drivers
- WD40 / PB Blaster
- Brake parts cleaner
- 12mm deep socket (or regular with extension)
- 17mm socket & wrench
- Possibly some clamps (I used cheap plastic clamps, broke one set - think they were $2 each)
The first step, unpictured, is to jack up the front end of the vehicle, remove wheels, and rest on jack stands. If you need a photo of this, you may wish to rethink the DIY brake job.
Next, spray this area with your WD40/PB Blaster for good measure. This is to hopefully loosen up some rust that may prevent easy removal of the rotor. Either it worked exceptionally well on mine, or mine weren't rusted in this area, because my rotor was ready to come off the second I moved the caliper.
You can do the rest while the spray goes to work. Locate the spring on the caliper. The top and bottom go in to holes in the pins, the middle section has a loop. You'll want to pop the loop out and the spring will then be easy to remove.
With the spring out you can then tap the two pins out that are holding the pads in. After this is done, the only thing preventing the pads from being yanked out are the caliper pistons pressing on them. I would recommend having a beer at this time, or any time. You can get them started with a hammer but you'll want to have your stick/allen key/chop stick handy so you can tap the pin back quite a ways before yanking it out with your hand or pliers. I started with the top and just tapped the end of the allen key gently until it was far enough out to grab. With both pins removed, the cross shaped tension plate deal will be free or have already fallen out. My understanding is that the plate provides tension to prevent the pads from rattling or something. In my reasearch, I found that some people doing this job didn't have the plate anymore, or didn't replace the plate (to no ill effect). Up to you, I had mine and put it back on. You should have the two pins, the spring, and plate out now. Feel free to clean them up if you want.
Now that you have both of the pins out, you'll need to loosen up the pads so they'll slide out. Before doing this, be sure to loosen your brake fluid cap under the hood. Other guides said to remove it, but I was drinking beer and have somewhat bad luck with misplacing things. I lifted mine up on an edge so that air could escape and nothing could coincidentally blow in to the reservoir. Anyway, wedge a screw driver in the area pictured and wiggle/wedge it a bit until you can tell the pistons are being compressed and the pad is getting looser. I wouldn't really suggest this if you were just doing rotors (for some reason), as the pads will probably be damaged from your brute gorilla force.
After you have a good gap between the pad and pistons, remove your screwdrivers. Then yank the pad out.
You'll want to do this for both sides. The video I watched had the guy compressing both sides of the rotor at the same time and sliding both pads out in one swoop. I guess I'm a weakling, so I did one at a time. With both of the pads out, you're ready to remove the two bolts holding the caliper and lift it off. Have your bungee cord or friend's hands ready. I was paranoid thinking that the second the bolt came out, the caliper would fall to the ground and destroy my brake line. As a precaution, I loosened the last bolt with my arm supporting the caliper underneath. I did feel it drop a hair but I'm not sure if it would have fallen off completely at this point. For me, better safe than sorry.
Oh yeah, speaking of that brake line. Go ahead and remove the one 12mm bolt holding it in position.
Now... I had two rather long bungees available, and that wasn't ideal. I just lifted it out of the way and wrapped things around a couple times until it was hanging with no tension on the brake line. You can hang it wherever as long as you accomplish the goal of a) not dropping it, and b) not stretching the brake line
Alright, so at this point nothing should be holding on the rotor except maybe rust (hence the PB Blaster in step #2). Mine came off with barely any force at all, but others will advise tapping the rotor with a hammer. Some even recommend a small sledge hammer if they're being a pain. Since you're not reusing it you may as well do whatever it takes to knock the thing off. You can clean as you see fit, I sprayed some brake cleaner on various areas throughout the process not really knowing what I was doing, but that's up to you. What you should DEFINITELY do, is spray the rotor all over pretty good. They apparently ship with some sort of grease to prevent rusting on the shelves, so spray and wipe it good.
Now you can put the new rotor in place. My research told me to avoid touching the rotor surfaces after cleaning, so I held it by the lug area and slid in place, securing with two lug nuts. I originally used one lug nut which let the rotor lean a little bit, thus preventing me from sliding caliper back in to place properly.
I then undid the bungee mess holding my caliper and put it back in place. I put the two bolts back in and tightened down. I torqued to 90 ft lbs, because that's what I found somewhere on this site.
With the caliper back on, you should probably crack another beer. The last few steps are really quite easy and you'll be done before you know it. With beer in hand, open up your new brake pads and prepare them for the great mounting. I bought some caliper grease, but have no idea how much I should have used. I employed critical thinking, recalling that when I bought my tube of grease the auto parts guy said "We also sell it in these small packs" (you know, up by the register). I guess you don't go overboard with it if they come in small packages, so I drew some childish phallic figures on the pad, smeared it around a bit, and called it good. What you should NOT do, is put the grease on the actual contact side of the pad, just the back. You could also put a layer on the piston ends as I read in another thread. I probably should have done that.
Edit - here's an additional tip on applying the grease, and it makes sense, should make them easier to remove in the future:
Nice. I would suggest that the application of anti-seize to the mating surfaces of the hub/rotor and rotor/wheel--but not the studs--is worth adding to your write-up. I did this the first time I pulled my rotors over ten years ago and every time since. They always come apart nicely. I highly recommend.
I then reinserted the pads, with the pad surface facing the rotors of course. Either my new rotor/pads were significantly thicker, or my pistons had returned to a more extended state, but I couldn't get the pads in to save my life. I used some cheap plastic clamp to give the pistons a little squeeze and the pads slipped in with minimal effort.
You can then start on working the two pins back in. I started these for the outward facing pad, and then dealt with that cross shaped bracket. It has curls on the top and bottom that wrap around the pins, so position that before sliding the pins all the way through. Also, if you can, try to pay attention to the orientation of the pin hole. You'll need to put that retaining spring back on at the end, so orient the holes appropriately. (Note: I probably should have greased the pins. They came out effortlessly, but I'd like them to stay that way as I've read some stories about 'em. Will likely do this when I get home today since the truck is once again on jack stands)
Lastly, you can put the little spring back in and reinstall your wheel, replace brake fluid cap, and pump brakes a couple times.
Be sure to bed in your pads properly. It seems like people like to do this in a couple different ways, so I'll let you google or search the board for the way you're most comfortable with. You should really take the time to do this, since you already did all of the above and there's no sense in ruining your new setup failing to do 30 seconds of research.
I can't really answer any questions as this is my first brake job, but this is how I did it, what I encountered, and the parts I used. Looking at the created date for my images, the job took me about an hour flat for one side, with a 20 minute break to get beer and order delivery. I could probably do each side in 20 minutes from wheel off to wheel on in the future (impact wrench helps on lugs obviously).
Last edited:


