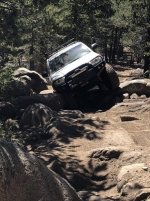
Havin fun's build

Getting some at the Gate Keeper to Deer Valley.
 

Attachments

  • IMG_1835-1.jpg
    IMG_1835-1.jpg
    75.5 KB · Views: 454
They usually don't come off that easy, trail that is. I've bang mine up bad and they stayed on, just no body lift, tire hit the front and popped it loose. Removed after that.

I filled the holes in, this is the way she stays now.

First off, awesome build.

Do you have instructions and/or pics of how you did this? I keep tearing off these panels and I'm getting tired of repairing/replacing. It's getting harder and harder to find donor vehicles.
 
First off, awesome build.

Do you have instructions and/or pics of how you did this? I keep tearing off these panels and I'm getting tired of repairing/replacing. It's getting harder and harder to find donor vehicles.

Thanks... I just used a flat bar and got behind them and pulled hard.
 
Thanks... I just used a flat bar and got behind them and pulled hard.

My apologies, I would have specified.

I was referring to how you filled in the holes in the body where the plastic clips were.

I've considered fiberglass on the inside, Bondo to fill the holes and then touch up paint.
 
My apologies, I would have specified.

I was referring to how you filled in the holes in the body where the plastic clips were.

I've considered fiberglass on the inside, Bondo to fill the holes and then touch up paint.

Used JB weld stick to fill, need access to the inside also to flatten/press together. After sanding to shape outside, used the liquid type to take imperfection out. Do believe there were a couple small holes next to doors edge that I had to weld no access.
 
Well I decided to order a set of steel 1" bolt in spacers for the bucket area. Full 4" lift in the rear now. Front stayed at 23.5" hub to fender, approx 4-4.5" lift
Definitely toned the roughness out from the 886s.

Periodically, I find a few drops of water in the air box from going through small rivers, too much liner cut out. Snorkle out off the question as I tend to go into some really ruff tight spaces in the woods. So decided to do the Cowl install.
View attachment 288204

Hey, I've been looking into doing this for my 4Runner, but every picture I've seen has been a slightly different cowl than mine. Yours looks to be the same with the "vent" right above where you routed your intake. Have you had any issues with water or such getting into your intake? I live in Colorado so snow buildup near the windshield is going to happen as well as some heavy rain occasionally. I appreciate the help! Sweet build.
 
Hey, I've been looking into doing this for my 4Runner, but every picture I've seen has been a slightly different cowl than mine. Yours looks to be the same with the "vent" right above where you routed your intake. Have you had any issues with water or such getting into your intake? I live in Colorado so snow buildup near the windshield is going to happen as well as some heavy rain occasionally. I appreciate the help! Sweet build.

With mine being oval shape going into the wall, it sits/touches the underside of the gutter for the vent. It also sit a few inches from the bottom water roll off that get in there from the vents.... So far I haven't had water in my intake box but a couple small drops.
 
You’ve built one helluva rig sir. Very cool!
I just read through the entire build. I have a question on your cowl intake. I did this mod not too long ago also. It looks as if you used maybe some rubber hose and silicone? It’s hard to tell. I used too large of a hole saw on mine. I had used some of that automotive door edging protector but it wasn’t thick enough to fill the gap and was squeaky on cold mornings. I removed that and have some household door and window weatherstripping now but I’m looking for other solutions.
 

Members online

Forum statistics

Threads
278,309
Messages
3,554,067
Members
248,016
Latest member
Advally Service

Trending content

Back
Top