Help - Tap corner (parking) lights for LED halos

Suspect_U

New member
Hi all! I've done a lot of searching on HID retrofits and halos, and I can't find exactly what I'm looking for.

I have my HID retrofit all wired up and working, that's no problem. But I want my halos to come on with the parking lights. All the threads I've found just say something like "tap or splice into the parking lights" - and that's as specific as it gets.

Problem is, I don't know how to tap or splice into those lights.

Here is what I'm working with on the halo end. How do I get this wired into my parking lights? Any advice (or pics!) would really help.

20170408_190722_zpsdgtvlyoh.jpg~original
 
Register to hide this ad
Hi all! I've done a lot of searching on HID retrofits and halos, and I can't find exactly what I'm looking for.

I have my HID retrofit all wired up and working, that's no problem. But I want my halos to come on with the parking lights. All the threads I've found just say something like "tap or splice into the parking lights" - and that's as specific as it gets.

Problem is, I don't know how to tap or splice into those lights.

Here is what I'm working with on the halo end. How do I get this wired into my parking lights? Any advice (or pics!) would really help.

20170408_190722_zpsdgtvlyoh.jpg~original

Either cut the ends of and solder them onto the parking lights. T-tap it or. Get a weather pack connector. Make the connector on the end that your showing male. Then make another end with female. Use t-taps on the parking lights and attach your harness and plug it in. Can see my build
thread to understand what I am saying. Different lights same concept.

Most simplest way would be also cut the OEM harness , and wire everything with a weather proof but connector.
 
Just did this myself for some halo's on my driving lights. Here's a pic of how I spliced the wire in (before shrink wrapping). Easiest way to splice a "Y" into a wire.

 
I think this will help you understand how I taped into mine. And it has seen plenty of water. From off roading to getting washed. No issues at all. Everything works flawlessly. Different lights. Same concept.


Test fitting the harness that goes into the white LEDs from the OEM lights


The little harness that t-taps into OEM harness and runs back to white led


Even though t-tap isn't 100% waterproof. I made sure I used electrical grease on EVERY T-TAP to prevent corrosion. Plus I feel safe about it. It's Hides behind the fender.


Harness perfectly measured so there's enough room to grab it and connect it together or disconnect


I used quality marine shrink wraps, quality electrical grease. On EVERY CONNECTION including t-taps. And even inside the weather proof Delphi connectors. Everything is easily removed in pieces for easy maintenance or in general.
 
I think this will help you understand how I taped into mine. And it has seen plenty of water. From off roading to getting washed. No issues at all. Everything works flawlessly. Different lights. Same concept.

...

I used quality marine shrink wraps, quality electrical grease. On EVERY CONNECTION including t-taps. And even inside the weather proof Delphi connectors. Everything is easily removed in pieces for easy maintenance or in general.

Wow, thank you! These pictures and explanation really help. I'm not electrically inclined in the least, and I'd never heard of t taps. That feels like my best option, as I'd rather not actually cut the OEM harness.

In this picture, would I connect the red in my pic to the green here and the black in my pic to the white with black stripe? Or vice versa?

20170408_190722_zpsdgtvlyoh.jpg~original
 
Wow, thank you! These pictures and explanation really help. I'm not electrically inclined in the least, and I'd never heard of t taps. That feels like my best option, as I'd rather not actually cut the OEM harness.

In this picture, would I connect the red in my pic to the green here and the black in my pic to the white with black stripe? Or vice versa?

20170408_190722_zpsdgtvlyoh.jpg~original

You can easily check which wire is hot. I had before where the black would be hot and red ground. Or he other way around. You can check it by attaching alligator clips and touching the battery terminals. And see when it lights up. Then you will know which is positive and which is negative for sure. On your item.

And to check which terminal is positive. You would check it with a test light. The hot pin will light up the test light.

Also use electrical grease on the t-tap. As it's not 100% water proof. But the electrical grease will protect it :)
 
So today was the day. Got the male spades connected and heat shrink around.

Then the t-taps were clamped on, plugged everything in and... Nothing!

I double checked the female clamp part of the taps and I think I just have bunk connectors. It looks like they aren't cutting through the insulation and forming a connection.

I removed them and tried another set. Still nothing. Anyone have any suggestions?


Sent from my SM-G900T using Tapatalk
 
So today was the day. Got the male spades connected and heat shrink around.

Then the t-taps were clamped on, plugged everything in and... Nothing!

I double checked the female clamp part of the taps and I think I just have bunk connectors. It looks like they aren't cutting through the insulation and forming a connection.

I removed them and tried another set. Still nothing. Anyone have any suggestions?


Sent from my SM-G900T using Tapatalk

What color t tap are you using around the wire ? You can test your t tap by clamping it around the wire. Turning your lights on or whatever your powering. And get a test light and touch the metal part on the t-tap clamp. It will light up if the t tap clamp cut through the insulation. Otherwise you need another t tap clamp for that proper gauge. And are you sure you don't have the wires mixed up ?
 
What color t tap are you using around the wire ? You can test your t tap by clamping it around the wire. Turning your lights on or whatever your powering. And get a test light and touch the metal part on the t-tap clamp. It will light up if the t tap clamp cut through the insulation. Otherwise you need another t tap clamp for that proper gauge. And are you sure you don't have the wires mixed up ?

I'm using the red t tap (18-22 gauge, I believe). I'm pretty sure I don't have the wires mixed up because the corner lights are still lighting up, just no halos.

20170430_094738_zpsblkxrqcn.jpg~original

20170430_095824_zpsvwzjr7qa.jpg~original


Looks like I'll have to go grab a test light. I'm pretty sure the taps aren't cutting through enough.
 
I'm using the red t tap (18-22 gauge, I believe). I'm pretty sure I don't have the wires mixed up because the corner lights are still lighting up, just no halos..

The corner lights will still work because your just tapping the original lines. If you have the wiring reversed to LED's they will not work. Positive needs to go to positive and negative needs to go to negative. So, reverse the wires. If they still don't work then get rid of those shitty t-taps and get some barrel fittings.
 
Okay, cool. I was just worried about reversing the wires, since I didn't know if that would cause a short.

Sent from my SM-G900T using Tapatalk
 
In case anyone is curious, I got the connection working. It was a loose connection on the positive male spade.

Sent from my SM-G900T using Tapatalk
 
In case anyone is curious, I got the connection working. It was a loose connection on the positive male spade.

Sent from my SM-G900T using Tapatalk

There ya go. Did you put electrical grease on the T-tap clamp ? And on the connector that crimps over the over ? So everything is protected ? And POST PICS LOL

A good to shrink wrap those connectors. Is to slide 2 different types of shrink wrap sizes. One that slides over the connector far end. Which is clearly to big for the wire. And another shrink wrap just big enough over the wire. When you put heat, slide them over each other. And shrink wrap it. So 2 shrink wraps, one covers the connector while the other shrink wrap covers that shrink wrap and the wire lol
 
Last edited:
Yes! I made sure to use the electrical grease on both sides. Funny thing, I ended up figuring out the double heat shrink thing on the second go around so looks like great minds think alike!

I'm terrible about remembering to take pics, but I'll throw a couple up soon.

Sent from my SM-G900T using Tapatalk
 
I used to have mine wired this way but I recently changed it to a separate circuit triggered using the OEM Toyota switch, completely isolated circuit.
 
There ya go. Did you put electrical grease on the T-tap clamp ? And on the connector that crimps over the over ? So everything is protected ? And POST PICS LOL

A good to shrink wrap those connectors. Is to slide 2 different types of shrink wrap sizes. One that slides over the connector far end. Which is clearly to big for the wire. And another shrink wrap just big enough over the wire. When you put heat, slide them over each other. And shrink wrap it. So 2 shrink wraps, one covers the connector while the other shrink wrap covers that shrink wrap and the wire lol

Hey, I have a switchback halo, Would this work as well, tapping the amber AND the white to the corner light?
 
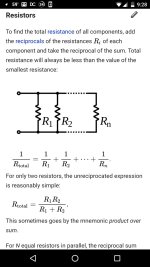
Suggest ya-ll check this link out. You add the Halo in parallel to the corner light bulb by splicing the positive voltage wire to power the halos. Then run a new ground wire and ground the halos. Done.

https://en.m.wikipedia.org/wiki/Series_and_parallel_circuits

See resistors (in this case a bulb) ....

AGAIN --- you'll be much better off in the multi-year long run if you just use a switch.

.
 

Attachments

  • Screenshot_20180302-212826.jpg
    Screenshot_20180302-212826.jpg
    116.2 KB · Views: 223
Last edited:

Members online

No members online now.

Forum statistics

Threads
278,310
Messages
3,554,080
Members
248,016
Latest member
Advally Service

Trending content

Back
Top