How to remove fender flares ????

pattycakes

New member
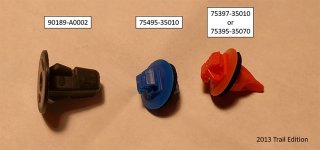
Tried taking off one of my front flares , took out all the bolts and then tried to pull it straight off , I broke a bunch of the blue and orange plastic tabs , it was cold out 4 degrees C , maybe should wait till its warmer . Any tips on taking these off without breaking the plastic tabs ?
 
Register to hide this ad
Tried taking off one of my front flares , took out all the bolts and then tried to pull it straight off , I broke a bunch of the blue and orange plastic tabs , it was cold out 4 degrees C , maybe should wait till its warmer . Any tips on taking these off without breaking the plastic tabs ?

Check the post for my slider install here: http://www.toyota-4runner.org/5th-gen-t4rs/94578-okkis-build-thread.html#post831782

It includes instructions on how to switch the rockerpanel and fender flares on a LE to TE. It also has a link to a vendor to buy replacement clips.

Okki
 
Yeah, aside from the clips, there is also a thin strip of double sided tape along the edge. That's a ***** to replace too. But it also means that only very little dirt will get behind it. If that was your only motivation to remove them, than you did yourself more of a disservice.

Okki
 
How fortuitous! I was just about to search [MENTION=55815]Okki[/MENTION]’s thread to find the fender removal part (not that I would have had to look hard since it is page 1...). Has me wondering if I might just rather tape off and paint my flares. Going to monster-line them to get a better flow with bumpers, sliders etc. Now I have to think about whether removal is worth it...
 
Thanks for the info , wow they are expensive
4ce5.jpg
 
When I had it 3/4 the way off I didn't notice any 2 way tape there . but did notice lots of dirt/salt/ mud build up that was wet and there a long time that will definitally rot out the fenders in short time . if there was tape there it aint stoping s#$t .and the dirt / mud is getting in from the bottom / front edge or somewhere .
 
Last edited:
Clips can also be found on Amazon.

Now on to how to;

  • Remove the 10mm fasteners on the inside of the flares. Good luck salvaging this, just rip the things out and buy replacements.
  • Remove the black clips that hold the fender liner in place.
  • Remove fender liner (or at least enough to reach is and pop the blue and orance clips.
  • Start to pry the forward edge of the fender flare off and reach inside with needle nose pliers to release the clip (orange or blue). Use a utility knife to carefully slice the double sided tape that attaches the flare to the body. I would advise marking the flare at each clip location prior to pulling on the flare so you will know when you are getting near them while slicing the tape. If you just pull the whole fender off without releasing the clips, you risk breaking the mount on the inside of the flare (ask me how I know).

If you do this carefully as described, you should not need to replace the blue and orange clips. The black ones, those things are sacrificial.

tapatalk_jpeg_1503322331150.jpg
 

Attachments

  • tapatalk_jpeg_1503322331150.jpg
    tapatalk_jpeg_1503322331150.jpg
    70.7 KB · Views: 8,014
be sure to get some 2-part plastic epoxy too.

The clips are easy to replace. The real problem is that the part of the fender flare that receives the clips will break away at some point. My friend that works at a body shop confided in me that they use plastic epoxy to repair this very often.

It's not ideal, but that's your only option other than ordering new flares.
 
be sure to get some 2-part plastic epoxy too.

The clips are easy to replace. The real problem is that the part of the fender flare that receives the clips will break away at some point. My friend that works at a body shop confided in me that they use plastic epoxy to repair this very often.

It's not ideal, but that's your only option other than ordering new flares.

Or a little JB Weld :eyebrows: if that's what is laying around the garage.
 
Hi all. I know this thread is over a year old, but I need to pull the flair on the driver's side rear passenger door. I can't access the clips from behind because there is no liner to pull back for access to release the clips. It just clips into the door. I'm working on the assumption that I simply pull the flare away from the body until the clips release. I can already easily get it started. I am expecting to find either that I need new clips or that the square pegs that receive the clips are damaged. Any tricks or experience removing this particular flair? Thanks!


94765f66-300f-4b20-9c90-88539e778183-jpg.35379
 
[MENTION=216191]rsimi72[/MENTION], any luck with removing the flares without causing any damage? I’ve noticed some rot at the bottom around the seams on my rear doors beginning and am hoping to nip it in the butt before it gets worse. Pulling the flares is step 1.

Cheers to everyone for the information and links for replacement clips.
 
[MENTION=216191]rsimi72[/MENTION], any luck with removing the flares without causing any damage? I’ve noticed some rot at the bottom around the seams on my rear doors beginning and am hoping to nip it in the butt before it gets worse. Pulling the flares is step 1.

Cheers to everyone for the information and links for replacement clips.

Hey! Yes, I was able to pull the rear door flare without issue. I ended up replacing most of the clips and it fit a bit tighter then. Might as well as long as you're in there. I found the most difficult spot to deal with was right at the main bend, or corner, beneath the door handle. There is only one clip there but that was the tough one for me. I had to bend the flare more than I wanted and I'm not sure I ever got it totally back into the original shape. You might flex it back before reinstalling. I have a barely noticeable gap there compared to the passenger side. Mostly, it required a couple of plastic pry tools and some courage. Good luck! Holler if you need further info.
 

Members online

Forum statistics

Threads
278,310
Messages
3,554,076
Members
248,016
Latest member
Advally Service

Trending content

Back
Top