How to removie the interior plastic cover over the left rear wheel

RysiuM

New member
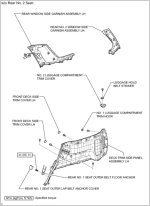
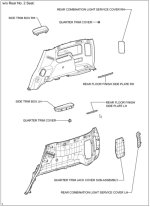
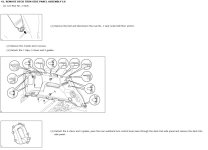
I have pictures from FSM but I still can't figure out, what would be the correct procedure of removing this panel trim. It is one big piece of plastic covering the wheel well and part of the wall. Which way to pull it so I don't brake any tabs, clips or pieces?

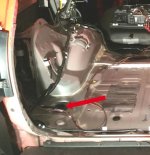
What I am trying to do is to install new wires going from the front along the left doors (under the door step covers) all the way to the rubber seal where the trailer wires are going through the floor (the arrow shows this rubber seal). Of course I don't want to strip the entire interior like this guy did, just absolute minimum required to route new wires.
 

Attachments

  • new wire.jpg
    new wire.jpg
    66.7 KB · Views: 2,411
Last edited:
Register to hide this ad
This is what I see in the manual, but really I do not understand that. Anyone can decipher it for me?
 

Attachments

  • 4Runner rear panel 01.jpg
    4Runner rear panel 01.jpg
    57.5 KB · Views: 2,363
  • 4Runner rear panel 03.jpg
    4Runner rear panel 03.jpg
    57 KB · Views: 2,490
  • 4Runner rear panel 05.jpg
    4Runner rear panel 05.jpg
    77.2 KB · Views: 2,431
Anybody? With all clips holding this thing what is the correct order and pull direction to not break anything? :help:
 
Anybody? With all clips holding this thing what is the correct order and pull direction to not break anything? :help:

You will break clips, that is a given. Unless you find a screw or bolt holding a panel then the proper method is to pull firmly. Once you take one panel off then you will understand. My advice is to go get a bunch of new clips because, even though you won't break a majority of them, just by the action of removing a clip, will stretch them a bit and might not be as good as before when you reinstall them.
 
You will break clips, that is a given. Unless you find a screw or bolt holding a panel then the proper method is to pull firmly. Once you take one panel off then you will understand. My advice is to go get a bunch of new clips because, even though you won't break a majority of them, just by the action of removing a clip, will stretch them a bit and might not be as good as before when you reinstall them.

It'll also squeak like a mattress in a cheap motel.
 
Anybody? With all clips holding this thing what is the correct order and pull direction to not break anything? :help:

You don't need to remove that panel to do what you want- I have about 50 wires running through there, lol.

First you will need to access the rear wheel well hidden storage area like this.

Pull the door sills.

Open rear door and pull the weatherstripping off the back side. See the gap?

Feed the wires through that gap into the rear wheel well storage area.

Remove jack access cover.

Feed wires into jack area

Remove 10mm bolt holding rear tie-down in place.

Feed wires into tie-down area.

See the rubber grommet in the back there (your red arrow in the pic)?

Get a metal fish, tape your wiring to it, grease the wire/tape lightly and push it through the rubber grommet. It will self-seal good enough to keep water out.

Mine has been this way for years.

Lemme know if you have any questions.:bump2:
 
Last edited:
I've done this or something similar on my last two 4Runner's and Tacoma. Going through the firewall is the hardest part. Running the cables lengthwise is relatively easy, just pull up the door trim panels and feed it through the pillar between the front and rear seats. I'm unsure of what you're hooking up, but I've got a fuse box mounted in back with 4awg marine cable powering it. I also have a 4awg grounding cable going from the fuse box, through that rubber grommet in the back, and to the frame. What I did was unbolt the cargo tie-down, that way you can access the grommet. I then drilled a hole in the plastic cover for the cargo tie down for the grounding cable to run through. I can take pictures later.

Either way, just unbolt that cargo tie down and you'll be able to access the grommet. You'll probably need a coat hanger or something to feed whatever wire you're running through.
 
You don't need to remove that panel to do what you want- I have about 50 wires running through there, lol.

I love you man, The last thing I wand to do is break whole bunch of clips.

First you will need to access the rear wheel well hidden storage area like this.

Do I need to break tabs like you shown on these pictures or there is a way do remove that piece without breaking it?
EDIT: I red other posts, and it looks like there is a way of removing two screws without braking these tabs.

Lemme know if you have any questions.:bump2:

That is perfectly explained instruction. Thank you.:kiss:

This is for Rear Fog Light connection. I have all wiring done for rear fog light on the front (hookup, switch, relay) and I have the wire already under the front door seal. I have also both lamps done in the rear bumper, so the only thing I need is to connect these two wires.

I'm moving my 4Runner to Europe next month and it will be easier to do it all here where I can find broken parts in local Toyota dealer around the corner. From Europe getting any part to 4Runner will be long wait.
 
Last edited:
Hey, maybe as you do this you can take pictures and instructions for us folks trying this later :) because, breaking things gets expensive so better to learn from you! Good Luck!
 
One of my favorite set of tools I have, and use a lot, is something like the following. Not real expensive and you will wonder how you lived without them if you mess with vehicles a lot:

Yep, already have them and used on various interior panels. But still I'm learning what is what for. :rockon:
 
I've taken all the panels off multiple times. It's intimidating at first. Truly a piece of cake though. You will occasionally break a clip, but it's more the exception than the rule. It is a good idea to have a supply of spares if/when you do break one. Toyota's notoriously come apart & go back together very nicely though. However, for what you are doing, I agree w/ the poster who said you can feed the wires through w/o having to take it off.
 
Thank you guys for your help, this forum is SUPER. :rockon:

I've taken all the panels off multiple times.

Do you have any write-up about this - where to start, which way to pull etc.

It is a good idea to have a supply of spares if/when you do break one.

Do you know part numbers for these clips? I have a stash of clips for lower door seal - is it the same?

I will try to take the lid of the wheel well cover and I'm sure that if I can have that hole, the rest will be piece of cake.

Later I may need to rewire the trailer plug as in Europe trailers use brake light separate from blinkers and rear fog light is also mandatory. I could tap in to existing rear fog light circuit but I would like to have trailer lights on separate fuse (I have my new fuse box :banana:). There would be no problem with adding new relay switched by existing rear fog light switch.

So many things to do and so little time. :ballchain:
 
Sage advice above and nothing I can add except I HATE removing body trim because no matter how careful you are....

Actually, I do have some advice.

One of my favorite set of tools I have, and use a lot, is something like the following. Not real expensive and you will wonder how you lived without them if you mess with vehicles a lot:

https://www.amazon.com/Panel-Remova...8837924&sr=8-11&keywords=auto+body+trim+tools

Harbor Freight sells those for like 10 bucks, but I agree, they are awesome.
 
Now I know the proper procedure for removing this cover. Unfortunately while I did not know what I was doing and learning on the go I did not take proper pictures from the procedure, just few photos why some sas already disassembled.. But during the process I learned how to do it. So here it is. This is the easy version: without third sit and no sliding cargo tray. Reference to the pictures in parenthesis

4Runner-left_rear_panel_01.jpg


You need to remove the trunk floor as the styrofoam gets in the way.

1. Fold the rear sits flat, it will be easier without them in the way.

2. Remove the two front cargo ties bolted to the metal floor(Ref.1). Lift the plastic cover near the D-ring (it will fold back) and expose a bolt (10mm socket wrench). Remove the bolt and the whole cargo tie with surrounding plastic can be removed.

3. Remove the plastic trim between the rear sits and cargo floor (it is shown laying up site down on the folded sits). There is one clip exactly at the center (Ref.2). Just pull the trim up and it will be easy removed.

4. Remove the plastic trim between between the cargo floor and rear hatch seal (it is shown laying on the folded sits). No need to remove the weatherstripping. It will be easier to remove it if rear tie downs (Ref.4) are also removed (the same way as the front tie downs)

5. There are several clips holding this trim down to the floor (Ref.3), but they can be easy lifted up.

6. On both ends this trim is latched to side panels (Ref.5).

4Runner-left_rear_panel_02.jpg


This is a tricky one. The trim is "wrapped around" the plastic belongs to side trims (Ref.a) It also has two hooks holding it closer to center line of the trim (Ref.b). So first spread the trim unlocking its outside from the side trim plastic then it will be easy to unhook center. Lifting the whole thing helps so you can put your fingers under it, that is why you need to remove the rear tie-downs.

6. Now under that trim you will see the felt floor has a white plastic channel that is hooked up to white plastic tabs holding some wires (Ref.6). Unhook these tabs from the channel (Ref.c) and then you will be able to remove the felt floor.

7. Finally remove styrofoam plate from the floor and you will see bare painted metal.

Second step is to remove all bolts and screws holding the side panel.

1. There are two screws holding the panel to the floor (at the wheel well). Philips screwdriver take them out (Ref.7).

2. One bolt is under the rear upper tie down (plastic hook looking like a T). First turn the "T" clockwise 90 degrees. After that it will pop out exposing bolt under it. This is long bolt with Philips head. Take it out.

3. Two bolts are under the round plastic cover. One is on the side of the wheel well, the other is on the all in recessed plastic (Ref.8). First remove the round plug. It has a slot at the bottom. I have a screwdriver with the end bent 90 degrees. Pull the round cover by the bottom where the slot is. It easy pops out exposing 10mm hex head bolt. Remove both.

4. Finally the rear sit belt anchor. Remove the plastic cover - spread it from both sides and it will be easy to remove it exposing 14mm hex head bolt. Undo the bolt but remember how the sit belt is oriented so you don't twist it when installing back.

Now all clips. This is very intimidating part. Some clips release easy some require a little force. It will be easier if you remove tire changing tools cover and plastic cover to access tail lights. This way you can put your hand under the plastic and pull it from behind.

4Runner-left_rear_panel_03.jpg


Work slowly from the rear to the front (Ref.A). When you try to pull the black plastic and you see the upper trim is following, there is a hook in the bottom part grabbing the upper part (Ref.B). Use the trim tool to unhook these two parts.

At some point I had the rear side of this panel away from the metal that I could put my hand behind and using short philips screwdriver and remove two screws holding the "tray" on the wheel well cover. When these two screws are removed there is no need for "brute force" to remove the tray.
When trey is out you have more access to behind the panel which will help with pulling clips at the front part of the trim.

4Runner-left_rear_panel_04.jpg


I did not take the whole panel out - three front clips were very stubborn: one near the bottom of the door opening and two near the door around the rear sit back "hook". I did not need that as like Antman I could access behind this panel after partially removing the rear door weatherstripping.

When I was installing everything back I did not put these two screws to "tray". As you can see on the picture below the tray has small hooks all the way around so I thought these two screws are just overkill. This way I have easy access to the space under the tray (like Antman did, just without breaking tabs).


4Runner-left_rear_panel_05.jpg


4Runner-left_rear_panel_06.jpg


The rest was just pulling wires and connecting them. The ground spot is just above the taillight cover, so I needed to guide only one wire from the front. I used water sealed 10A connectors I got from ebay. They will easy survive and protect contacts in winter conditions in Europe. Now my rear fog lights are fully operational.

 
Last edited:
I just ran wires from the front to back and through that grommet that leads to the trailer wiring harness under the 4R. I didn't have to remove any trim panels or break any clips to get the wires there.

Step 1: Remove the plastic step panel at the bottom edge of the driver's side rear door.

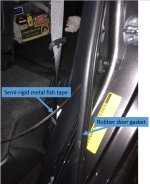
Step 2: Pull back the rubber door seal gasket. This will reveal a little space between rear plastic trim panel. See picture 1 below.

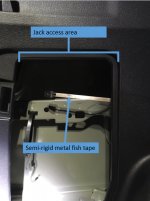
Step 3: Insert a semi-rigid metal fish tape into that space (also in picture 1). It will run into the rear wheel well space that everyone takes apart to get more storage. I didn't want to remove the little cubby that is there (the one shown in the last few pictures of post #16 of this thread) because I didn't want to break anything as mentioned by others earlier in this thread. Keep pushing the fish tape. It will eventually appear in the jack/tool access area just behind the rear wheel well (picture 2). You might have to stick your hand in the jack access area and feel around for the fish tape so you can grab it and pull it through.

Step 4: Tape your wires to the end of the metal fish tape.

Step 5: Pull the wires through the jack area, through the wheel well, and out of the rear door gasket gap.

Step 6: Run the wires to the front of the vehicle through the rear door step panel and the front door step panel.

Step 7: In the cargo area, remove the bolt that secures the tie-down hook. You can now reach under the cargo floor and access the rubber grommet that leads to the trailer wiring harness under the 4R. I taped the wires to a coat hanger and shoved it through the grommet.
 

Attachments

  • run wire to rear1.JPG
    run wire to rear1.JPG
    130.6 KB · Views: 5,791
  • run wire to rear2.JPG
    run wire to rear2.JPG
    108.4 KB · Views: 5,690
Last edited:
Sorry to revive this old thread, but was wondering if someone has figured out an easier way to run a 4 AWG wire to the back through the plastic cover and into the jack and spare removal kit mount?
 
using something to fish the wire through the back like the post above yours is the easy way to do it

go through a grommet in the firewall, the trim on the door jams just pop right off revealing wiring raceways, then just fish the wire through the plastic to the jack area
 

Members online

Forum statistics

Threads
278,317
Messages
3,554,126
Members
248,016
Latest member
Advally Service

Trending content

Back
Top