I just have to ask... uca/lca......

TeamPez

New member
I don't know how many hours I've been logged on his forum the past few months. Most have been super helpful in their own ways. Hard to believe the amount of things I've learned about our trucks from the time spent enjoying build threads and other continuous issues.

With that said I figured it was time to pop the cherry and throw out my first thread.

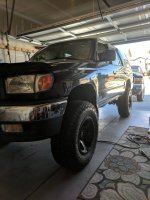
Just put my toytec lift in over the weekend. 3 inch and I couldn't be happier. New wheels and tires as well. I'm definitely a by the book protocol type of guy so I drove it right down the street for an alignment. Here comes the bad news go figure. "The driver side alignment went great but the passenger side has seized cam adjusters". Sweet. Just was I was hoping to hear.

So where does this leave me? Shop wants $480 to make the repair which apparently involves a whole new lower control arm. Option two would be that I tackle it myself and cut the sleeves/bolts out and replace bushings with whiteline. I'm a fairly capable guy who can perform general maintenance, lift installation, timing belt changes. Never worked on the lower control arm and the only experience I have comes from Tim's video on Toyota time. Questions come to mind such as where exactly do I make the cuts? How do I get the seized sleeves and bushings out of the frame of the car once the control arm is removed?

Then there is option three. In reading through the forums the last few days I've seen people discussing new upper control arms which have a certain degree of alignment adjustability built into them. Is it crazy to consider replacing the upper control arm so that I can account for the alignment needs and make other gains in aftermarket off-road technology? Or do I need to correct the lower issue first and dabble with upper upgrades down the road? Appreciate the insight you guys offer in advance.
 

Attachments

  • 3C0BEA4C-37A5-4585-808C-56AC16549AC4-4458-00000A6CABBA8621.jpeg
    3C0BEA4C-37A5-4585-808C-56AC16549AC4-4458-00000A6CABBA8621.jpeg
    95.5 KB · Views: 609
Register to hide this ad
Even with new UCA's you'll still need to get the LCA fixed. A seized cam bolt basically means you can't align that side of the car. So even with UCA's you'll still not going to fix the problem or be able to get an alignment.

I replaced my LCA's a couple years. It was a PITA due to having to cut the cams out, but it was doable. My only advice to you is do BOTH sides, and change the bushings on both sides while you're at it. Keep in mind that once you remove the LCA, and put it back in. You're alignment is going to be way messed up. After I finished mine I couldn't get them adjusted enough to feel safe driving down the road, and ended up having it towed to the shop for the alignment.

Getting UCA's is a good option as well, but it doesn't sound like you're going to have alignment issues once the cam is fixed.
 
Even with new UCA's you'll still need to get the LCA fixed. A seized cam bolt basically means you can't align that side of the car. So even with UCA's you'll still not going to fix the problem or be able to get an alignment.

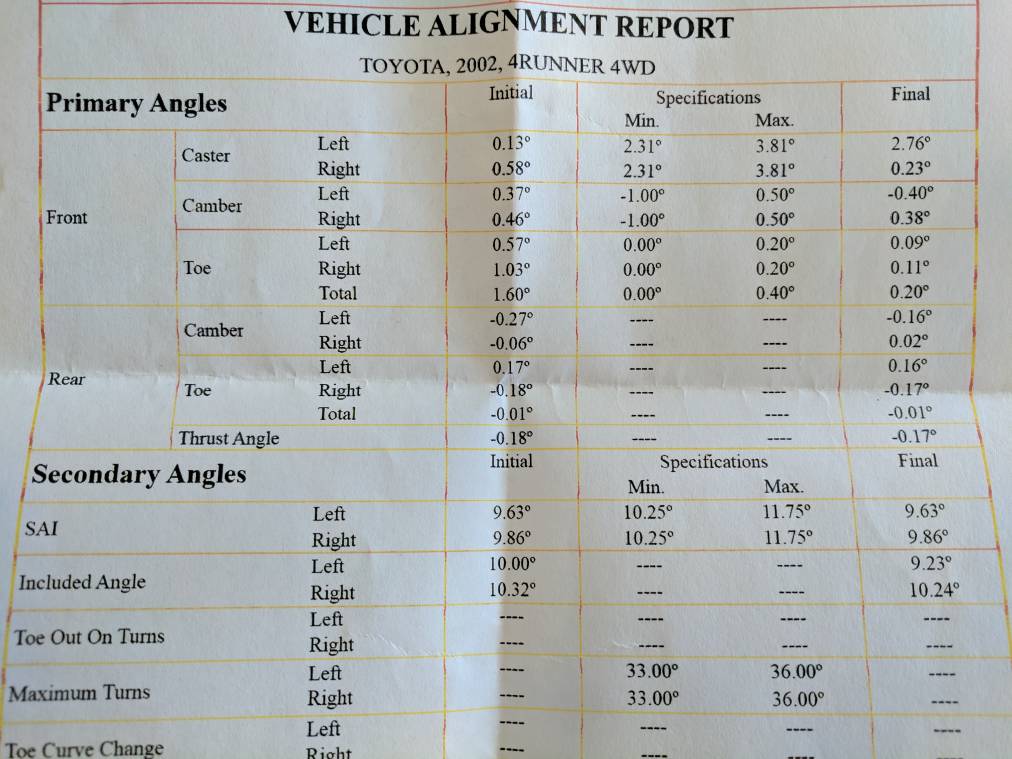
The cam bolts adjust camber right? If new UCAs have camber adjustment, why wouldn't new UCAs work? Maybe its so far out that the UCA can't bring it in spec at full adjustment - but OP never mentioned how far out it is?
 
To cut the cam adjuster sleeves out, you need to cut on both sides of the bushing between the frame bracket and bushing. Get some Diablo Demon Carbide Tipped Blades and a reciprocating saw. The Diablo blades are proven to make this repair much more tolerable and quicker.

Once you cut on both sides of the bushing for any seized adjuster, the LCA will come out of the frame. Then you just follow the same procedure of using a bottle jack and torch to remove the bushings.

Please don't pay a shop to do this. With our video, you can absolutely handle this repair yourself. Good luck!
 
The cam bolts adjust camber right? If new UCAs have camber adjustment, why wouldn't new UCAs work? Maybe its so far out that the UCA can't bring it in spec at full adjustment - but OP never mentioned how far out it is?

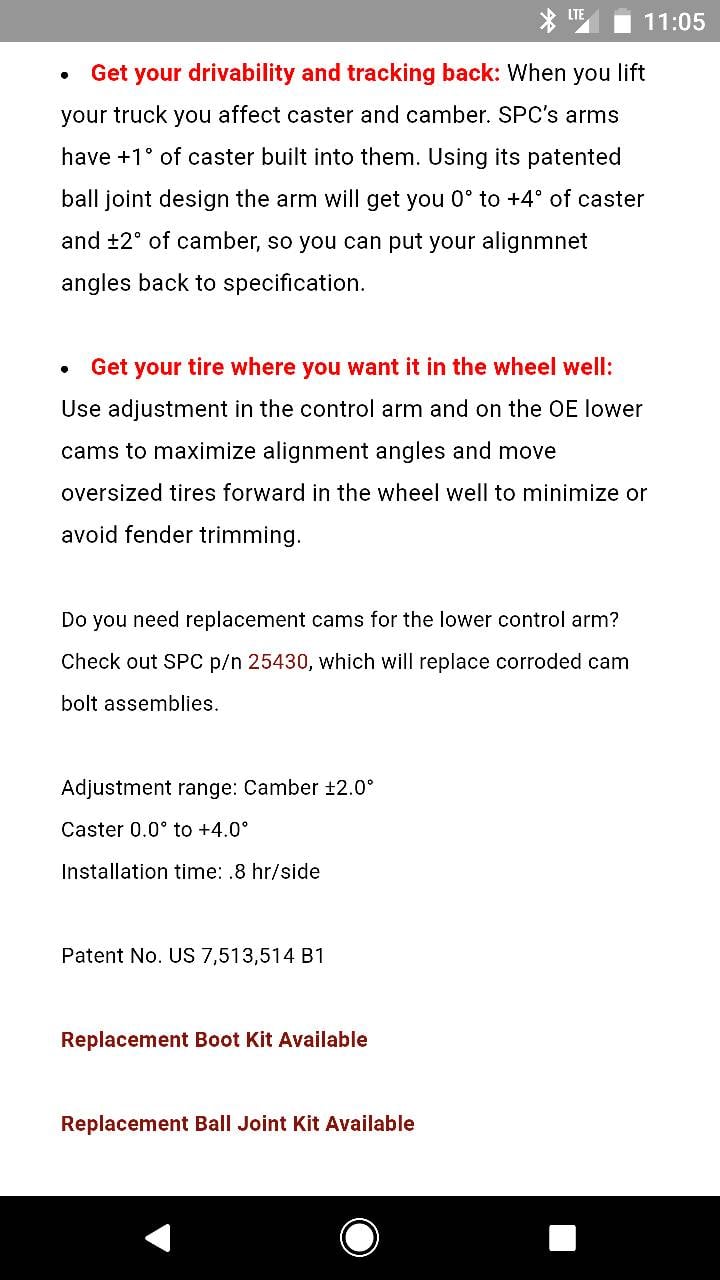
The UCA's like SPC's have adjustments but they are crude, not precise at all. You still need LCA's to fine tune the alignment.
 
The cam bolts adjust camber right? If new UCAs have camber adjustment, why wouldn't new UCAs work? Maybe its so far out that the UCA can't bring it in spec at full adjustment - but OP never mentioned how far out it is?

Correct, those adjust the camber. New UCA's will give somewhere around 5* of additional camber to help allow alignment with a lift. Depending on how much he's off makes a big difference. The new UCA's could put him over the edge if it's only off by 2*. That being said, adding UCA's to gain camber in the this position would only be putting a band aid on the issue.

The feel problem still sits with that fact the cambolts are seized. Chances are if the bolts are the seized the bushings could also use a changing. After having changed all of this on my own 4runner I can say it made a world of a difference, and worth all the time it took.
 
Got a better look under there today so I can see now where you were talking about making the cuts. I've seen the video twice now and can definitely do the work myself. Sourcing the parts has been interesting as everything seems overpriced. My bushings are definitely shot on both sides as well. Here's a photo of the alignment sheet they gave me and the specs on the SPC upper control arm I was looking at
13dd0abbf8dfbf5431b099f97ce3e516.jpg
d04a90dc7624a5c60a263f11d07473e6.jpg


Sent from my Pixel XL using Tapatalk
 
Looks like I'll be doing the bushings on both sides as they look equally as worn. They actually look to have disintegrated in there. This will set me back on purchasing a set of your end links but it's still on my list for sure

Sent from my Pixel XL using Tapatalk
 
Got a better look under there today so I can see now where you were talking about making the cuts. I've seen the video twice now and can definitely do the work myself. Sourcing the parts has been interesting as everything seems overpriced. My bushings are definitely shot on both sides as well. Here's a photo of the alignment sheet they gave me and the specs on the SPC upper control arm I was looking at

Sent from my Pixel XL using Tapatalk

The spc arms can not be fine tuned for camber. You must lift the truck off the front tires, move the entire ball joint bolt and tighten it up. So its very crude and wont be able to fully align without the lower cam bolt adjustment. I'm sure an alignment shop would charge 1-2 hours labor just to adjust the SPC arms.

You can try to remove the LCA's without cutting. If they are siezed you just cut the cam bolts out between the LCA bushing and the mount on the frame. You will see this when doing the work.

You will need a new set of LCA cam bolts and some new bushings. Either Whitelines, energy suspension or OEM. Whitelines need pressed in with a press. ES slip right in but you must reuse the OEM bushing sleeves and this requires buring the old rubber off the sleeves. OEMs need also pressed in and out.
 
Looks like I'll be doing the bushings on both sides as they look equally as worn. They actually look to have disintegrated in there. This will set me back on purchasing a set of your end links but it's still on my list for sure

Sent from my Pixel XL using Tapatalk

Good choice. If you run into any snags, send me a PM and I'll help you out.

Also, read the video description for more tips. I've now done this job twice and learned you can pull the steering rack back far enough to remove the rear cam bolt on the driver side without removing the boot on the steering rack. The key is to remove the bolt that affixes the power steering line bracket onto the inside of the driver side frame. Once you do that, you can get more movement out of the rack. I'm pretty sure we show the removal of that bracket bolt in the LCA video, but if we didn't, check out our steering rack bushing and sway bar bushing video because I know for sure we show it in that video.

I would definitely go with Whiteline bushings. Energy Suspension are not worth the hassle.

Good luck!
 
I just did the energy suspension kit and had no issues with the install. Just used a lot of heat from my torch and the old rubber came right out. I used this guys videos to get the job done. https://youtu.be/jeq8V4p4xNM
Watch all 6 parts. Feels like a completely different vehicle now. It wasnt hard to do but it did take the better part of a weekend to do because i wasnt in a huge rush.
 
Before you do the job mark the locations of the cam adjusters so you can put the new ones back in the same position and have a good enough alignment to drive the truck to the shop to get an alignment done. It's not a terribly difficult job, but time consuming. You will have to unbolt the steering rack to get the rear cam bolts out. I can't remember if it is both sides, but it is at least driver side.

Cover the new bolts and sleeves in anti-seize so they don't seize up again.

Since you're unbolting the steering rack now is a good time to replace the bushings in it with poly if you haven't done so already.

Also if you have a diff drop you will have to remove that to be able to remove the one bolt holding the steering rack in that comes in from the front. The diff is too low with the diff drop to be able to pull the bolt out.

Just some lessons learned from when I did the job. I didn't want to mess with pressing bushings in and out so I bought all new arms from Toyota.
 
I just did the energy suspension kit and had no issues with the install. Just used a lot of heat from my torch and the old rubber came right out. I used this guys videos to get the job done. https://youtu.be/jeq8V4p4xNM
Watch all 6 parts. Feels like a completely different vehicle now. It wasnt hard to do but it did take the better part of a weekend to do because i wasnt in a huge rush.

You just helped prove my point that the energy suspension aren't worth the trouble. A SIX Part Video. I'll repeat that, SIX PART VIDEO! That's enough to scare me away. I actually watched quite a bit of his series and then found out Whiteline made a better more plug and play option when [MENTION=102606]infamousRNR[/MENTION] and I helped [MENTION=142071]sunsetrunner[/MENTION] with his LCA bushings. Yes, the Whiteline are more expensive but we'll worth the extra expense in my opinion.
 
Last edited:
You just helped prove my point that the energy suspension aren't worth the trouble. A SIX Part Video. I'll repeat that, SIX PART VIDEO! That's enough to scare me away. I actually watched quite a bit of his series and then found out Whiteline made a better more plug and play option when [MENTION=102606]infamousRNR[/MENTION] and I helped [MENTION=142071]sunsetrunner[/MENTION] with his LCA bushings. Yes, the Whiteline are more expensive but we'll worth the extra expense in my opinion.

ES kit can be installed with no press. They are actually easy to install.
 
You just helped prove my point that the energy suspension aren't worth the trouble. A SIX Part Video. I'll repeat that, SIX PART VIDEO! That's enough to scare me away. I actually watched quite a bit of his series and then found out Whiteline made a better more plug and play option when [MENTION=102606]infamousRNR[/MENTION] and I helped [MENTION=142071]sunsetrunner[/MENTION] with his LCA bushings. Yes, the Whiteline are more expensive but we'll worth the extra expense in my opinion.
Wait, what's the difference in watching the 6 part 50ish minute video series he posted, or a 50ish minute video you posted?
I watched both and a few others to get a good idea of what the job involved before diving in.
 
Wait, what's the difference in watching the 6 part 50ish minute video series he posted, or a 50ish minute video you posted?
I watched both and a few others to get a good idea of what the job involved before diving in.

The difference isn't in the length of the video. Yeah, I know, our videos are long but that's because they are comprehensive and cover every aspect of the repair. It's the steps the guy took to do the job. Like I said, I watched most of the series and the guy had to do a ton of different steps to remove the bushings and get the Energy Suspension ones installed. Our removal and installation of the Whitelline bushings involved clamping the LCA in a vice, getting the bottle jack in place, heating up the LCA and forcing it out with the bottle jack. The installation is a simple press procedure using a bench vice.

Anyway, I guess to each his own and the OP can choose which one he thinks is the better way to go.
 
Good choice. If you run into any snags, send me a PM and I'll help you out.

Also, read the video description for more tips. I've now done this job twice and learned you can pull the steering rack back far enough to remove the rear cam bolt on the driver side without removing the boot on the steering rack. The key is to remove the bolt that affixes the power steering line bracket onto the inside of the driver side frame. Once you do that, you can get more movement out of the rack. I'm pretty sure we show the removal of that bracket bolt in the LCA video, but if we didn't, check out our steering rack bushing and sway bar bushing video because I know for sure we show it in that video.

I would definitely go with Whiteline bushings. Energy Suspension are not worth the hassle.

Good luck!

Success. Also lucked out a bit. Was able to pick up the lower control arm from a pull and pay this morning for $37. The lucky part came in as I was unable to find Whiteline bushings day of but a friend of mine had already purchased the exact set needed as he plans to do his in the near future. He gave me his and I just ordered a replacement set for him. Cut the old control arm out using the Diablo blades. Can't imagine using any other blade given the severity of the cuts that had to be made. These blades held up very well considering. Pretty sure I have every loaner tool the local O'Reilly Auto Parts store has in regard to pullers and presses. [MENTION=120071]mtbtim[/MENTION] the steering rack video which I originally watched a month ago came in very handy along with the lower control arm bushing replacement video. Me and my brother knocked it out step by step. The bottle jack trick went off without a hitch. Honestly find all of the videos invaluable. Doing the work myself also gives me the perfect opportunity to let the wife know about the new tools I need for my collection. She was even a team player and went out and picked up the specific sockets I was lacking to hit some tight spaces for the steering rack.

Both sides are put back together however the passenger side with the new lower control arm and cam adjusters is definitely turned to the right a bit. Plan on lifting the truck back up tomorrow and adjusting this as close as possible before driving to get an alignment two miles away tomorrow morning. Hopefully those two miles don't chew up my brand new rubber.

One point that I was confused on in the video. When you put the lower ball joint back together. Please forgive me if this sounds stupid but we used the puller to take it apart and it was a pretty pronounced process as it came loose. What exactly is needed to put it back together? We just put the castle that back on and tightened to specified torque values.. Going to watch the video on this as well but surprised that you wouldn't need to press it back in after needing a puller to get it apart in the first place.

Additionally once I recover from this project I think I'm going to take it back apart and replace the lower ball joints and possibly the tie rods just from a preventive maintenance point of view.

Thanks to all of you guys and your experience today. Much happier having the LCA rebuilt and greased up cam adjusters rather than seized up with newer upper control components.
 
The spc arms can not be fine tuned for camber. You must lift the truck off the front tires, move the entire ball joint bolt and tighten it up. So its very crude and wont be able to fully align without the lower cam bolt adjustment. I'm sure an alignment shop would charge 1-2 hours labor just to adjust the SPC arms.

You can try to remove the LCA's without cutting. If they are siezed you just cut the cam bolts out between the LCA bushing and the mount on the frame. You will see this when doing the work.

You will need a new set of LCA cam bolts and some new bushings. Either Whitelines, energy suspension or OEM. Whitelines need pressed in with a press. ES slip right in but you must reuse the OEM bushing sleeves and this requires buring the old rubber off the sleeves. OEMs need also pressed in and out.

Good call. I'm not really the type to put a Band-Aid on the situation and feel much better having corrected the issue. With that said I'll feel even better tomorrow after the alignment is complete. Then I can move onto the next project. Thanks for your help
 
Before you do the job mark the locations of the cam adjusters so you can put the new ones back in the same position and have a good enough alignment to drive the truck to the shop to get an alignment done. It's not a terribly difficult job, but time consuming. You will have to unbolt the steering rack to get the rear cam bolts out. I can't remember if it is both sides, but it is at least driver side.

Cover the new bolts and sleeves in anti-seize so they don't seize up again.

Since you're unbolting the steering rack now is a good time to replace the bushings in it with poly if you haven't done so already.

Also if you have a diff drop you will have to remove that to be able to remove the one bolt holding the steering rack in that comes in from the front. The diff is too low with the diff drop to be able to pull the bolt out.

Just some lessons learned from when I did the job. I didn't want to mess with pressing bushings in and out so I bought all new arms from Toyota.

Definitely had to remove the bolts from the steering rack to gain enough room to get the cam adjuster and bolt out. The slug just enough clearance to pull it off. I put anti-seize on the threads and coded the bolts and the sleeves with some Marine Greece. I've only had the truck for months since my 2003 was totaled and the steering rack and bushings all appear to be brand new from the PO. I did price new parts through Toyota but it was way out of my current price range as I just purchased the lift, wheels, and tires last week. Pressing in the bushings With my vice was actually quite simple. I definitely appreciate your time and advice. Thank you
 
One point that I was confused on in the video. When you put the lower ball joint back together. Please forgive me if this sounds stupid but we used the puller to take it apart and it was a pretty pronounced process as it came loose. What exactly is needed to put it back together? We just put the castle that back on and tightened to specified torque values.. Going to watch the video on this as well but surprised that you wouldn't need to press it back in after needing a puller to get it apart in the first place.

It's not a stupid question. The puller is just to break the connection of the balljoint from the lower control arm because over time it gets really wedged together. The parts aren't actually pressed together. The LBJ to LCA and the outer tie rod to LBJ knuckle is a tapered fit. The tapered fit coupled with the castle nut torqued to the correct value holds the connection firm. So, by assembling the connections and torquing the castle nuts to the correct value, you did the job right.
 

Members online

No members online now.

Forum statistics

Threads
278,316
Messages
3,554,111
Members
248,016
Latest member
Advally Service

Trending content

Back
Top